
This is not my graphic, but I found it on the web, and it taught me a lot of things I didn’t know.
Whether you are a stage manager, computer geek, gamer, or all three, you will find ample uses for this knowledge. Enjoy.

This is not my graphic, but I found it on the web, and it taught me a lot of things I didn’t know.
Whether you are a stage manager, computer geek, gamer, or all three, you will find ample uses for this knowledge. Enjoy.
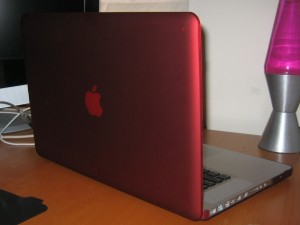 I’ve admired these shells for years. I like color, I like customizing things, and I like protecting my valuable devices — as long as the protection is attractive, stays out of my way, and doesn’t add too much bulk. Our wardrobe supervisor on tour this year had almost the same shell, only in a different color. I had many opportunities to study it, as it was hard to find someplace to sit in the front lounge while dodging the six Macbooks and one (gasp) PC that lived on the bus. I would question him about it regularly over the course of the tour. It really didn’t get scratched under the case? How often do you look? How often do you take it off? How long have you had it? You’re really sure it’s not causing abrasions on the aluminum? Do you find you use it differently because you have the case on? Is it too heavy? After six months of this I was reasonably sure it wouldn’t hurt my laptop.
A life lesson, learned the hard way: There’s a button on the case covering the battery button (which illuminates a series of LEDs showing the battery charge). Part of the case is sort of cut out around the button so it’s loose and can be pushed in. As it happens, this color of case is so dark that you really can’t see the LEDs light up. For the longest time I struggled putting the case on and off, checking the alignment, testing the battery button naked, and trying to figure out why it didn’t work with the case on. Eventually I manipulated the plastic button so much that it broke off. I didn’t really care, by that point I was so disappointed that it didn’t work that I was OK with poking something in the resulting hole to get to the real button (I can just barely press it with my pinky, but I have tiny hands). Only then did I figure out that the button was probably working the whole time, and I just couldn’t see the lights. Disappointing on several levels.
I might as well mention that the other LED on the case, the sleep light, shines through just fine, and actually looks pretty cool in red. As anyone who has ever slept in the same room as a Mac knows, the sleep lights on all of them can pretty much be seen from space, and you’ve probably devised some method of covering them up so they don’t scorch through your eyelids while you sleep. So dulling the light with the case is not a bad side effect.
PROS:
CONS:
The weight is significant. You wouldn’t think a thin layer of plastic would weigh so much, but it is the size of the entire computer itself. I had done my research about that beforehand, and I know what a pound-and-a-half is (perhaps you’re familiar with how anal I am about weight when packing for the road), and I know what a difference it is in laptop terms. I think the difference isn’t so great to outweigh (literally) the benefits of protecting the device. This is, after all, the most important thing I own, as well as the most expensive. It needs to last in excellent condition for three, or ideally four years. Making it heavier is a small price to pay for the ability to use it without constantly worrying about damaging it. Of course the case will not protect it from serious damage, but for everyday hazards (like the contents of the kitchen counter falling on the lid on a moving bus), it places an extra layer of protection between the computer and light bumps and bruises. In a situation where I know the MBP won’t be traveling much for a while, I might keep the case off, but definitely on the road or in a rehearsal situation utilizing many rooms and locations, it will be a huge help.
After much debate, mostly about the weight and price, I decided to go ahead and buy this because I bought a new computer bag (review to come eventually, I’m sure), and it has a zipper for a storage pouch that lives in basically the same spot as the top of the laptop. In other words the laptop slot doesn’t come all the way up over the top of the laptop, so the zipper would probably be rubbing against the bare laptop most of the time. Rather than hermetically sealing my neoprene sleeve every time the laptop goes in the bag, I decided that was the final straw to justify the Speck shell.
I worry a little about the newfangled Magsafe connector style, shown here:
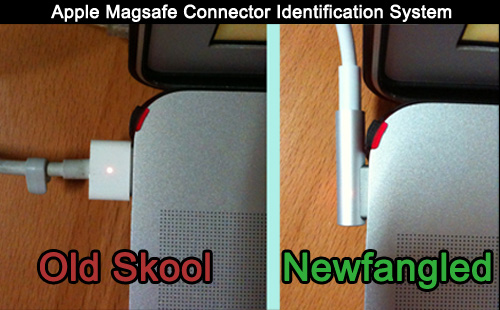
The natural way to position it is with the cord headed “upstage,” away from the user, and out of the way of the other ports. The only problem is that the little tab holding that corner of the shell on is right there with the connector laying over it. While it does make an electrical connection and seems to charge fine, it doesn’t look like it’s laying perfectly flat, and I just worry about my AC connection not being a perfect seal. If you don’t mind covering the Ethernet and FW800 ports, you can just turn the Magsafe connector the other way with the cord coming towards you, but that’s a pretty big compromise for something that should just work. It’s a pretty tricky part to try to mod yourself, as the piece that’s in the way is the part that clips that corner in, and if it were to break or be weakened, you’d probably have problems with the shell falling off. It might be easier to shave off a millimeter of the barrel of the Magsafe connector, but that seems like the wrong set of priorities, to damage an $80 electrical device that’s essential for the operation of the computer, for the sake of a $40 piece of plastic. In the future it would be nice if Speck could move the clippy part away from the corner and more toward the hinge, so that section right next to the AC port wouldn’t be so thick. Although it’s possible it would interfere with the operation of the hinge if moved any closer, I don’t know.
If you have the old-style charger, it’s no problem at all. I have an old-skool one at home, and use the new one for travel. I also have a second old-skool one for my old MBP, and should it become a real problem, I could swap them. So, buyer beware, but if you have the old one, you have nothing to worry about.
UPDATE: Before heading back out of town, I had to decide which AC adaptor to bring, and decided not to compromise. I brought the new adapter and filed down the case, after reading of a couple success stories. I used the edge of my Leatherman’s file, and a nail file for smoothing the edges. I decided to quit once it fit, rather than risk breaking or weakening the case by trying to make it look perfectly machined. So it’s not beautiful, but the plastic is fairly soft, and if you wanted to make it look prettier, it should be very possible.
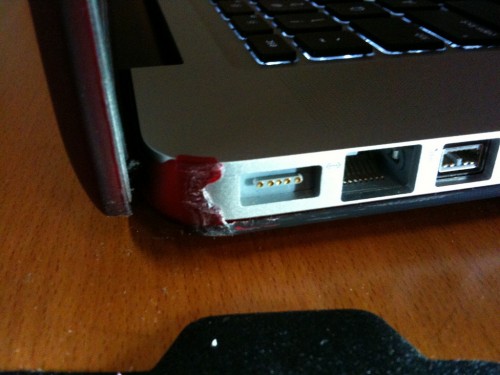
Detail shot of the front-right corner:
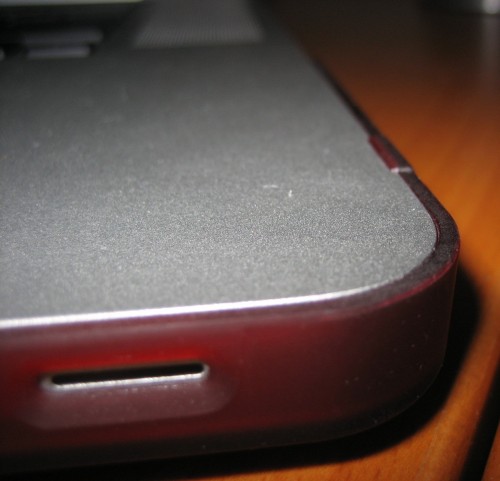
Outer shell. Sorry this is so blurry. I spent time on three separate days (with a real camera, even!) trying to get a shot that wasn’t blurry but didn’t wash out the true appearance with the flash.

Once again, the shell is made by Speck, who are purveyors of, well, stuff like this. They also make some iPhone and coming-soon iPad cases. In addition to the satin shells, they make a line of more fully-transparent shells that also come in other colors (including clear), which is the SeeThru line, as opposed to the SeeThru Satin. They make them to fit all shapes and sizes of Macbooks, so look carefully to make sure you’ve got the right one for your model. They are carried in Apple Stores, but I always find the selection to be rather limited as far as which sizes and colors are in stock. I had to order mine online, which I got from Small Dog Electronics, my favorite 3rd-party Apple retailer.
The shells retail from Speck for $49.95, but Small Dog sells them for $39.99, so shop around. You can also get them on Amazon, where the prices are generally a little higher, but you might find a good deal on a specific color.