HOME

January 7, 2014

We Need to Talk About RGB LEDs

I call this: tech — Posted by KP @ 2:55 pm

Recently I made an impulse buy: I found a great deal on a good length of RGB LED ropelight with associated color-changing controls. Essentially what this means is that it’s a length of ropelight that can make pretty much any color — within reason — it would depend on how many levels of control it has over the red, green and blue, whether it’s thousands of colors or millions. I’m guessing thousands. Let’s just say it’s a whole lot more options than going to Home Depot and buying a roll of, say, red ropelight. Which I did at one point.

And if you know how theatrical LED lighting works, well it’s basically like that. It’s not as pure of a color as a light going through a color filter (like a gel, or regular ropelight), because sometimes you can see the different shades that make up the overall color, but it’s still pretty cool. And I don’t have to call a show in my living room, thank God, because I have something of a love/hate relationship with LEDs on stage. Mostly due to watching them attempt to dim and brighten.

In my travels around the web, I found this deal on eBay, which is only a few dollars more than buying a single color of ropelight at Home Depot. (When the link stops working, the seller was dazzlewerllc.)
$_3

So I tore out the red ropelight that ran along the back edge of my desk and replaced it with the RGB strip. And I’m addicted. The controller I have comes with a bunch of preset colors, and six programmable buttons for whatever color you can invent. Here’s what I’ve come up with in a few days:

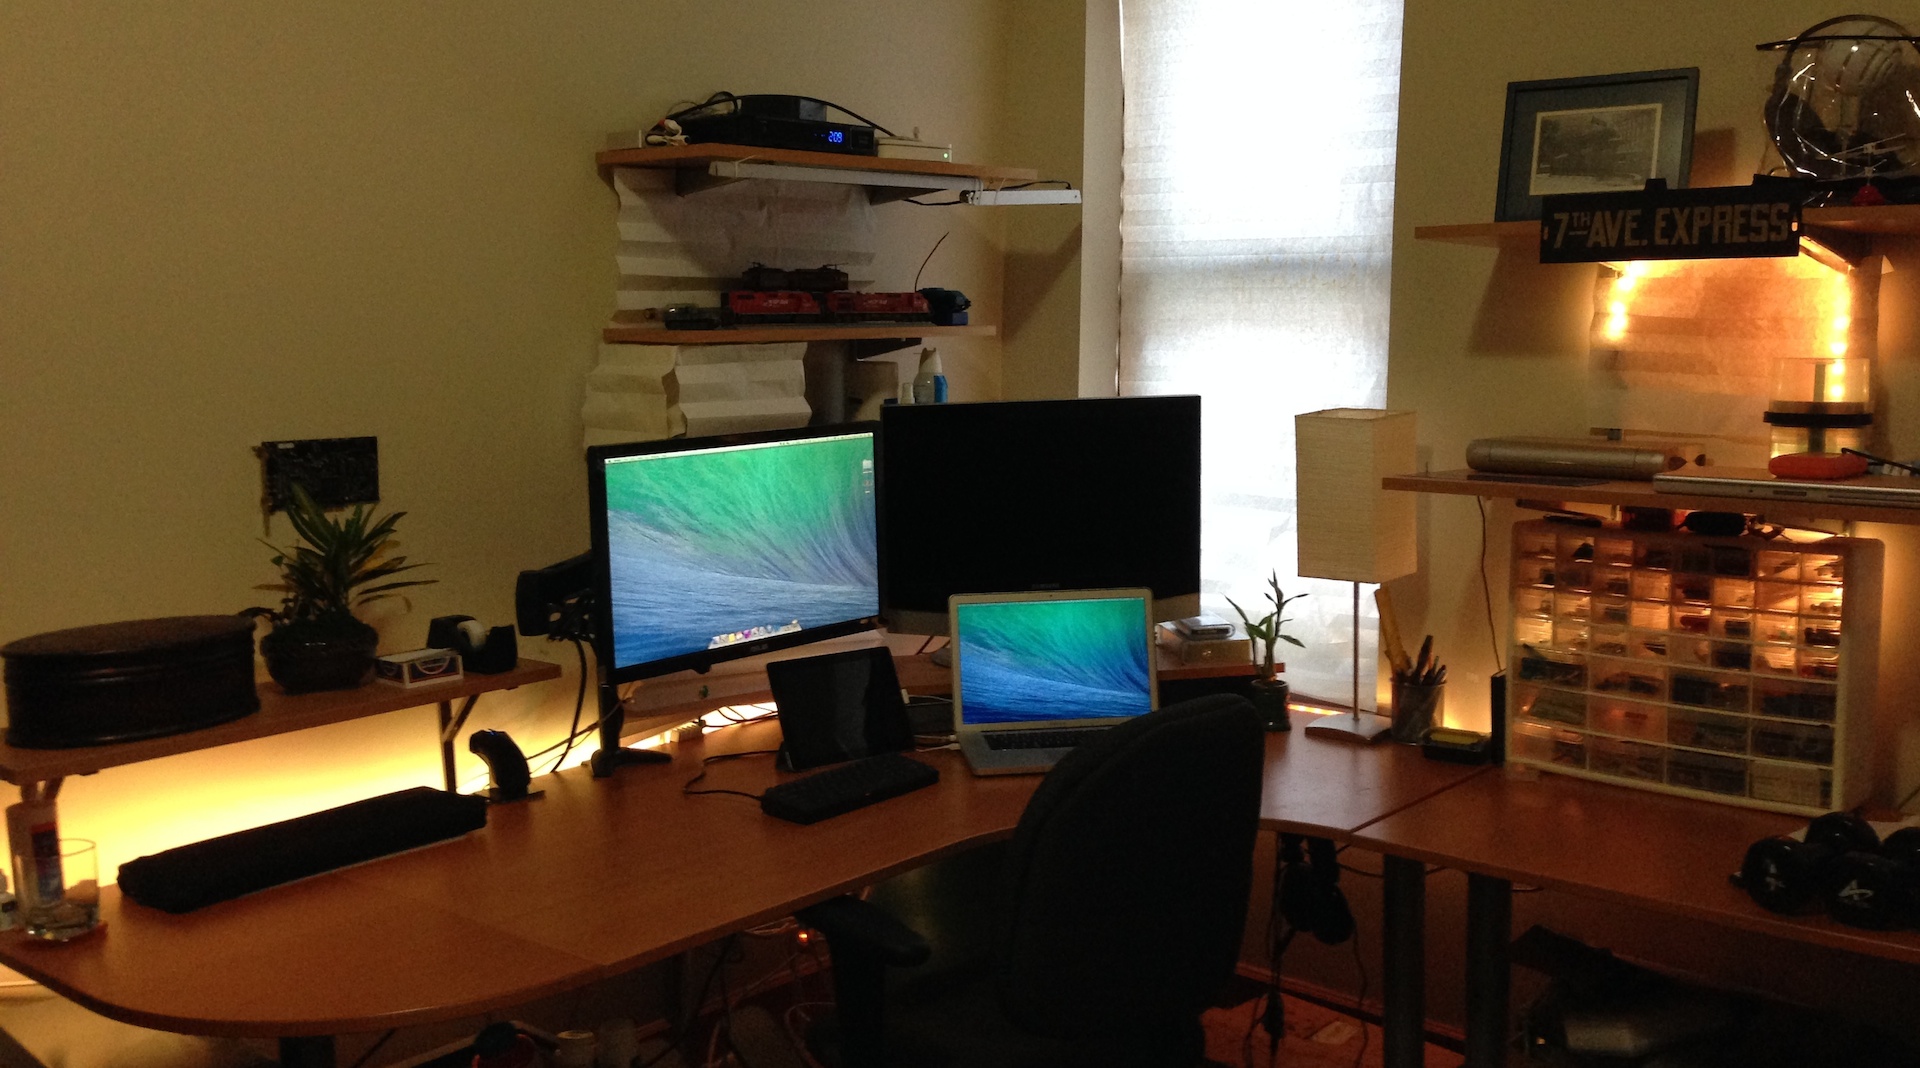
I really like this soothing yellow in the morning.
IMG_4346

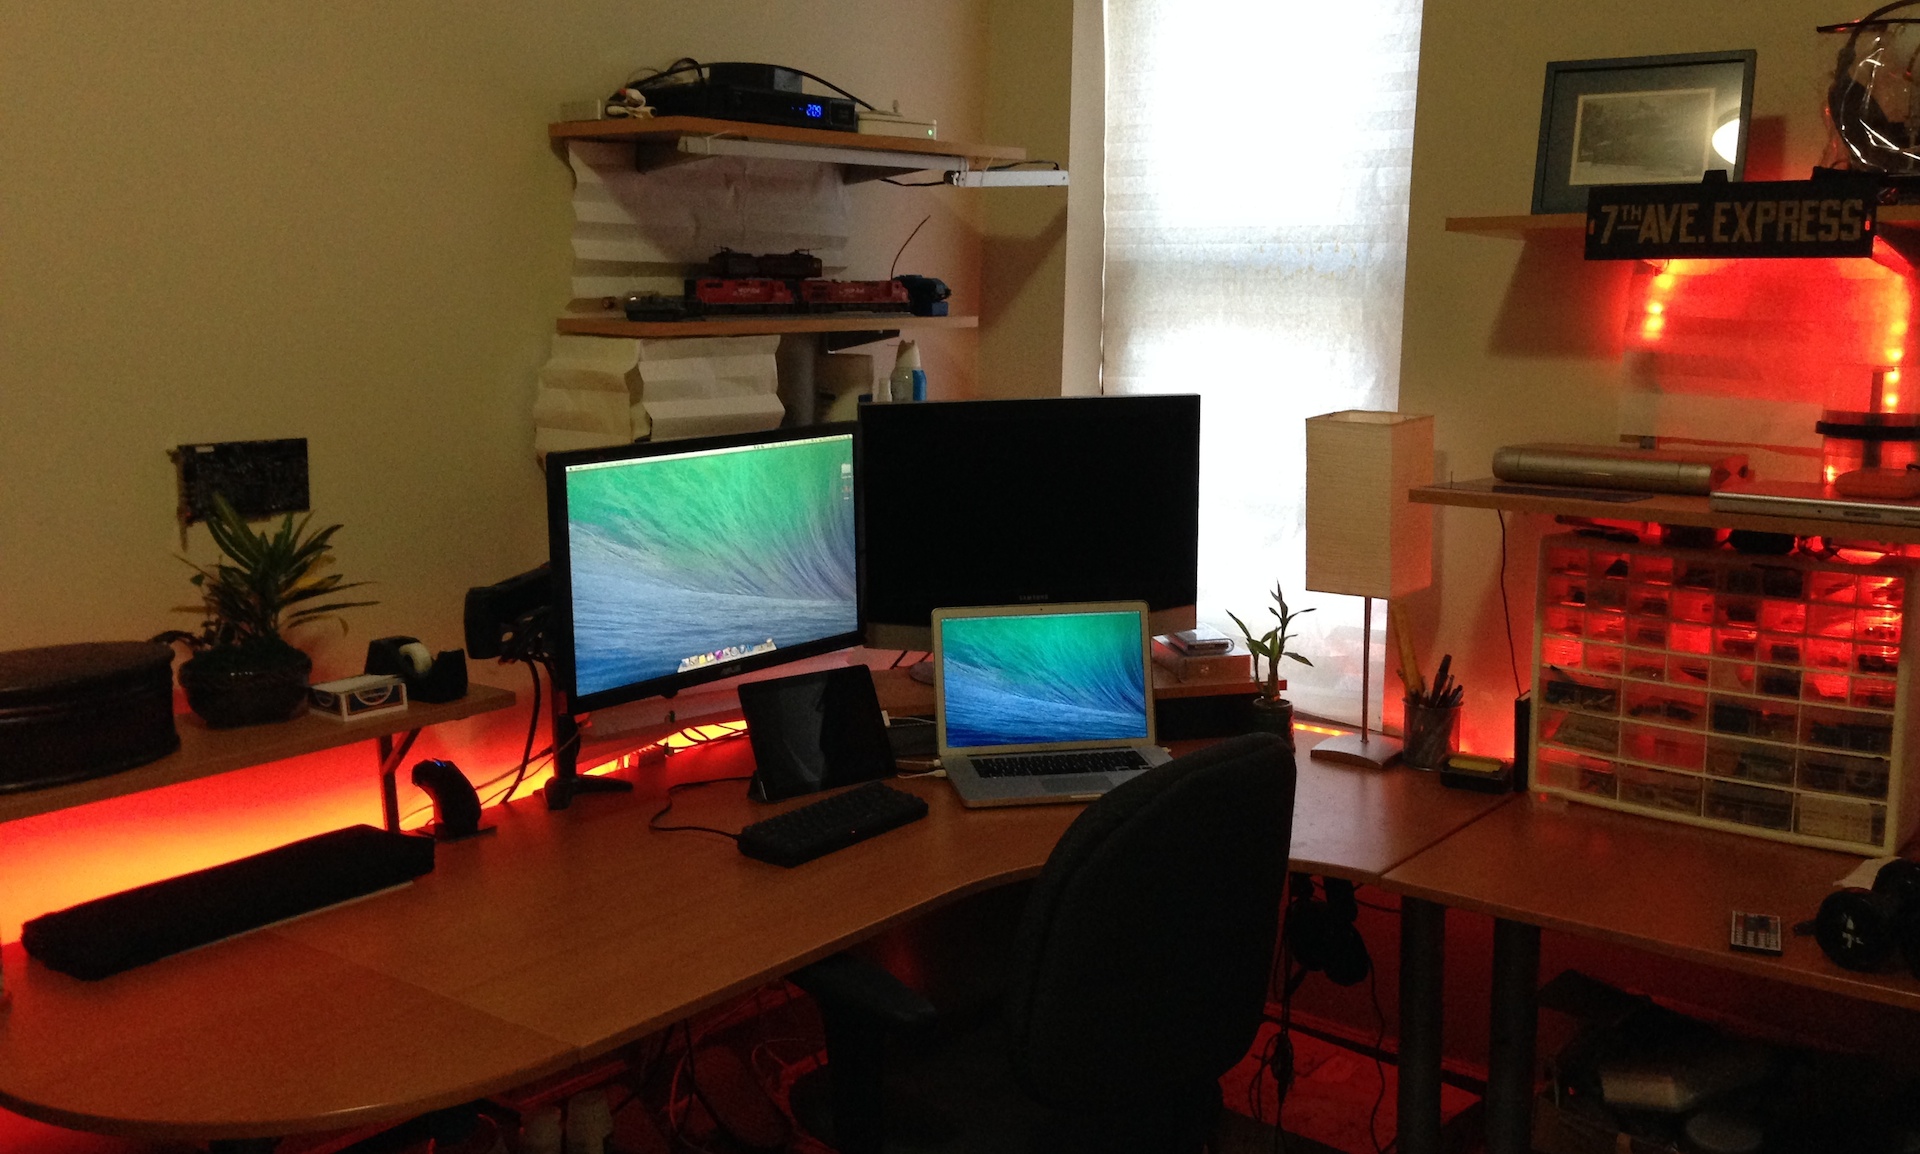
I made this deep orange to match the backlighting on my keyboard.
IMG_4348

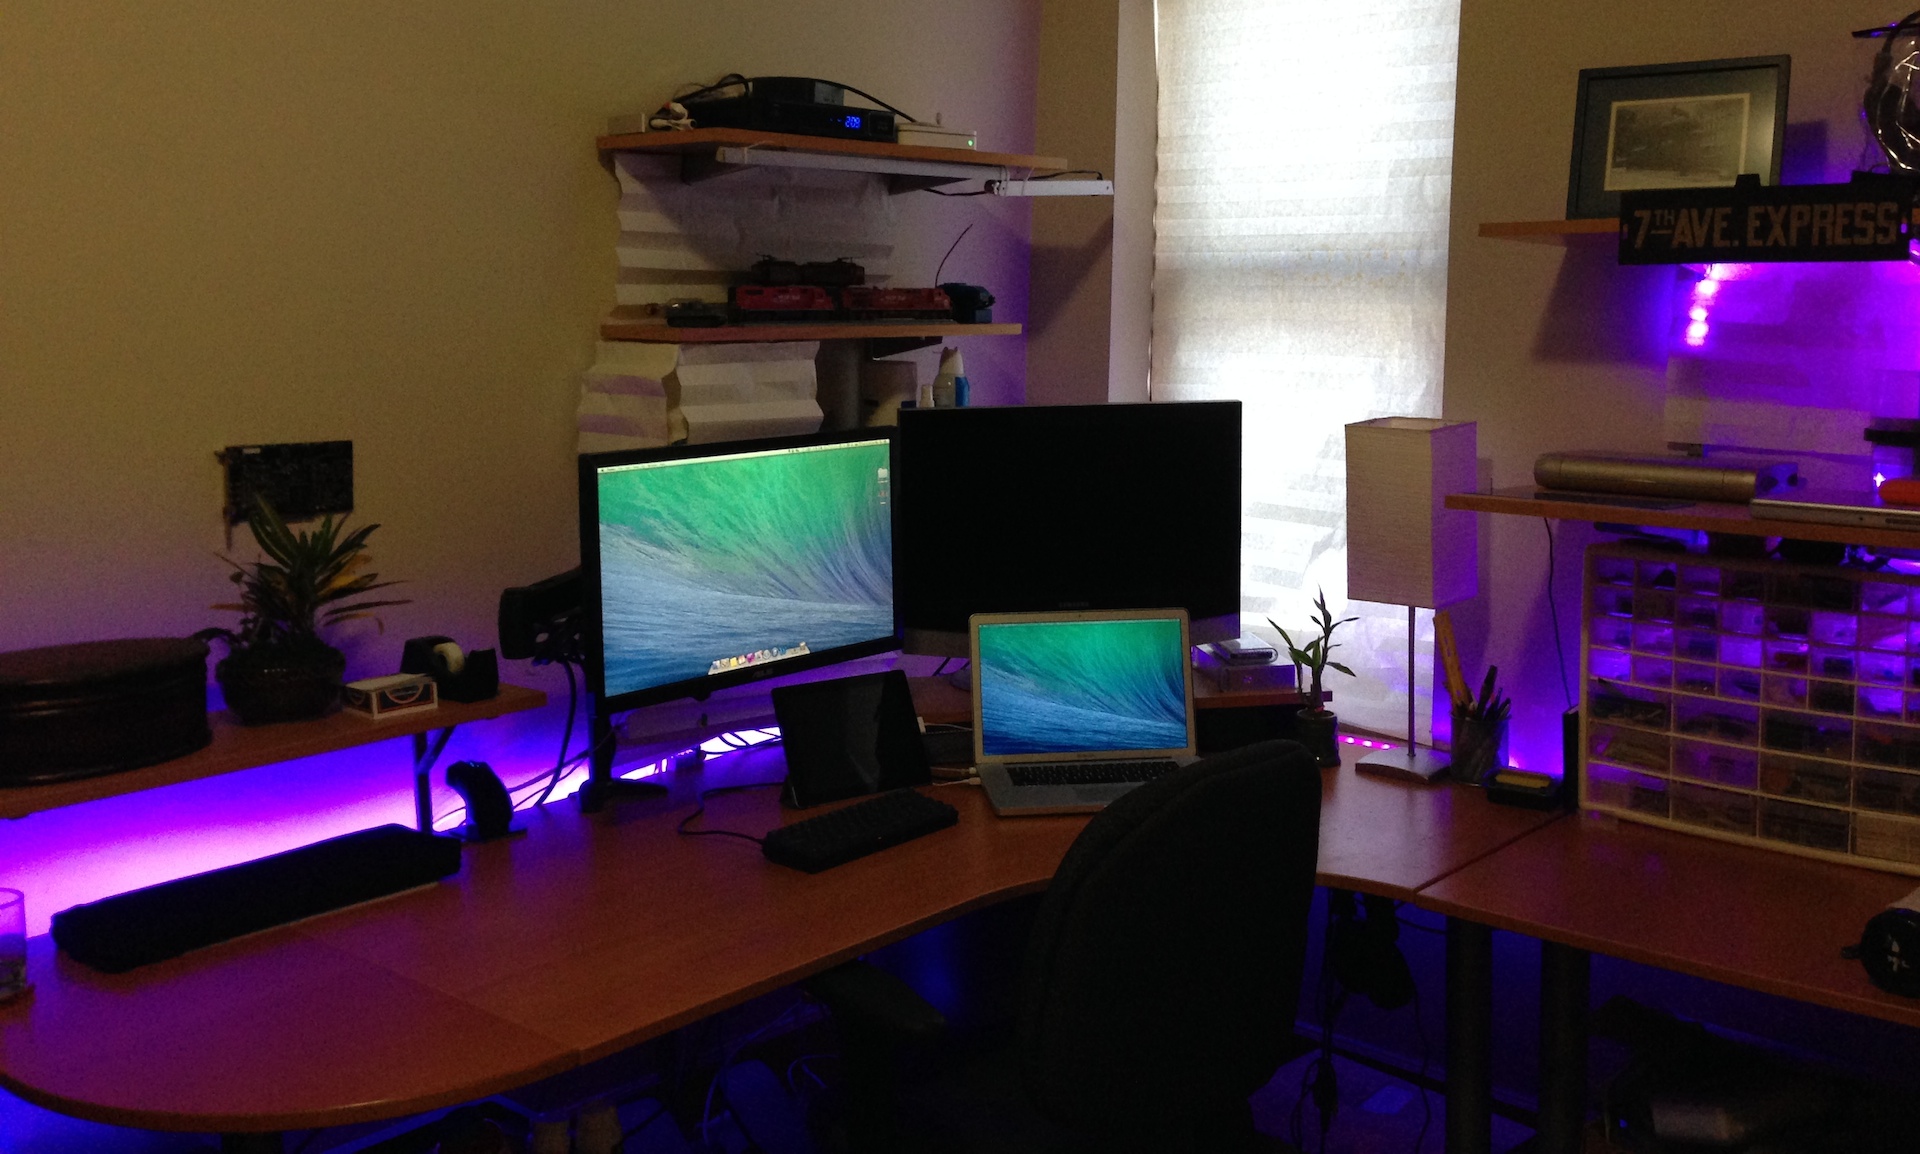
This purple is very calming, especially at night.
IMG_4349

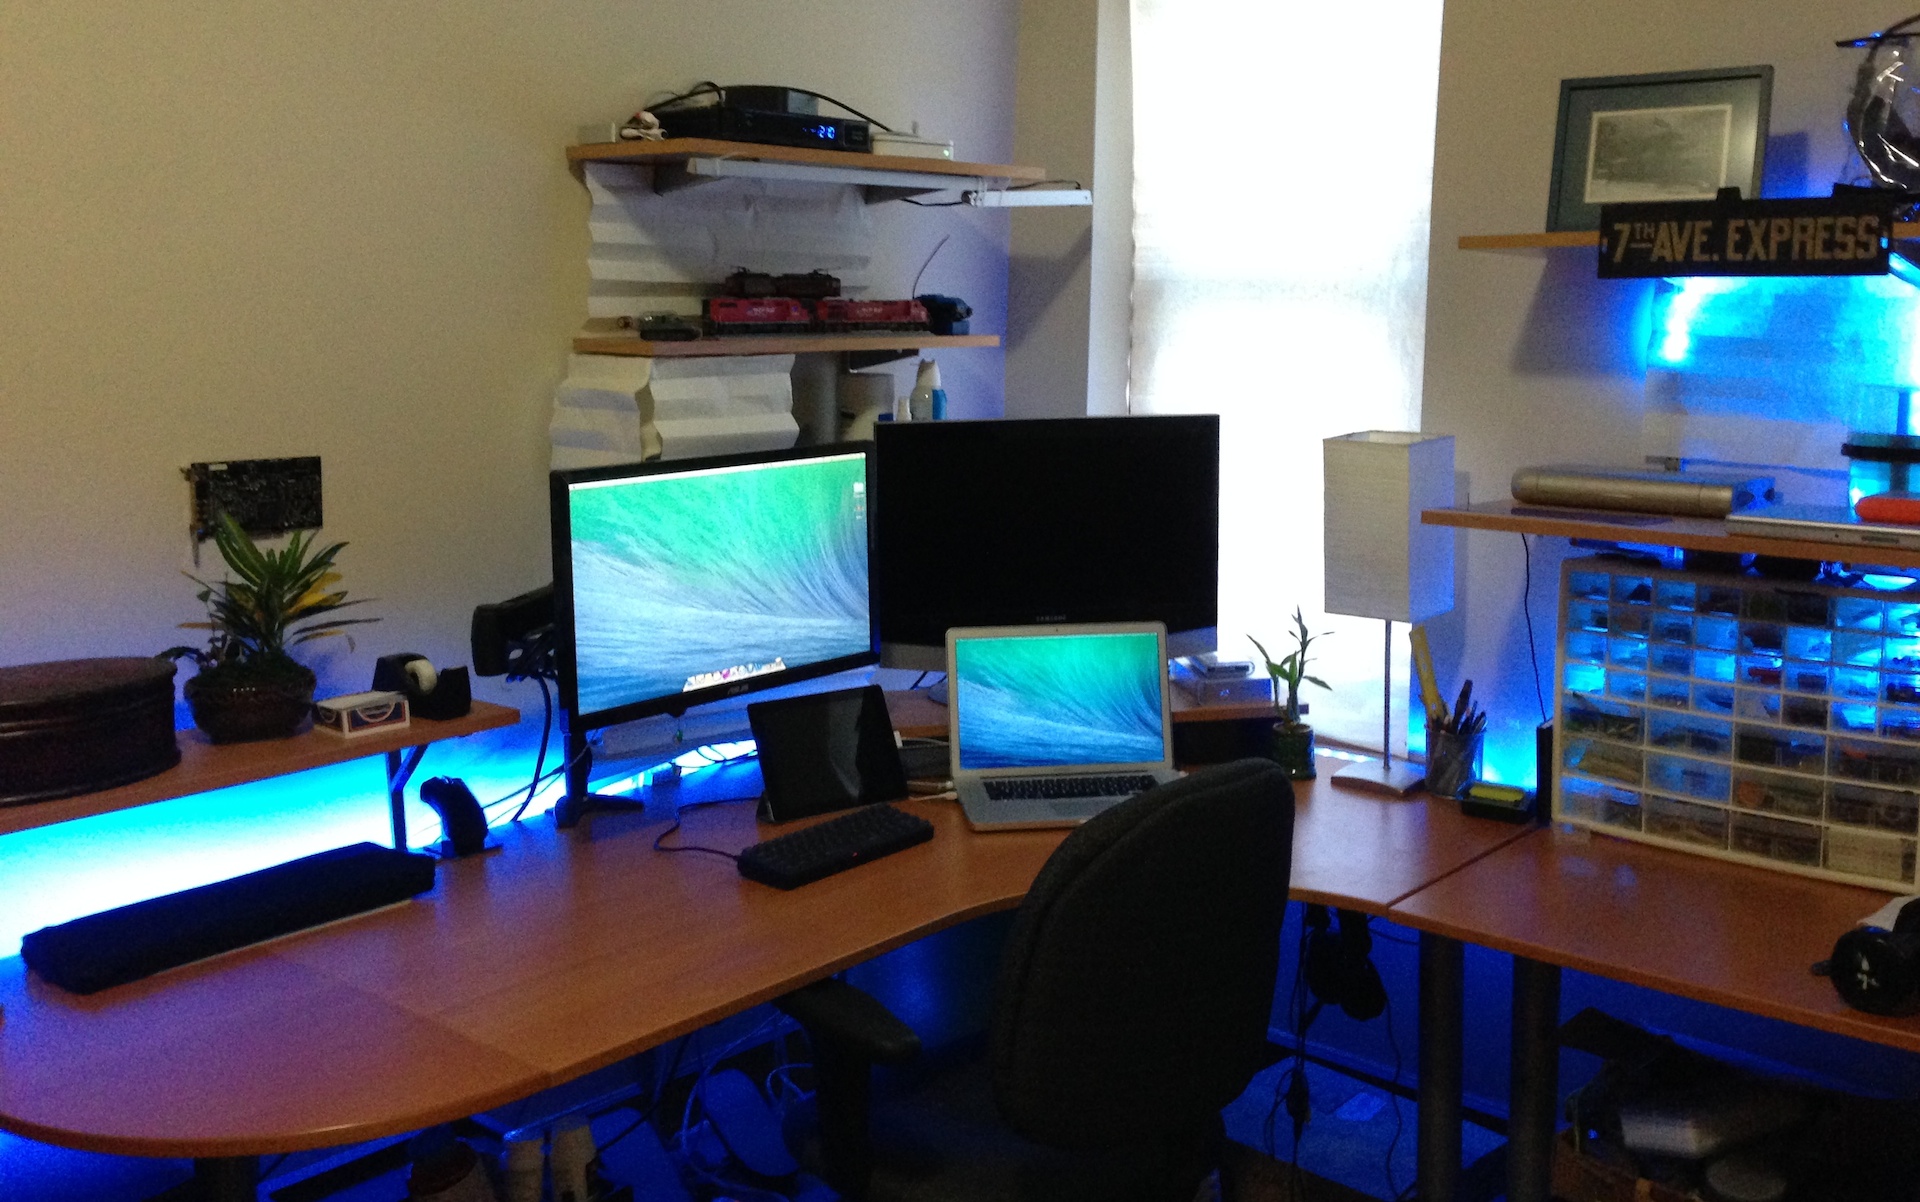
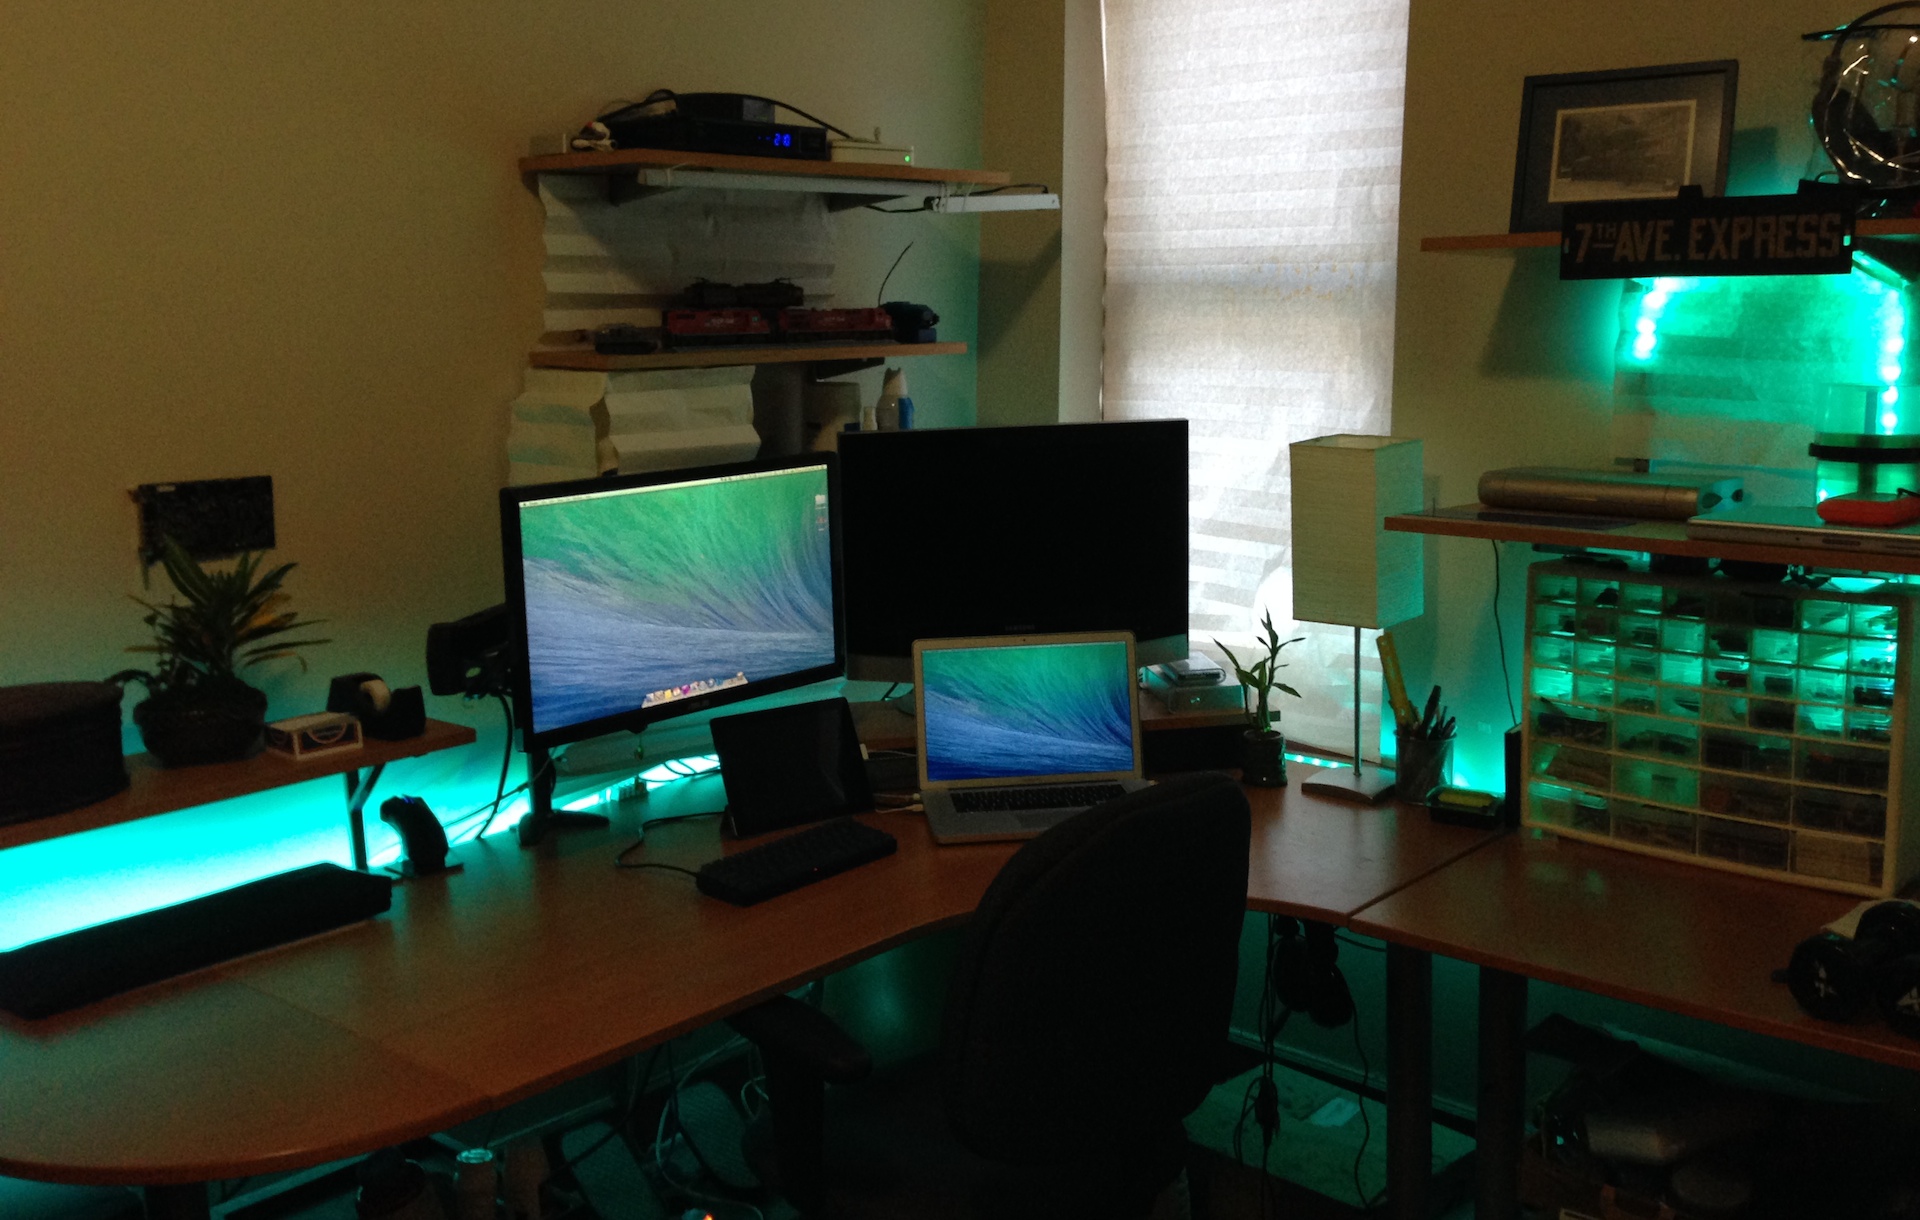
This blue matches the wallpaper on my computer (right now the default Mavericks wallpaper), which is apparently a popular thing to do, cause I guess it’s easy on the eyes when the color matches what you’re looking at on the screen. Some people even hook their LEDs up to their computer and have software that automatically adjusts the LED color to match the screen.
IMG_4350

And this is just my favorite lighting color in general:
IMG_4351

These were all taken during the daytime, obviously, but given that my apartment is always rather dark, I actually appreciate the accent lighting more during the day. It makes me feel like I have windows that let in light coming from somewhere other than the concrete wall across the street.

It’d also be pretty cool for lighting a road box without needing to do any fancy electrical work. You could have bright white light when you’re working, and then some dim blue (or red, or whatever) light during the show. Make it the color of your show logo, or the color of the set.

The possibilities for fun and practical uses are kind of endless, and it’s gotten much more affordable than I realized.


January 31, 2012

Battleship in a Bottle

I call this: random — Posted by KP @ 3:45 am

This has nothing to do with anything, but I just have to share what I spent my evening doing:

I had been looking for some kind of hands-on project for a while, even considered the idea of building something geeky in a bottle, and had given up. Then today, while looking at all the stuff on my shelves and categorizing the things I don’t need, my eyes rested on the less organized part of my shrine to the ’80s (yes, I have one, and yes, it includes a Voltron), where I realized I owned a Battleship set. I didn’t even remember buying it (it’s not the one from my childhood — thanks, mom!). Suddenly what needed to go in the bottle became clear.

And thus, I put on seven episodes of West Wing, and this came out the other end.

Really, I am doing a reading in 2 weeks, and I have two jobs in April. In the meantime, I am literally whittling.


July 8, 2011

Shuttle Memorabilia

I call this: random — Posted by KP @ 7:22 am

I was poking around my parents’ house recently when I stumbled upon my favorite hat of my childhood:

I think I probably got this at the Air and Space Museum when I was about nine or ten. Sadly after 20 years the hat is so deteriorated that it’s not wearable, so I won’t be able to have it on while watching the final shuttle launch.

I will be wearing the pin, however (it’s Discovery, not Atlantis, but whatevs). Here’s a closeup of the pin:

I was a total space geek when I was a kid, so to rediscover these prized possessions just before the end of the shuttle program was a nice surprise.

Update

SPAAAAAAAAAAAAAACE, bitches!


May 26, 2010

Caffeine

I call this: tech,theatre — Posted by KP @ 7:36 pm


This is not my graphic, but I found it on the web, and it taught me a lot of things I didn’t know.

Whether you are a stage manager, computer geek, gamer, or all three, you will find ample uses for this knowledge. Enjoy.


May 17, 2010

A Published Tip on Lifehacker (and CrunchGear)

I call this: computers,tech — Posted by KP @ 3:03 pm

Today is kind of a big day in my geek life:

I’m a big reader of Lifehacker, and today I have had my first tip published on the main page. It’s one I haven’t shared with you guys either, so I’m definitely blogging about it.

It relates to storing your headphones underneath your desk to keep them out of the way.

I’m hoping someday I’ll make it into a featuredworkspace profile.

UPDATE: My friend (and frequent commenter) Tom found that the tip has also been picked up by CrunchGear today, which is another site I read regularly.

Reaction to the articles has been good, although many people have pointed out that due to cats, babies, long legs, and other things I will never have to account for, it’s not the best solution for everybody. It also would appear that this style of top-mounted hook is actually very hard to find. I hope anybody who wishes to try this tip has good luck in finding one, and if you do, please post where you got it.

UPDATE: If you’re having trouble finding hooks like these, reader Jon has spotted them at Amazon. Thanks, Jon!


May 2, 2010

Nerd, Geek, Dork, Dweeb?

I call this: random,tech — Posted by KP @ 1:09 pm


Somebody posted this online, to settle a debate about the difference between nerd and a geek. I don’t know what the source of it is, but it was clearly created by somebody with a fine understanding of linguistics and nerd/geek/dork/dweeb culture.

I tend to think of myself as a geek — a dork when being self-depricating. But I think this proves I am actually a nerd. I feel like that should require there to be tape on the bridge of my glasses, but maybe I’m just a nerd in a union with a good vision plan.


January 19, 2010

Teaching the Database to Speak

I call this: tech — Posted by KP @ 2:40 am

I have to tell you what I learned tonight. I must caution you, there is some geek-speak below, in as plain terms as possible.

I was watching a screencast from Filemaker, about the fun new things you can do in Filemaker Pro 10. This isn’t really news to me, as I’ve been using v. 10 for months, and the last version I owned before that was v. 7. But this particular screencast began by talking about the ontimer script feature. That’s not something I’ve really worked with much, except that I have a Filemaker clock that I found online, and basically tinkered with just enough to add it to my database, without exactly understanding how all of it works.

This screencast explained it (it’s actually really simple, it just executes a specified script every however-many seconds), and suddenly I figured out how to do something that I knew was theoretically possible, but thought was outside my programming knowledge: to get the performance report to remind me to make calls based on what time it is.

The report already has an “intermission calculator” where I can enter how long I want the intermission to be, and based on the end time of Act I, it displays what time I need to call 5 and places (assuming it takes 3 minutes from calling places to actually being able to start). It does the math for me, but it doesn’t help to remind me in any way, I still have to keep watching the clock.

Well using the ontimer script, which I have running every 10 seconds when the performance report is loaded, it records the current time as a variable, and then goes down the list of possible calls (30 minutes, 15 minutes, 6 minutes, and 2 minutes before the scheduled start time, as well as the “call 5 at” and “call places at” times from the intermission calculator), comparing the current time to those times.

I added a series of fields to each report that corresponds to each call that needs to be made — by default the value is 0 (the call has not been made). The script looks through each of the possible calls whose value is 0, and then looks to see if the current time is greater than or equal to the time one of the calls is due. If so, it says — out loud — the call (i.e. “Half hour please”) and then displays a pop-up window saying “Call half hour now!” Once this window is dismissed, the call field changes from 0 to 1, and from that point on, the script no longer worries about that call.

It’s absolutely hysterical. But most of all, it’s going to be very handy. From here pretty much anything is possible. Now I’ve got it to send me a text message when it makes a call, so even if I’m not in the booth I’ll get the call wherever I am (except for the places calls, where I should already be in the booth). At the end of the script it checks to see if all the calls are marked as “1” and if so, it ends the timer script.

I can’t wait to start using this tomorrow!

I’m so excited I made a movie demonstrating how it works. I suggest watching it at Youtube where it’s in higher resolution.


December 25, 2009

Christmas Coding

I call this: computers,phones,tech — Posted by KP @ 6:59 pm

It’s been a really long time since I had the time to learn anything new about web development. The next thing on my list has been to learn more PHP so I can learn how to write scripts and generate dynamic content on the site.

I had an idea months ago for an online quiz I wanted to put on the site: I kept reading about iPhone apps where the title of the app gave little indication of what the purpose of the app was. Some of them were actually kind of funny (and by funny, of course I mean “could potentially be raunchy”). I had visions of a quiz which would present the title of an app and the user would have to guess from several descriptions of what the app was for. My only problem is that I didn’t know any programming languages to allow me to create such a quiz from scratch.

So today, Christmas Day, after a video chat with my family, I set about learning some more PHP (like all my coding knowledge, I don’t have any fancy books, I just type “php tutorial” into Google and see what comes up). I have gained some new knowledge, and I present to you:

The iPhone App Name Quiz!

Once I got used to the syntax, things came easily. Between my work on spreadsheets as part of my very nerdy involvement in the high command of Battleground Europe, and the stage management database I’ve been designing for the last four months or so, I have been spending a lot more time dealing with calculations and logic formulas. The last programming I successfully did before this year was in BASIC, back when I was in gifted camp when I was ten, so I am happy to find that my brain is retaining things and having an easier time working with concepts like if/then/else statements.

I’m not sure what else I’ll want to do with this newfound knowledge, but now I will have one more trick up my sleeve while adding to the site.


November 9, 2009

Razer Megalodon Review

I call this: computers,gaming,pc,tech — Posted by KP @ 10:18 pm

razer_megalodonI had been saving up for months so that I could get this headset before going back on the road. Why, you ask? Well for one thing, my surround headset of choice, the Medusa, was a 5.1 surround headset with analog connections — meaning it plugs into the audio out ports of your sound card, or for that matter, any regular audio equipment that accepts stereo mini plugs. I liked this option at the time because it’s compatible with all audio equipment and allows your sound card to do the heavy lifting, which is what it’s there for, after all. The other option, which the Medusa also offers, is to get it with a USB connector, in which case your computer has to figure out how the surround sounds should be sent out to your hardware, creating extra processing work. And of course, you can’t plug a USB connector into your stereo or TV. At least you couldn’t back then, what do I know about these newfangled TVs and stereos?

Then something happened that changed my mind: I started spending way more time away from home than at home, and suddenly my big fancy gaming PC was collecting dust, and I had to cobble together a way to make my laptop satisfying for gaming long-term.

My immediate solution was to connect the Medusa with its analog connections as a stereo headset to my Macbook Pro. First of all, you immediately lose the point of having such a nice headset, because the laptop (or most laptops for that matter) don’t support analog surround sound. So it’s just a really expensive stereo headset with a mic. Oh, and about the mic — the Macbook Pro’s audio-in jack is line-level, it doesn’t support unpowered mics, so you need Griffin’s iMic USB adapter or something similar. It’s a lot of crap to carry around, with no better performance than a cheap $15 USB headset from Radio Shack.

So this past summer, I bought a cheap $15 Radio Shack headset, just to carry to the theatre, and laughed when the guys I play online with said I sounded much better than on my old ($125) headset.

But the true problem I was having with life on the road was the lack of surround sound. The game I play, Battleground Europe, is very audio-dependent if you want to survive for long as infantry, and playing in stereo basically means spinning in circles to figure out where a sound is coming from based on where it sounds loudest. The way I was used to playing is that I could hear a single rifle shot and know if it was friendly or enemy, almost an exact direction, and an approximate distance. With one shot I would know exactly where the enemy was, and could turn right to him and shoot back, or move quickly to flank around him if he wasn’t visible. With stereo headphones that’s not possible at all. So I realized that the circumstances of my life required that I would need a USB headset if I ever hoped to play with surround.

It was around this time that Razer released the Megalodon — a 7.1 surround headset, powered by USB, and featuring a nice control box that allows you to adjust volume and a number of other features with just a few buttons.

I saved up all summer, and purchased it in the fall to prepare for going on the road. And now I’ve used it enough to answer all your burning questions.

Wait – first of all, what is a Megalodon?

Razer likes to name their products after fearsome animals. Sort of like how the Navy names different classes of ships after states, presidents, etc., Razer also has naming conventions. Mice are always snakes, for instance (see my review of the Mamba). Well headsets are… fish. Usually bad-ass fish. Cause nobody wants to brag about how they’re gonna frag your ass with their Goldfish.

The megalodon is a shark (thank you, Wikipedia). As you might have guessed from the name, which sounds kind of like it means “big-ass dinosaur,” it’s a prehistoric shark, a friggin’ huge prehistoric shark, which is estimated to have been up to 56ft in length.

Here’s a dude sitting in one’s mouth. RAAAAWWRR!!
585px-Carcharodon_megalodon

Are you gonna review this thing or not?

Hold your horses, you’re gonna get some educatin’ with your gaming peripheral review. OK, now I’m ready.

Setup

The Megalodon connects to your computer with a simple USB plug. According to the specs it does not require USB 2.0, but a powered USB port is recommended. I tried it in my keyboard USB port (which is USB 1.1 and connected through a hub), and it was none too happy.

You don’t have to install any drivers, they are built into the control box and will automatically configure whatever computer you plug it into. Nice, huh?

Because the headphones are USB, they don’t require a sound card, which is good if you’ve got crappy sound in your rig or laptop, or bad if you’ve got a really expensive sound card waiting to be used.

The Control Box

About four feet down the braided-fiber-covered cable from the headset is the control box, which looks kind of like an iPod that’s been attacked by a gaming device. It has a scroll wheel (which actually turns like ye olde iPode, it’s not touch-sensitive). In the center is the Select button, with a nice light-up Razer logo on it.

mega_control

On the left side is a volume meter which indicates different things depending on what mode it’s in, but usually it’s just your plain old volume.

At the top is a button that says Maelstrom. That’s Razer’s name for the technology that processes the 7.1 surround sound. You can push that button to toggle between 2.0 (stereo) and 7.1 mode, and the appropriate number will light up in blue on the left or right of the button. It will also cause the speaker icons around the box to light up, to show all seven speakers, or just the two at the top. Razer recommends listening to stereo sources in 2.0 mode, because the Maelstrom engine is apparently not helpful unless your source is 5.1 or 7.1 surround, and will just make it sound kind of funny.

There are three buttons on the bottom of the scroll wheel, all of which are mic-related:

  • Mic mute — mutes the mic, of course, and also lights up red when activated, so hopefully you’ll notice that you’re muted and not talk to yourself for 10 minutes like one of my squad leaders is fond of doing
  • Mic sens — while this button is pressed you can use the scroll wheel to adjust the mic’s sensitivity (shown on the volume meter)
  • Mic level — adjusts the volume of your mic’s output

The nice thing about these features is that when they are activated you can hear yourself in the earphones, so you can check right away how it sounds (in the business this is called sidetone, which is one of those terms that makes me feel really smart when I use it to explain what’s wrong with my comm).

Other Features

If you press the center button it will highlight each set of speakers on the control box and let you adjust their relative levels. You can’t independently set levels for left and right, only for each type: center, front, middle, rear, and bass.

There’s also a hidden, undocumented setting where you hold something while pressing something else. I can’t remember what it does, though. But when I find it I’ll add it.

These are all you get — there is no software to install, which also means no control over the finer points of your audio experience. They plug in and they work. I find that really great for being on the road, but it’s a little unnerving as a PC gamer geek. However, I have never felt a strong desire to tinker with the settings, which is more than I can say for the Medusa, which was mostly a product of my sound card (SB Audigy 2ZS) flipping the hell out every time I changed video drivers.

The Hardware

The main difference between these headphones and the Medusa (well basically between the Medusa and any other gaming headphones I know of) is that the Medusa creates surround sound by actually having three separate speakers in each earpiece. Most other headsets use software to figure out how to balance each sound to trick your ear into perceiving its correct direction. I thought the Medusas were pretty amazing, but the Megalodon does a nice job of indicating direction, too.

The first thing I really like about these, especially for travel purposes, is that they’re very light. They look just as bulky, but the materials are very lightweight. If you have an unruly child, or perhaps just like slamming your headset on your desk when you get killed in particularly inglorious fashion, I’d wager they won’t hold up nearly as well. But if you can be a civilized gamer, the build quality seems good, if a little more delicate.

The mic is a single piece of plastic, it doesn’t bend into position. It has a little bit of flexibility in the middle, though I don’t think that allows you to keep the shape you want, it just bends enough so it doesn’t snap accidentally. My professional feeling on headset mic booms, if you really want to know, is that I prefer the ones you can bend into any shape… until they get worn out and won’t stay where you put them. The nice thing about the solid ones is that when you put them somewhere, you can trust that they’re still there the next time you have to call a cue. And I feel the same way about gaming headsets.

The headset seems to shrink down to a pretty small size for an adult head, and expands quite a bit. I don’t know how it would do with a little kid, as thankfully I don’t have any kids here to test with, so I think you’ll have to look elsewhere for opinions if you’re a really cool and/or crazy parent to buy your small child a $150 headset.

The velvet ear pads are very comfortable. The headphones don’t block out outside noise particularly well, but that’s not always a bad thing.

Accessories

One of the coolest things about this headset, that caught me completely by surprise when I opened it, is the carrying case it comes with. It has a semi-hard shell, molded to fit the headset and control box on the inside, which closes with a zipper, clam-shell style. If you stomped on it, bad things might happen, but it will definitely keep your headset safe in most travel situations, and like the headset itself, is surprisingly lightweight, so there’s no reason not to use it. I can’t wait to go on the road with this thing. I will feel better about traveling with my expensive headset, and will know that the cord won’t be getting all tangled up in my pajamas. Getting pajamas at gametime or headset at bedtime is not productive. It’s going to be a very clear distinction from now on.

mega_case

My rough scientific analysis which consisted of me stepping on a scale both holding and not-holding the case with headset in it puts its total weight at 1.5lbs. I’ve probably told you I obsess over the weight of my suitcase, so this is very good news. Incidentally, the Medusa weighs 1lb, without a case or control box.

Does it work with Mac?

appleRazer’s official answer on this is kind of, “um, maybe, we think, but we’re not sure.” What I can tell you is that you can definitely plug them in and listen to regular audio with them (you have to select them in your audio settings to make the headphones and mic the active input and output). I don’t have any surround games to play with on the Mac end right now, but on listening to a few minutes of a 5.1 DVD, it certainly sounded like it was working. Which pretty much convinced me that that’s the only way I can ever listen to a DVD on my Mac again.

Does it work with TrackIR’s TrackClip Pro?

Yes. The TrackClip Pro clips rather nicely to the headband, as shown here.

mega_trackir

Summary

Pros

  • light weight
  • simple, literally plug-and-play setup
  • awesome carrying case
  • comfortable fit
  • no soundcard required
  • easy access to volume and mic settings
  • shape is compatible with TrackIR TrackClip Pro

Cons

  • no detailed software configuration possible
  • control box adds bulk compared to simpler alternatives
  • I wish there was a simple audio out jack on the control box so I could plug in external speakers or otherwise get sound out besides using the headphones.
  • not compatible with standard audio equipment, or console gaming systems

Overall I’m very happy with it. There’s not much to play with, but I think especially on the road that will be very good. I don’t have a lot of time to play, and if I’m in a hotel at all it’s generally a new one every night. Being able to take the headset out of the bag and plug it in without worrying any more about it for the rest of the night is just what I need.

Alternatives

If the lack of software controls bothers you, there is also the Logitech G35 7.1 headset which has its own control panel and apparently some nice features. Before you get all excited, I will leave you with a picture of what it looks like:
17299.1.0


October 31, 2009

Site Updates

I call this: tech — Posted by KP @ 4:54 am

You’ll see some changes to the layout happened overnight.

Dear IE6 Users: I hope you’re both happier now

It started out with me wanting to make the site look just a tiny bit better in IE6. Our computer at the office has it, which has given me an opportunity to see just how craptastic it is. IE6 users make up 1% of my traffic, so I’m not willing to compromise too much — make that at all — but I wanted to fix any glaring mistakes.

One thing is that my resume was illegible because IE6 doesn’t take kindly to being given font sizes in percentages. By switching to pixels everybody’s happy, and now some producer with an old computer who doesn’t know how to download Firefox can read my resume.

The other major ugliness is that IE6 doesn’t support transparency in PNG images. It does support transparent GIFs, but GIFs are naturally lower quality. I tried to save the logo as a GIF and it looked awful around the edges. I felt I had tried. But tonight, I decided to try again, and when I cheated by using the matte feature in Photoshop to tell it what color the edges should blend into (I chose my favorite gray, #333333, which blends quite well with the carbon fiber background), it actually looked basically the same as the PNG. And the file size is a third of the original. So now IE6 users will see the nice clean lines of the logo and the bullet points.

OK so how do I know this? I found a nice little program called MultipleIE. It’s a Windows-based program that only runs on XP. It automatically installs a copy of whatever old version(s) of IE you want, from 3.0 to 6.0, and does not interfere with whatever newer version you have. I run Windows virtually in Parallels, so it’s easy to flip between coding on the Mac and checking Safari, and then checking how it looks in Windows.

I still have some more little ugliness to address (some of it in IE8 as well), which I will look into some other time when it’s not 5AM on a matinee day.

Warning: More Geek Speak Ahead

This morning I was reading about CSS3 and HTML5, both web standards that are all new and fancy and not yet completely supported by even the most current browsers. But I found it interesting to think that I could start playing around with some of these features, so long as they don’t make the site look bad in older browsers.

The biggest thing I played with tonight is the idea of curved boxes. I’ve always wanted curved boxes, but my philosophy with this site is that I want it to be flexible and code-based, and not wrestled into looking pretty with a bunch of images strung together that only look good in one size window.

However, using the CSS3 properties -moz-border-radius and -webkit-border-radius (for Mozilla and Webkit-based browsers, naturally), you can specify the radius in pixels (I used 10). There are also ways to add curves to each corner individually. This is the page where I learned about it. The best part of all this is that if you’re using Firefox or Safari, the site will look really cool. If you’re using something else, it will just look rectangular instead of curvy, which is not as cool, but still not bad. It doesn’t punish people for having an older browser, it’s just an added bonus for those who do. That’s why I’ve always had text shadows, and have stuck to color combinations that are still legible without the shadow.


Older Posts »