HOME

February 24, 2014

Filling Out Payroll Forms Remotely

I call this: computers,mac,pc,tech,theatre — Posted by KP @ 11:35 am

This is more of a company management post than stage management, but it might be a useful link to send to your company manager. Or if, like me, you take a company management gig because it comes attached to a stage management gig, and/or you just really need some money, you might want to use this yourself. Or maybe you’re actually a company manager, in which case, I invite you to let me explain this process to your company.

So everybody always wants to get payroll set up before first rehearsal. Especially stage managers, who are supposed to get paid on the Thursday before first rehearsal!

In a lot of cases, you have actors coming from out of town, busy on other gigs, or the company itself is out of town, and it’s hard to get everybody to come into the office early to fill out their contracts and other paperwork.

DISCLAIMER: Before we get into the paperwork stuff, I’d like to remind you I am NOT a company manager, general manager, producer, or any of those people who know or care very much about payroll or running a business. This post is really about the technical aspects of filling out and returning a PDF online. Which forms you need and what you do with them are up to you to figure out.

The IRS has payroll forms online that can be filled out and printed, for example:
W-4
I-9
W-9

So you send your company the link, and they can fill out their information on the form. But now they need to get the form back to you. I recently found myself in this position, and because it’s my nature, I guess, I basically wrote a blog post with graphics to my company explaining all the ways they could do that. So I figured, you know, might as well save all that work and put it in the blog. Plus, knowing how to print to PDF is something that everybody should learn because it has applications far more useful than filling out a W-4.

If you’re sending this to anybody, you can actually skip all the explanatory stuff above and use this link to skip to the good part: http://headsetchatter.com/blog/2014/02/payroll/#instructions

Instructions Start Here

This assumes that you’ve already got the link to the document you need, opened it in your browser, and filled in your information.

Now you need to print your document to a PDF, which you can then email to your company manager, producer, or whoever is asking for it.
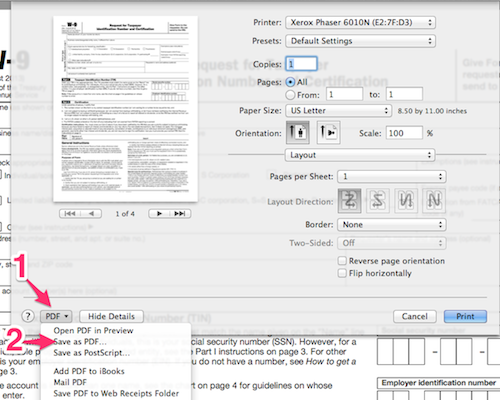
MAC USERS
Choose to print the document and then click on “PDF” and “Save as PDF” as shown:
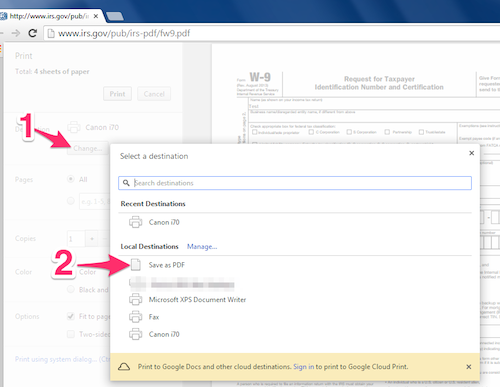
osx

PC USERS
On a PC there are a number of ways to add this ability. If you don’t know if you have it, look on your list of printers for something like “Save to PDF” or “Print to PDF.” Even if you don’t have this feature, if you use Chrome as your browser, you can use it within Chrome, which is good enough for our purposes. Open the IRS link in Chrome and when you’re done, choose print, then click as shown: “Change” in the printer section, and “Save as PDF.”
chrome

BONUS: iOS SCANNER WORKAROUND
I didn’t bother confusing my company with this, but for you, my dear readers, I’ll share another of my paperwork-returning secrets: you can use your iPhone (or iPad for that matter, or your Android device) as a scanner. A crappy scanner, maybe, but if you have steady hands and decent lighting, it works fine for basic paperwork.

If you want a free solution for iOS I suggest GeniusScan, which has a free version that can quickly scan, PDF and email multipage documents (make sure you select PDF as the format — if it’s a single page it may try to send it as a JPG).

I own a scanner (which is ancient, and a pain in the ass because it no longer has Mac drivers, so I have to fire up Windows to use it), and unless I’m scanning photos or something very intricate, I never need to use it.


September 17, 2011

How I’m Using Evernote Today

I call this: mac,pc,tech,theatre — Posted by KP @ 6:51 pm

Just a quick use case for Evernote in rehearsal.

Right now we’re still focusing on music, so one of the few things to track in rehearsal is what songs we’ve covered. That’s the biggest challenge on this show — there are 31 of them.

When I’m PSM, I have a ridiculous database that tracks things like this, but this is a pretty simply-structured show, being basically a revue, with minimal blocking, sets and props, and most of what the database does is either not needed, or not needed when I’m the ASM.

Back when I was doing pre-production I made myself an Evernote note with the names of all the songs, because I wasn’t familiar with the show and knew I’d need to be referring to it often. If I were really on top of things I’d have the names of the characters who sing them on there. Maybe that’s my next project.

I didn’t really plan this, but I had nothing to do in rehearsal, and when I have free time when assisting, I do one of two things: create more paperwork than I probably need, and monitor things that the PSM is already doing, just in case it becomes helpful to have that redundancy — for instance if the PSM needs to be out of the room for an extended period he will miss some of what we were working on, and my paperwork can be used to double-check his list for the report.

So I started using my note to not just list the songs, but to check them off as we learn them. I love checkboxes in Evernote. On the Mac you can make them quickly with shift-command-T. I have a suspicion it’s shift-ctl-T on Windows. The system I came up with is that when we start a song, it gets a checkbox. When the song is completely taught it gets a checkmark.

Nothing fancy, but sometimes Evernote is so open-ended that I don’t quite know what to do with it. So here’s an example.

I only wish the iOS client didn’t crash so much. I would keep my run sheet on it. But I can’t have a run sheet that crashes just before a scene change, or loses its most recent changes, and I feel like that would happen at least five times a day, which is five times more per run than I can accept. Currently I’m writing the run sheet in Word. I’m not sure yet what method I’ll use during tech. It will very likely be paper.


May 17, 2011

Evernote Use Cases

I call this: computers,mac,pc,phones,tech,web — Posted by KP @ 9:44 pm

I made my first post about Evernote back in August, as I was preparing for the last Acting Company tour. If you’re not familiar with Evernote, I suggest reading that first, as it will give you a basic idea of what the app does. In very brief, it stores and categorizes any text, document, photos, or other media you want, and makes them searchable and available on the cloud (and as a result can also sync with your phone and between your computers).

I had just begun using Evernote when I made my first post, and since then have mentioned it in passing on occasion. My assistant, Meaghan, and I had been sharing Evernote notes during the tour, as well as keeping our own individual notes about various things related to the show. Now that the tour is complete and I’ve been using Evernote for about nine months, I finally feel prepared to really write about how I use it, not how I thought I would use it. So I went through all my notes to sum up which ones are/were most useful.

Like most things in my life, I find I can divide it into three categories: work, personal, and technology. So that’s how I’m going to break it up. Behold!

Work

  • Cast checklist This is by far the most useful single note in my Evernote. All it is is a list of the full names of the cast, with a checkbox by each one. Initially this can be used as a reference for remembering people’s first and last names, and checking spelling. Once you get to the point where you know everybody’s name, it’s basically used for taking a headcount, or marking off when things have been completed for each actor (such as if you were making labels for their valuables bags). I think it’s fair to say that Meaghan and I used this note nearly every day, very often multiple times per day.
  • Other checklists Some other uses of the handy checklist features of Evernote are for prop presets, pre- or post-show checklists, and one of my favorites, the list of things needing to be run at fight call, and the actors and weapons needed for each one.
  • Rule books and contracts I tend to also have these files on my DropBox, but this is something that is worth the redundancy, I think. I keep the PDFs of all applicable Equity rule books, contracts, riders, letters of agreement, etc.
  • Codes On the TAC tour we had a note filled with all the codes we’d accumulated over the tour: copier codes, combination locks for our road boxes, door unlock codes, bus door codes, computer usernames and passwords, etc.
  • Procedures How to do things you might otherwise forget how to do. An example of this would be on The Comedy of Errors, we used the house’s main curtain in our show. In theatres where that wasn’t possible or desirable we had an alternate set of lighting cues. In theory they were written into the show file. But I kept a note with the designer’s original notes of all the changes made to the original show file to create the curtainless cues, as well as a breakdown of the steps that needed to be taken to make the routine switch between the curtain show and the non-curtain show.
  • “People Who Have Gotten Screwed” I have a note with this title, which is simply a list of names (there were three by the end of the tour). The gist is that when somebody gets arbitrarily screwed (like there’s no way to make the schedule without somebody having a four-hour break in the middle of their day), the person who gets screwed gets their name on this list. The next time that kind of decision has to be made, if there are multiple people who could potentially be screwed, a person with their name on this list will be passed over for screwing.
  • Interview or initial hiring notes When somebody first calls me about a job, I use Evernote to take down quick notes about the name of the show, who’s involved, where it’s being done, the dates, and salary if known.
  • Quotes I kept a list of all the funny quotes that came up during the tour.
  • Directions and maps I’ve got some notes with maps and written directions for how to get to various venues and rehearsal studios.
  • Truck pack info I didn’t end up using this as much as I intended to (probably due to not being able to type on my iPhone with my gloves on), but I had a note for documenting our truck pack, which could be lists of the order items come on in, as well as pictures of various sections of the pack to show how the items fit together.
  • Travel info / itineraries Any time I got a flight itinerary (which sometimes was way in advance), I threw it in Evernote and didn’t worry about it again, knowing I would always know where to find it when I needed it.
  • Notes for reports On more informal shows, I take my notes for the rehearsal / performance report on my phone if it’s not convenient to have my computer out. It’s also handy for making lists of questions to ask the director, or for topics to bring up at a production meeting. Then when I get home or back to my computer, I can process them more appropriately.
  • Exit interview notes While on tour, I knew that at the end of the season I would be brought in for a meeting with the general manager to discuss what was good and bad, what had improved or not since last year, and so forth. I’m pretty terrible at remembering these kind of things six months after they happen, so from the start of the tour I kept a note with all these thoughts.

Personal

  • Shopping lists Definitely my favorite in this category. Great for quick, disposable lists like groceries, and also for long-term shopping that I might not get to for a while, like things I want to get for my apartment.
  • Movie and book recommendations Any time I hear about a book or movie I might like, I go to my “Books” or “Movies” notes and jot down the title and maybe a reminder of what it’s about, or the author. This helps me not to forget things that I’m interested in, because when I’m in need of some new entertainment, I can just go down the list and head over to Netflix or to bn.com to see if any are available.
  • Insurance information I have a note with various information about my health insurance plan, and another covering my eye doctor visits last year. I haven’t needed to reference them yet, but it will be very handy over time to have documented when my last check-up was, the doctor’s name, etc.

Technology

  • All useful infomation My most prized note in this category sums up everything there is to know about my Mom and Dad’s technological lives. I did a total revamp of their house quite a few years back, and do periodic upgrades and maintenance on their computers and network. Naturally I don’t always remember all the details, so I have a file that has all their various usernames and passwords, router names and passwords, wi-fi network name and password, and computer names. I use this all the time when I’m over at their house.
  • Ink cartridge information This could be as simple as a line of text with the cartridge numbers, but I prefer to take a snapshot of the printers’ ink cartdrige, mostly because it’s faster to take the picture than to transcribe the information. Also it gives you visual confirmation of what the cartridge should look like, which is sometimes helpful.
  • Troubleshooting procedures When something goes wrong with my stuff and I find the directions to solve it online, I generally make a note with that information, if I feel like it’s something I won’t remember if it ever happens again.
  • Terminal commands and other shortcuts Ever find something online like “just type ____________ in the terminal to get this really useful option”? That’s great. Until you reinstall your OS or get a new computer, and then you forget all about that thing you cut-and-pasted two years ago. So I have a single note (which used to be a Word document I dragged around from computer to computer) that holds all of these.
  • Specs of my computer I have one that’s just a screenshot of the item description of the last batch of RAM I bought. I’m pretty bad at remembering my computers’ specs over time, so I keep them in various notes. This also includes serial numbers and MAC addresses.
  • Product keys I really keep all my product keys in 1Password, but when I first get something I often snap a photo of the product key if it’s on the box or the CD or whatever. That way I can be sure I don’t lose it or accidentally throw it out before putting it into 1Password.
  • Configuration info The one that saves me the most time is the settings for Coda, which is the web development software I use. There’s a configuration screen that allows the app to access the local and remote versions of this site, and every time I have to re-enter that information I screw it all up. So now I have it in a note, with a screenshot of how everything should be filled in.

Summary

These are the notes I’ve found most useful. Evernote can really be used for whatever you want. For instance, I don’t make any attempt to make it a task manager, as I have the much more powerful and dedicated OmniFocus for that. I wouldn’t say that I’m a power user of Evernote. I do have the $5/month Premium subscription, which allows me gazillions of gaziggabytes of uploads (I believe that’s the technical term) per month (which is more necessary when you’re uploading photos), but I rarely have really needed that subscription. I think about bumping back to the free version (Evernote is fantastic about not making you lose any of your stored data if you decide to go back to free), but I keep thinking “it’s just $5” and I like the app so much. And I really don’t want to lose the 150×150 pixels or whatever it is that the ads take up. But if you were on a budget, you could easily survive the workflow that I normally use on the free account.


December 23, 2010

Dropbox is the Shiznit

I call this: computers,mac,pc,phones,tech,theatre — Posted by KP @ 10:57 pm

Over the past six months or so, I’ve written a couple posts which mentioned my interests in incorporating cloud computing into my stage management life a little more. I talked about the wonders and terrors of cloud computing in general, and mentioned in passing about the software Meaghan and I are using on this tour.

Over the summer — I don’t think I talked much about it — over the course of three productions, I quietly and tentatively began using Dropbox to store my folder of show files on the cloud. I used to use MobileMe’s iDisk for this purpose, but being slow as all hell, and just as likely to corrupt and delete your data as to save your bacon when you need remote access to a file, I would periodically back up to MobileMe, but never actually trust it with the primary copy of the show files.

At the urging of several of my colleagues (and readers), I tried out Dropbox. As I said in one of my other posts, “It’s just like MobileMe, except it works.” So while it’s redundant, it’s also completely life-changing. Over the summer I went from cautiously putting my show files on it while keeping backups elsewhere on my hard drive, to using it as the primary storage point. I also back up to a Time Machine drive, of course, so in theory there is an isolated copy that’s at most several days old, even if Dropbox totally fails and deletes an important file both from the server and from my local copy.

The Acting Company tour this year is the first production I’ve done where every file related to the show (except the backup of our SFX files, which is over 2GB) is kept on the Dropbox, and is shared with my ASM. The files are also stored locally, so we also have offline access to the most updated files on our hard drives, for those times when we’re in a basement theatre or the bus has driven into a patch of wilderness, without ever having to think about making manual backups or syncing.

For all intents and purposes, as far as the show is concerned, it’s like both our computers share a single hard drive. And our iPhones can access that drive if they need to, as well. It’s like the most exciting thing to happen to stage management since the headset. Only once have I seen a situation where we both tried to edit the same file at once, and it seemed to have been handled safely, if a little clumsily, with a copy being saved in each of our names. For the most part, Meaghan has things she keeps paperwork on, and I have others, so the odds of us needing to edit the same file at the same time are surprisingly low. We tend to reference each other’s paperwork a lot, but not necessarily collaborate heavily on the same thing. In a different situation the limitations of this system might get more annoying.

Also, here in Minneapolis, Meaghan has been using the Guthrie-provided laptop. She can’t install Dropbox on it, sadly, but can still access and upload files through a web browser, which is not nearly as convenient, but still a great option to have when you’re using somebody else’s computer that’s locked down.

My favorite story comes from the New York rehearsal process of R&J: we made a change to the script, and some hours or days later, I went to add the new text to our Word file of the script. When I got to the appropriate page there was a happy purple bubble pointing to the already changed text telling me that Meaghan had made such-and-such an edit on such-and-such a date. After last year’s extensive re-writes, which Nick and I took turns updating by emailing the file back and forth to each other (and having to be very meticulous about who had the absolute most current file), I was actually stumped for a moment at how this had happened. But it’s so simple. There is really only one copy of every file, so there’s virtually never an issue of “my copy”/”her copy.” We’ve been working this way for three months now, and I can’t imagine how stages were ever managed before this!

So I just want to say to any stage management team: Dropbox. Do it. It will change your life. In the good way!


November 8, 2010

RAM and Virtualization

I call this: computers,mac,pc,tech — Posted by KP @ 6:09 pm

For as long as I’ve had a Mac, I’ve had an install of Windows on it. Back in the day it was VirtualPC, then when Intel Macs came out it was Boot Camp and Parallels. I’ve had some trouble with Parallels over the years, but overall I’ve preferred it to the competing VMWare Fusion every time I’ve tried Fusion out. There’s just one problem: Parallels charges like $50/year for upgrades. And there’s always the same features touted: “faster, and you can play 3D games! No seriously, this time you can play 3D games. Not like last year when we said that and none of the games you play would actually work. This time we really mean it.” Anyway, working or not, for an $80 app, $50 for a yearly upgrade feels like a lot relative to the cost of the initial purchase, when the functionality doesn’t really increase in the same proportion. It’s not like 5/8ths of the app is new features.

This year, right around the time Parallels 6 came out, demanding $50 for what sounds like pretty much exactly the features I have now, VMWare sent out an email advertising a deal whereby a person owning a license for Parallels could buy Fusion for ten bucks. Think about that for a moment. You could spend $50 to upgrade an app you’ve already paid for three times before, or you could buy an entirely new app that does essentially the same thing for TEN BUCKS.

First of all, I haven’t been very happy with the performance of Parallels lately. I had 4GB of RAM in my Macbook Pro, and Parallels was running like crap. I’d tried all sorts of configurations, some worked better than others, but just opening the start menu took like 10 seconds sometimes. I wanted to upgrade to 8GB, but it was still pretty expensive, and I was broke.

When the VMWare deal came out, I jumped on that, of course, cause I’d pay $10 just to have someone find the person who decided on Parallels’ pricing model and kick them in the face. To get an app with it as well would be awesome. So I installed Fusion and it felt basically the same. It’s hard to say since I don’t have too much cause to use either, especially with the obvious RAM shortage I’m having.

Finally, I decided it would be really nice to be able to actually use these apps, and I once again researched the cost of RAM. I always buy my RAM from Crucial, at least for my Macs, because I just trust them. RAM is a hard thing to shop for. You really can’t tell what you’re getting ahead of time, and it can even be hard to tell after the fact if your RAM sucks. So all you really have to go by is the reputation of the company. Crucial was still a little out of my desired price range, but then I realized that Amazon actually sells Crucial RAM. Their price was better than buying it direct, and I had some gift certificate money to spend as well, which brought it down to a reasonable cost. So as we were going on the road in a week, I rushed to make my purchase.

The RAM arrived when we were in tech for Romeo and Juliet. I had it delivered to the office because I knew I’d be at the theatre 18 hours a day from then until we went on tour, so our company manager dropped by with it at some point during our day. I was going to wait until lunch to install it, but decided on a 10 that I had to try it. At the start of the 10 I shut down my computer and began taking it apart. When I was finished and had rebooted we still had four-and-a-half minutes remaining on the break. I was pretty impressed with myself.

Honestly I don’t notice the speed all that much when going about my normal OS X activities. 4GB is still plenty for day-to-day work. However, there is a HUGE improvement in running Windows simultaneously. It almost feels as smooth as if it’s running natively. I have 3GB allotted to the virtual machine.

Gaming-wise, I don’t ever expect it to compete with running in Boot Camp, but you can actually get things done in games. Especially if you’re playing MMOs or something that doesn’t require instant reflexes all the time, it would be perfectly serviceable for doing more leisurely tasks.

As far as Parallels vs. Fusion, I don’t really have enough evidence to do a side-by-side comparison. I was also running last year’s Parallels and upgraded to this year’s Fusion, so that’s not really fair. I would have to buy Parallels 6 to really say anything. I will say that the one thing I miss from Parallels is Modality mode, in which you can have a tiny, semi-transparent window showing your Windows screen floating over your Mac stuff, and actually click in it and do stuff. If you’re doing background tasks, such as installing software, in Windows, you can keep an eye on its progress without it taking up your screen. There doesn’t seem to really be an equivalent to that feature in Fusion, which is a shame. Honestly, as software, I’ve always liked Parallels better and would never have been inclined to switch, except for the exorbitant cost of keeping up with the latest versions. The only reason I have v. 5 is that it was offered as part of a bundle, where for $50 I got Parallels plus like 10 other apps. If that happens again I’ll probably end up with a v. 6 license at some point, but I feel the official upgrade cost is pretty insulting.

It’s not really my intent to make this post a comparison of the two apps. The point is equally valid for both: if you’re struggling running virtualization because of RAM issues and are considering investing in more RAM, do it! It’s totally worth it! It will change the way you use your virtual machine.


September 5, 2010

Let Me Tell Ye: Windows 7 Upgrade

I call this: computers,mac,pc,tech — Posted by KP @ 11:20 pm

It’s been a while since I’ve done a “Let Me Tell Ye” post, so just a reminder / warning that in addition to some useful computer tips, you’re going to get some snark.

I’ve been using Windows XP since late 2001, shortly before I switched to Mac (basically WindowsME was what made me switch, and by the time XP came out, my mind was made up, but I bought it just to get me through the last couple months before I could afford a Mac). Since then I’ve always had an install of Windows on my Mac, which until this week has always been XP. I also have a gaming rig, which also runs XP. I recently hit a point where I felt that Windows 7 had been around long enough that I trust it will be compatible with my games and peripherals, and will provide better performance with modern hardware (such as my 4GB of RAM). Over the summer it made it to the top of my short list of things to buy when I get a little money.

As part of preproduction for my upcoming tour, I’ve been focusing on Windows a little more than usual because I have a PC-using assistant. So I thought it might be a good idea to take the opportunity to buy Windows 7 now, so that if we ever need to do something Windows-based, there won’t be a chance of it not working because I’m using an obsolete OS.

So let me tell ye, without further ado, my experience installing Windows 7 on my MacBook Pro, over an install of XP. I wrote this throughout the process:

Background

So here’s what I’m working with:

  • mid-2010 15″ 2.66GHz i7 MacBook Pro
  • 4GB RAM
  • Mac partition with Snow Leopard 10.6.4
  • Windows partition with XP SP3 32-bit
  • Windows 7 upgrade disk (which comes with 32-bit and 64-bit install disks, I will be attempting 64-bit)

The Begininng

I made sure I had the latest Boot Camp update (3.1) for Windows 32 bit, which gets run on XP before the update. Honestly I’ve never been quite clear how Boot Camp works, but I know it’s necessary for driver support, so I need to make sure that’s done first, and everything I’ve read says this is necessary before installing Windows 7 in Boot Camp.

Step 1: Open the Box

When I had recovered from the optical spectacular that is the hologrammed install disc, I found a loose piece of paper in the box making it sound like if I’m going from XP to Win 7 my life is going to be miserable. So I grabbed one of my spare hard drives, reformatted as NTFS, and got ready for an ordeal.

The instructions sent me to a website to download a helper. I carefully typed in the address (in IE, cause I figured they’d do something stupid like make that important). But because I was using IE, it didn’t send me to the page because I didn’t put “http://”. Sorry. I must have been looking for that other internet, so it’s a good thing you sent me to Windows Live Search instead, where the only result happened to be the page I was looking for.

The first instruction cautions me that when I start the installation I need to select the “custom” option if installing from XP. Well, I know the OS is old. To me it feels like just yesterday because I switched to Mac just a few months after it came out. But let’s not pretend that the only OS in between didn’t suck. Plenty of smart people, and lucky ones who didn’t need to buy new computers, skipped over Vista. So stop acting like those of us still on XP are some kind of technology-shunning aberrations. Thanks.

So it checked that my computer is compatible with both 32-bit and 64-bit versions of Windows 7. Then I was instructed to download the optimistically-named Windows Easy Transfer. Now this “easy” transfer doesn’t actually transfer all your stuff intact, it takes your files, but you need to reinstall your programs. That seems like a pretty smart idea when changing OSes anyway, but I’d call it more like, “We’ll Kinda Help You Transfer.” Like if a friend offers to help you move and all they do is hold the door open for you while you carry the stuff out, and then leave you at the door to your new place with a list to help you remember all the stuff you have to unpack.

While Windows analyzed my computer for ease of transfer, I heard my Mac reboot. Apparently spontaneously and unintentionally, because when I restarted it said the bit about “Windows has recovered from a serious error,” and actually used the word “blue screen” somewhere in there. I wish I had been looking, it would have been a great photo op.

With this comforting sign before I’ve even begun my major upgrade, I started over with the “Easy Transfer” program. That time, it alleged it was able to back up all my files. Then while doing absolutely nothing, my computer initiated a shutdown. It wasn’t a blue screen or anything, just a very calm “windows is shutting down now,” like any other shutdown, except that I hadn’t asked for it. Now I’m hoping that this install will wipe everything, cause obviously it’s F’ed up.

Side note: Dropbox is being real slow. I wonder if Evernote might actually be faster for transferring single large files. I’ve been researching and downloading the files I need from my other computers and then just putting them in my DropBox so I can get them from the machine I’m updating.

So finally I put in my install disc. Because I’m going from a 32-bit OS to a 64-bit one, I have to boot directly from the CD, it can’t be done with the OS loaded. Check out this futuristic loading screen. I’m so excited to be computing in the 21st century!

Of course the progress bar has no bearing on actual progress and freezes at 100% for an uncomfortable period of time. Maybe I should just play a game of Civ 4 or something while I wait so I’m not tempted to mess with it. I’m not kidding, that’s what I’m doing. Let’s see how many millennia I can get through while it loads files.

…I started in 10,000BC, by the year 435AD I gave up.

I came to discover through more googling that apparently while you can upgrade from XP to 7, on a Mac it’s not so easy. Something about how it boots off the CD, and the differences in how Macs and PCs boot. The only path seemed to be to do a clean install. Which is more or less what it was going to end up being anyway, as I understood it, so I didn’t find that to be a problem. Back to the same “loading files” screen… This time I got beyond it. There were even some greater-than-1-bit graphics.

Finally the whole thing installs beautifully. Then I go to put in my product key and it says it’s invalid. I come to find out that you can’t do a clean install from the upgrade disk, despite the fact I had read that you could. It doesn’t bother to ask you for a valid XP product key or install disk. So now I’m back to square one of reformatting and installing XP (which also means an upgrade to SP3 and all other updates since then) before I’m ready to try the upgrade to 7 again.

Total elapsed time so far: 3 hours.

5 hours in, I am now back where I started. I got interrupted when The ’70s called, asking for its progress bar back. I said it was still frozen on my screen and I’d return it when I got it unstuck. I even tried using the 32-bit install disc, thinking that would be an OK solution temporarily until I can figure out how to fix this. But that still told me it needed to boot from the disc, and still froze in the same place.

I googled some more, and found that getting stuck on “Windows is loading files” is very common, for Mac users and regular PC users alike. One lucky fellow I read about said he found the solution to his problem in that after randomly restarting about 10 times, all of them resulting in the process freezing at “loading files,” he was rebooting again, giving up and trying to boot in OS X and suddenly it worked. Mine had only failed about 3 times, so I decided this ridiculous “solution” was worth trying. And on the fourth time, suddenly it loaded fine. So far so good. Back in the 21st century.

If I EVER have to go through this process again I will not be happy. I would just like to point out that this is one of those situations where legitimate users get punished. I can only imagine how many people have installed pirated copies and had none of these troubles because they could have done the clean install and avoided the incompatibilities with XP.

6 hours and counting — it accepted my product key and I’m using the OS. Haven’t installed Boot Camp drivers yet, but it’s run its first software updates.

Boot Camp installed, so I can now see it in full resolution. This is the ugliest OS I’ve ever seen. I don’t think it’s supposed to be. When I start tinkering with settings I’m sure I’ll figure it out. Right, Microsoft?

Well I found the personalization settings. Yeah it does get a little more attractive with all the Aero effects turned on.

The default wallpaper is hideous. I’ve always thought Microsoft was pretty good about that in the past. I don’t like any of the built-in wallpapers. I decided to start with an orange theme, and found a wallpaper I liked online. I’m not sure I like it, but I would have died of boredom with the default theme on. My buttons still turn blue when I mouse over them, and I don’t see a way to change that.

Overall performance seems good. I like that I finally have an OS for gaming that can see all my RAM. I haven’t done a lot of gaming yet, but what I have done feels very good. Sorry, I don’t have any before-and-after FPS comparisons.

So to summarize, if you run into this problem that a lot of people face with the install freezing at “loading files,” the highly sophisticated solution is to just keep doing it over and over and one time it might work. Which, incidentally, is also the definition of insanity.

Parallels

After getting everything up and running in Boot Camp, I checked it in Parallels. I had to go through a bit of a reinstall, but Parallels handled that pretty well. There was a point where Windows tried to do a repair on itself and failed, but I used the tried-and-true method of “just try it again” and it worked. I wasn’t given any grief about activation. With virtualization you can have problems because the OS sees your machine as having different hardware in Boot Camp and Parallels, and thinks you’re a filthy pirate trying to install it on two different computers. I actually don’t know how they check it, but I’ve never had it reject me since 2007, when I had to call a number and explain to them what I was doing. The nice woman I spoke to in India cleared it without giving me any argument, so it wasn’t a terrible experience. I’m just amazed that as many times as I’ve messed around with that install, it’s never happened again.

Performance in Parallels is something I’ve been struggling with for quite a while. I had finally gotten it to a level I was happy with, which involved devoting less than half my RAM to the virtual machine. Unfortunately Windows 7 requires 2GB of RAM, so I have not tried giving it less than that. I’m still experimenting. I really would like 8GB of RAM, but it’s still pretty expensive.

I wish the install hadn’t sent me on a wild goose chase, but when it was all done, I was able to get the OS I wanted installed, and so far I like it. Of course I won’t really be spending much time in it, but I like what I see so far.


September 4, 2010

Cross-Platform Stage Management

I call this: mac,On the Road Again,pc,theatre — Posted by KP @ 7:16 pm


This tour is going to be something of an experiment, and an opportunity for new stage management technical discoveries, as I have an ASM who uses Windows — I know!

Contrary to popular belief, I will actually choose ASMs who use Windows. And the people I most often assist use Windows, so I’m used to the cross-platform thing, although it’s been a while since I’ve been the PSM in that case and had to decide what software to use for the show. So I had no reservations about Meaghan not being a Mac user. I knew she was a PC user when we worked together two years ago, but I couldn’t remember if she had since switched, and I didn’t ask until this week when I was trying to nail down what software I’m going to use for the tour. Well she has a PC, but she assures me she has an iPhone, which is comforting somehow, and is an advantage I never had with Nick and his cursed-trackball Blackberry.

In day-to-day life I don’t find the OS to make that much of a difference. There were a couple events over the course of two years on tour where I remember saying to Nick, “thank God you have a Mac, or we’d be screwed!” but those were situations where we were already screwed and managed to avoid further screwing. Which is good. But those situations are rare, and if you are lucky enough not to be screwed in the first place, then you have nothing to worry about. The big one I remember was when my computer just up-and-died one day, an hour before the show. I was able to install all the software I needed on Nick’s and carry on. It was great, but in reality if that happened again, especially in the more cloud-based world we have now two years later, most things would be fine on a PC, and if I really needed a Mac, there will be like 15 more of them on tour and I could borrow somebody else’s to get what I need converted into PC-friendly form. But those kind of contingency plans will be part of the decisions I make when setting up our digital world.

The first of which is that there needs to be a backup of all our critical files on a drive formatted for FAT32. My backup drive, which uses Time Machine, is formatted for HFS+, which is the format required for Mac-bootable drives. I think I may keep all our files and installers on an 8GB thumb drive that I just purchased. Our show files are on DropBox so we both have access to them, so that’s a pretty good backup right there, but it might be smart to have an offline copy as well. I’ll probably keep that backed up every day or two.

I also have Windows running on my Mac (both natively, and alongside Mac OS using Parallels), which might come in handy if we need to share something in a Windows-only way. I was still using XP for compatibility with older games, and out of cheapness, but when I had the money, wanted to buy Windows 7. I would hate to find us in a situation where we can’t share something because I was still on XP, so I started to think of it as a business necessity to invest in the upgrade at this point. So I just installed Windows 7, and it seems to run well on my machine so far. Maybe this whole collaboration will help me to educate myself on changes in the Windows world that I’ve glossed over since I switched to Mac in 2002. That would be helpful, cause I sell myself as a computer geek stage manager, and if you sat me down in front of a machine with Vista or Windows 7 I don’t think I’d be much of a geek, and at this point it’s starting to feel like false advertising.

Meaghan and I are now pretty much caught up as far as being set up with all the software we’ll be using. Here’s what we’ve got:

  • FileMaker Most of the actual paperwork for the show will go in my database. Thankfully FileMaker is cross-platform, so we should have no problem with that. When at work, we will work off the master copy served from my computer, but I have recently added a feature to upload a copy of it to DropBox, so if she needs to reference the information inside when away from the theatre it will be in the cloud. Plus we could both access it from our iPhones if we wanted. If she was going to do some homework of her own, she would have a copy to work in, as long as I know not to be making changes at the same time on my copy, and to make the Dropbox file the master after she’s done. Nick and I sent the file back and forth over email sometimes, but this way should be a little cleaner.
  • DropBox This summer I started using DropBox as an alternative to MobileMe’s iDisk. The main difference between the two is that DropBox works. It works well enough that I could put my folder for each show on my DropBox and trust it not to get corrupted or out of sync. After three shows using that method, I’m now taking it a step further: I’m sharing that folder with Meaghan, so we will both be able to work off the same files.
  • Evernote For more on Evernote, you can see my first impressions post. I’m storing a bunch of stuff on Evernote, everything from the show logos to essential emails from office staff, to my shopping list for Staples. Meaghan can then check it to see all the information I have, and when we’re actually working she can add notes to my notebook for the tour with information and paperwork that she generates. I’m hoping between this and DropBox, we’ll never have to worry about me forgetting to pass on a file to her.
  • Microsoft Office Obviously. I don’t create all that many Office files, but it’s always necessary at some point. Our script will be the biggest one, and changes will be tracked throughout the rehearsal process.
  • Skype It may come in handy from time-to-time, but what I really intend to use it for is to teach the database before we start rehearsal. Meaghan only arrives in New York the day before we start, so using screen sharing will have to do.

In addition to getting us set up for rehearsal, I’ve been trying to make Windows a little more hospitable for my own use. The problem I have when gaming is that I become completely useless for anything else, because in order to access, well, anything, I have to reboot into OSX. The use of all these cloud-based, cross-platform tools has made it much easier to spend hours and hours in Windows without being prevented from doing anything else. The one major element I’m missing is OmniFocus, which is cloud-based, but only compatible with Mac and iPhone. However, the act of creating or checking off a task is so quick and simple that doing it on my phone is almost as fast as doing it on the desktop. Overall I’m excited to play with some new ways to organize.


May 5, 2010

What I’m Using Virtualization for Today

I call this: computers,mac,pc,tech — Posted by KP @ 11:34 am

In my opinion the #1 reason to use virtualization software to run a different operating system on your computer in the middle of your primary one is:
because you can.

Is there any better reason to do anything with technology?

But today I discovered a very useful purpose for it, which for some reason I’ve never employed before. I have an old HP Scanjet scanner (the 3570c, if you care). HP stopped supporting it with OS X drivers many years ago (the last drivers were compatible with Tiger), not that their Mac drivers were ever particularly good. In fact I’m kind of glad they don’t have drivers because my desire to install HP drivers on a perfectly good machine is somewhere around my desire to install anti-virus software.

The scanner is such a pain in the ass to use that I don’t even keep it plugged in most of the time. It sits on a bookcase shelf across my living room. When I have needed to use it (basically when my need to scan something reaches such proportions that I have absolutely no choice), I plug it into my PC, which runs XP and works just fine with the default drivers and Windows imaging software.

So today when I needed to scan some old pictures for the site, I plugged it into my new MacBook Pro, just to see if anything had changed, and of course it was hopeless. The Mac acted like I had just plugged a rock into it (and if you’d like to try and don’t have an HP scanner, ThinkGeek sells USB pet rocks which apparently behave similarly). The scanner also acted the part of a rock. But then I had an idea.

Instead of booting up my PC, stretching the USB cable across my workspace, and going through the hassle of moving the resulting files between systems, why couldn’t I just start Windows in Parallels, direct the scanner to connect to it, scan the photos in XP, and drag the file from the Windows desktop onto the Mac desktop? The answer is I can, and it’s that easy. As far as I’m concerned it’s just as easy as having to open a specific app for the scanner, with the added bonus of not having some intrusive drivers installed on my main system. I have no idea why I’ve never thought of this before.

So I will leave you with two bits of knowledge: if you have old hardware you need to use occasionally that’s incompatible with your Mac, you may be able to use it without much inconvenience by using it through a virtualized Windows installation.

And two, here’s what my bedroom looked like in 1990 when all my walls were covered in New Kids on the Block posters.


April 3, 2010

Son-of-a-Bitch: The PC Edition

I call this: computers,gaming,pc,tech — Posted by KP @ 5:40 am

So you know, I’m home on vacation for five lovely days.

What’s the one thing I want to do on the rare occasions that I’m home? Why, play on my gaming PC, of course. It’s big and heavy and can’t go anywhere, but I’ve put a lot of money into it over the years, and sometimes I’d like to play it a little before it’s obsolete.

Well when I got home, I noticed that it was making a strange sound. It sounded to me like there was something wrong with one of the fans in the back. Upon further investigation, I realized the noise was coming out of the power supply. This got me nervous.

First of all, the PSU is one of the only original parts from when I first built it in January of 2005. I was going to replace it at the same time as the motherboard, CPU, video card, and RAM, back in 2008, but I ran out of money. It’s a 600W, which was really good at the time it was new, and when I discovered it could just barely run the more power-hungry components I was adding, I decided to stick with it until I had more time and money for an upgrade.

Sometimes it does weird things. Sometimes when the computer is off, the lights on my joystick and headset flicker. Sometimes all the case lights don’t come on. A lot of times, the light on the power button doesn’t come on. Sometimes peripherals would light up when the computer was off when they never have before. There doesn’t seem to be any logic to it.

My basic assessment of it has been, “yeah it’s sketchy, and I’d feel better with a PSU that’s really designed to handle newer parts.” But I’ve been on the road ever since the upgrade in 2008, and naturally I haven’t felt it was wise to invest in any upgrades since then, since computer parts lose their value so quickly.

So today I started to really worry about the noise. It rises and falls with the activity level of the PC (i.e. it starts or gets louder when opening or saving large files). I did some research online, and it seems like it’s fairly common in old or cheap PSUs. Something to do with the transistors getting loose. Apparently it’s not a sign that your PSU is going to explode, although the general consensus seems to be that it’s a good sign you should get a new one.

There’s also the strange fact that my TrackIR receiver for some reason stopped working while I was gone (like has no reaction at all to being plugged in, like it’s totally dead). It was one of the things that would light up for no reason when the PC was off. The other strange new behavior is that the computer will not turn on right after the switch on the back of the PSU is turned on. Based on the flickering of the lights on my peripherals (which luckily pretty much all have lights), I can see that it’s as if it’s summoning up the power to turn on over the course of a minute or so. First my headphones will flicker, then get stronger, and finally light up fully, then one side of my X52 joystick, then the other, then once both of those are lit, or at least starting to flicker, then the power button will actually succeed in turning on the computer. Scaaaary!

Oh, and also when saving the BIOS settings, instead of a restart, the computer suddenly shuts down, and again has to go through this building up of power before it will turn on.

I am beginning to seriously worry about what this unstable power might be doing to my peripherals, and if it has indeed killed my TrackIR, I don’t want to lose anything else!

While the expense of a new PSU is an inconvenience, if the damn thing does blow up in the next day-and-a-half, I can’t replace the whole computer. So as much as I want to play while I’m home, the fact is, ordering a $100 part from Newegg after the tour is over is the smarter thing to do, rather than trying to squeeze a few hours of fun out of it and frying $2000 worth of parts that I wouldn’t be able to replace for years. It would all be over — that’s it, kaput — gaming on a Macbook Pro till the end of time.

Speaking of which, those new Macbook Pros rumored to have the i7 chips still aren’t out yet. Mine is behaving lately, so I’m actually OK with the delay. I really still love this machine, although on this last leg of the tour I had some more time for gaming, and couldn’t help thinking how much better it would be with a faster CPU and more video memory.

Anyway, perhaps this unfortunate situation will cause me to spend a little less time gaming, and more time doing productive projects, like working on the database, and some expansions of the site that I’ve had in mind.


November 9, 2009

Razer Megalodon Review

I call this: computers,gaming,pc,tech — Posted by KP @ 10:18 pm

razer_megalodonI had been saving up for months so that I could get this headset before going back on the road. Why, you ask? Well for one thing, my surround headset of choice, the Medusa, was a 5.1 surround headset with analog connections — meaning it plugs into the audio out ports of your sound card, or for that matter, any regular audio equipment that accepts stereo mini plugs. I liked this option at the time because it’s compatible with all audio equipment and allows your sound card to do the heavy lifting, which is what it’s there for, after all. The other option, which the Medusa also offers, is to get it with a USB connector, in which case your computer has to figure out how the surround sounds should be sent out to your hardware, creating extra processing work. And of course, you can’t plug a USB connector into your stereo or TV. At least you couldn’t back then, what do I know about these newfangled TVs and stereos?

Then something happened that changed my mind: I started spending way more time away from home than at home, and suddenly my big fancy gaming PC was collecting dust, and I had to cobble together a way to make my laptop satisfying for gaming long-term.

My immediate solution was to connect the Medusa with its analog connections as a stereo headset to my Macbook Pro. First of all, you immediately lose the point of having such a nice headset, because the laptop (or most laptops for that matter) don’t support analog surround sound. So it’s just a really expensive stereo headset with a mic. Oh, and about the mic — the Macbook Pro’s audio-in jack is line-level, it doesn’t support unpowered mics, so you need Griffin’s iMic USB adapter or something similar. It’s a lot of crap to carry around, with no better performance than a cheap $15 USB headset from Radio Shack.

So this past summer, I bought a cheap $15 Radio Shack headset, just to carry to the theatre, and laughed when the guys I play online with said I sounded much better than on my old ($125) headset.

But the true problem I was having with life on the road was the lack of surround sound. The game I play, Battleground Europe, is very audio-dependent if you want to survive for long as infantry, and playing in stereo basically means spinning in circles to figure out where a sound is coming from based on where it sounds loudest. The way I was used to playing is that I could hear a single rifle shot and know if it was friendly or enemy, almost an exact direction, and an approximate distance. With one shot I would know exactly where the enemy was, and could turn right to him and shoot back, or move quickly to flank around him if he wasn’t visible. With stereo headphones that’s not possible at all. So I realized that the circumstances of my life required that I would need a USB headset if I ever hoped to play with surround.

It was around this time that Razer released the Megalodon — a 7.1 surround headset, powered by USB, and featuring a nice control box that allows you to adjust volume and a number of other features with just a few buttons.

I saved up all summer, and purchased it in the fall to prepare for going on the road. And now I’ve used it enough to answer all your burning questions.

Wait – first of all, what is a Megalodon?

Razer likes to name their products after fearsome animals. Sort of like how the Navy names different classes of ships after states, presidents, etc., Razer also has naming conventions. Mice are always snakes, for instance (see my review of the Mamba). Well headsets are… fish. Usually bad-ass fish. Cause nobody wants to brag about how they’re gonna frag your ass with their Goldfish.

The megalodon is a shark (thank you, Wikipedia). As you might have guessed from the name, which sounds kind of like it means “big-ass dinosaur,” it’s a prehistoric shark, a friggin’ huge prehistoric shark, which is estimated to have been up to 56ft in length.

Here’s a dude sitting in one’s mouth. RAAAAWWRR!!
585px-Carcharodon_megalodon

Are you gonna review this thing or not?

Hold your horses, you’re gonna get some educatin’ with your gaming peripheral review. OK, now I’m ready.

Setup

The Megalodon connects to your computer with a simple USB plug. According to the specs it does not require USB 2.0, but a powered USB port is recommended. I tried it in my keyboard USB port (which is USB 1.1 and connected through a hub), and it was none too happy.

You don’t have to install any drivers, they are built into the control box and will automatically configure whatever computer you plug it into. Nice, huh?

Because the headphones are USB, they don’t require a sound card, which is good if you’ve got crappy sound in your rig or laptop, or bad if you’ve got a really expensive sound card waiting to be used.

The Control Box

About four feet down the braided-fiber-covered cable from the headset is the control box, which looks kind of like an iPod that’s been attacked by a gaming device. It has a scroll wheel (which actually turns like ye olde iPode, it’s not touch-sensitive). In the center is the Select button, with a nice light-up Razer logo on it.

mega_control

On the left side is a volume meter which indicates different things depending on what mode it’s in, but usually it’s just your plain old volume.

At the top is a button that says Maelstrom. That’s Razer’s name for the technology that processes the 7.1 surround sound. You can push that button to toggle between 2.0 (stereo) and 7.1 mode, and the appropriate number will light up in blue on the left or right of the button. It will also cause the speaker icons around the box to light up, to show all seven speakers, or just the two at the top. Razer recommends listening to stereo sources in 2.0 mode, because the Maelstrom engine is apparently not helpful unless your source is 5.1 or 7.1 surround, and will just make it sound kind of funny.

There are three buttons on the bottom of the scroll wheel, all of which are mic-related:

  • Mic mute — mutes the mic, of course, and also lights up red when activated, so hopefully you’ll notice that you’re muted and not talk to yourself for 10 minutes like one of my squad leaders is fond of doing
  • Mic sens — while this button is pressed you can use the scroll wheel to adjust the mic’s sensitivity (shown on the volume meter)
  • Mic level — adjusts the volume of your mic’s output

The nice thing about these features is that when they are activated you can hear yourself in the earphones, so you can check right away how it sounds (in the business this is called sidetone, which is one of those terms that makes me feel really smart when I use it to explain what’s wrong with my comm).

Other Features

If you press the center button it will highlight each set of speakers on the control box and let you adjust their relative levels. You can’t independently set levels for left and right, only for each type: center, front, middle, rear, and bass.

There’s also a hidden, undocumented setting where you hold something while pressing something else. I can’t remember what it does, though. But when I find it I’ll add it.

These are all you get — there is no software to install, which also means no control over the finer points of your audio experience. They plug in and they work. I find that really great for being on the road, but it’s a little unnerving as a PC gamer geek. However, I have never felt a strong desire to tinker with the settings, which is more than I can say for the Medusa, which was mostly a product of my sound card (SB Audigy 2ZS) flipping the hell out every time I changed video drivers.

The Hardware

The main difference between these headphones and the Medusa (well basically between the Medusa and any other gaming headphones I know of) is that the Medusa creates surround sound by actually having three separate speakers in each earpiece. Most other headsets use software to figure out how to balance each sound to trick your ear into perceiving its correct direction. I thought the Medusas were pretty amazing, but the Megalodon does a nice job of indicating direction, too.

The first thing I really like about these, especially for travel purposes, is that they’re very light. They look just as bulky, but the materials are very lightweight. If you have an unruly child, or perhaps just like slamming your headset on your desk when you get killed in particularly inglorious fashion, I’d wager they won’t hold up nearly as well. But if you can be a civilized gamer, the build quality seems good, if a little more delicate.

The mic is a single piece of plastic, it doesn’t bend into position. It has a little bit of flexibility in the middle, though I don’t think that allows you to keep the shape you want, it just bends enough so it doesn’t snap accidentally. My professional feeling on headset mic booms, if you really want to know, is that I prefer the ones you can bend into any shape… until they get worn out and won’t stay where you put them. The nice thing about the solid ones is that when you put them somewhere, you can trust that they’re still there the next time you have to call a cue. And I feel the same way about gaming headsets.

The headset seems to shrink down to a pretty small size for an adult head, and expands quite a bit. I don’t know how it would do with a little kid, as thankfully I don’t have any kids here to test with, so I think you’ll have to look elsewhere for opinions if you’re a really cool and/or crazy parent to buy your small child a $150 headset.

The velvet ear pads are very comfortable. The headphones don’t block out outside noise particularly well, but that’s not always a bad thing.

Accessories

One of the coolest things about this headset, that caught me completely by surprise when I opened it, is the carrying case it comes with. It has a semi-hard shell, molded to fit the headset and control box on the inside, which closes with a zipper, clam-shell style. If you stomped on it, bad things might happen, but it will definitely keep your headset safe in most travel situations, and like the headset itself, is surprisingly lightweight, so there’s no reason not to use it. I can’t wait to go on the road with this thing. I will feel better about traveling with my expensive headset, and will know that the cord won’t be getting all tangled up in my pajamas. Getting pajamas at gametime or headset at bedtime is not productive. It’s going to be a very clear distinction from now on.

mega_case

My rough scientific analysis which consisted of me stepping on a scale both holding and not-holding the case with headset in it puts its total weight at 1.5lbs. I’ve probably told you I obsess over the weight of my suitcase, so this is very good news. Incidentally, the Medusa weighs 1lb, without a case or control box.

Does it work with Mac?

appleRazer’s official answer on this is kind of, “um, maybe, we think, but we’re not sure.” What I can tell you is that you can definitely plug them in and listen to regular audio with them (you have to select them in your audio settings to make the headphones and mic the active input and output). I don’t have any surround games to play with on the Mac end right now, but on listening to a few minutes of a 5.1 DVD, it certainly sounded like it was working. Which pretty much convinced me that that’s the only way I can ever listen to a DVD on my Mac again.

Does it work with TrackIR’s TrackClip Pro?

Yes. The TrackClip Pro clips rather nicely to the headband, as shown here.

mega_trackir

Summary

Pros

  • light weight
  • simple, literally plug-and-play setup
  • awesome carrying case
  • comfortable fit
  • no soundcard required
  • easy access to volume and mic settings
  • shape is compatible with TrackIR TrackClip Pro

Cons

  • no detailed software configuration possible
  • control box adds bulk compared to simpler alternatives
  • I wish there was a simple audio out jack on the control box so I could plug in external speakers or otherwise get sound out besides using the headphones.
  • not compatible with standard audio equipment, or console gaming systems

Overall I’m very happy with it. There’s not much to play with, but I think especially on the road that will be very good. I don’t have a lot of time to play, and if I’m in a hotel at all it’s generally a new one every night. Being able to take the headset out of the bag and plug it in without worrying any more about it for the rest of the night is just what I need.

Alternatives

If the lack of software controls bothers you, there is also the Logitech G35 7.1 headset which has its own control panel and apparently some nice features. Before you get all excited, I will leave you with a picture of what it looks like:
17299.1.0


Older Posts »