HOME

June 18, 2010

My iPhone Upgrade Plan

I call this: phones,tech — Posted by KP @ 5:25 pm

Since Steve Jobs’ latest keynote a few weeks back, I haven’t mentioned what my thoughts are on the iPhone 4. I did tweet a bit during the keynote. Before it began I said:

(8:57AM) Just for the record, as of right now I don’t feel the need to buy a new iPhone the day it comes out. We’ll see in a few hours.

Later during the keynote my tone changed:

(1:37PM) Sigh. Do want.

Basically what attracts me about it is the higher pixel density (“higher” is kind of an understatement for allegedly greater than the human eye can perceive), and the camera features. I use my camera constantly, mostly for blogging and Flickr, and often for work. When I’m not using my camera, it’s usually because I want to take a picture, but the subject is too dark, or will come out too blurry for my needs. Any improvement to the camera is something I will benefit from every day.

Unlike some people, I really like the new design with the square-ish edges and metal border. Especially when we found out that the border is metal because it IS the antenna. That’s pretty brilliant, and I hope it pays off in better reception. I don’t honestly think the phone gets bad reception on average. I think AT&T’s coverage spontaneously decides to suck (like this morning when I got a phone call in my apartment where I normally have full bars of 3G, but at that particular moment had 1 bar of GPRS and couldn’t hear the other party).

Anyway, I decided the phone was worth getting, and since it will be obsolete in a year, buying it on day 1 or day 20 or day 100 is going to cost the same amount of money, but will provide the earliest and longest enjoyment when purchased on Day 1.

So on pre-order day I began trying to place my order. The Apple site was crashing when it tried to access AT&T’s records, so while attempting to use it for hours, I read all the tweets complaining about it, and found one that mentioned that Radio Shack is offering a trade-in for old iPhones. Now I’m a self-respecting Mac geek and would never go anywhere to buy an iPhone other than an Apple Store at 5AM on launch day. Certainly not to a freakin’ Radio Shack! But I did some more research and found that they are offering between $200-300 for a used 3GS, depending on wear and tear. I think mine is in pretty good shape, having been in a case all its life. Still recovering from the purchase of my MacBook Pro, a discount that would simplify the process of getting rid of my 3GS, and give me back most or all of the cost of the new phone sounded too good to pass up. So I went to my local Radio Shack just before they started taking preorders.

I was #5 in line when sales started at 1PM. After a few tries, the first guy got his phone. I waited in that store for 45 minutes, with three registers attempting to reach the servers, and in that time, nobody else was able to complete a sale. Then I had to go to work. Just before I left, I also found out that Radio Shack — all of Radio Shack — had only 9,500 units available for preorder. They have 6,500 stores. Having recently read an article about Radio Shack franchises, I knew this number was somewhere around 5,000, and realized that I had been standing on line for what was probably only 1 or 2 available phones.

Now I know that Foxconn can only make so many phones before launch (especially with most of their employees jumping off the roof), and that Apple wants to make sure that their own stores have the best supply, but I was insulted at having spent an hour of my life in line for a phone that it would have been impossible to buy, even if the servers had worked. Why even bother selling something if you only have one per store? That doesn’t benefit customers at all, it only benefits the corporation to trick people into their store with an item they want, when they know damn well they don’t have any.

The local Radio Shack is taking a waiting list, but at first I was still considering making the annual pilgrimage to the Apple Store at 5AM, because it’s fun, more than anything else. But I think I need to be a responsible adult and enjoy the release of iOS4 on launch day, which will still be exciting for my 3GS, and then at some later date, when the second batch of phones hits Radio Shack, I can get mine cheap. I don’t need to have the new features next week as opposed to next month. Most of all I will really miss the excitement of an Apple Store opening on launch day. If anybody I know is getting one, I would totally get on line with them for moral support!

Unless I can think of something to buy with the Radio Shack store credit that I actually need and would have to eventually buy anyway… Windows 7 is a possibility. So in short, I still don’t know exactly what’s going to happen. But right now I think I might wait a while.


May 29, 2010

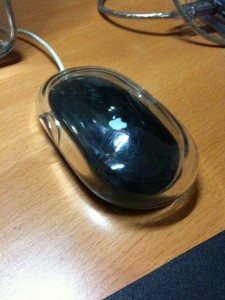
Apple Pro Mouse, Better Late Than Never

I call this: mac,tech — Posted by KP @ 3:39 am

This is an Apple Pro Mouse from 2002. It’s one of my favorite pieces of Apple hardware ever, in terms of design. It also happens to be a terrible mouse, even before you consider the fact that it only has one button and no scroll capability. That one button does have a wonderfully satisfying click, though.

Because I love it so much, despite its near-uselessness, I keep it as close as any spare mouse in my life, in a box under my desk, along with a Microsoft travel mouse (which is probably even older) which has two buttons and a scroll wheel, and is about as bad at tracking. These two very portable, very attractive mice are the ones kept at arm’s reach when a mouse is suddenly needed. My absolute favorite time to use it is when my PC is freaking out because one of my Razer gaming mice aren’t playing nice with the drivers. In my mind the conversation goes something like this.

PC: You have no mouse.
KP: Yes. I do.
PC: No you don’t.
KP: This is a $125 mouse. Why can’t you see it as a generic mouse without the driver?
PC: If your hardware is already connected, please install the driver provided by the manufacturer.
KP: That would be much easier with a mouse. Can’t I just use this one to select the file?
PC: This one what?
KP: This mouse that’s plugged in.
PC: You have no mouse. If you would like to install a mouse, click OK.
(rustling under desk)
(sound of USB connector sliding in)
*boo-doop*
Pro Mouse: Boom.
PC: Name?
Pro Mouse: Apple Pro Mouse connecting, please.
PC: (sigh) Um, OK. What do you do?
Pro Mouse: I have an X axis.
PC: Uh huh.
Pro Mouse: I have a Y axis.
PC: Uh huh.
Pro Mouse: I have a button.
PC: Is Button 1 a left-click, right-click, middle-click, or other?
Pro Mouse: I have a button.
PC: You have a button? That’s what you do, you have a button?
Pro Mouse: Yes.
PC: Are you lost?
Pro Mouse: Is this the PC that has a 7-button mouse connected and can’t see it?
PC: I don’t know anything about a 7-button mouse.
Pro Mouse: But you see me, yes?
PC: Yes. Your hardware is now configured and ready to use.
KP: Thank you.

Tonight I’m packing for the summer stock season, and having decided that any more gaming will be bad for my productivity, I’m packing my gaming supplies, including the mouse that drives not only my gaming PC, but my home entertainment Mac. So the Mac needs something to do the simple pointing and clicking involved in watching TV and ripping DVDs, so the Pro Mouse has been promoted for a few days.

This practice has been going on since, well, 2002, but I’ve never blogged about it before or properly honored the Pro Mouse, so here you go.


What I Learned Today: Apple Power Adapter Tricks

I call this: mac,tech — Posted by KP @ 1:24 am

My favorite part about my life at the moment is that pretty much every day, I learn something interesting. I’ve decided to share them in a new recurring feature. Interestingly, my first few attempts at this had to be aborted when, in doing additional research for my post, I learned that the exciting new information I had received was not actually correct!

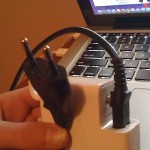
The connector in the power brick of an Apple magsafe AC adaptor is the same as a standard appliance cord

As a stage manager, the situation in which you’d be most likely to encounter this piece of hardware would be plugged in to the back of a boom box you’re using in the rehearsal room, or one that keeps the crew entertained in the shop. It’s also pretty common as a component of most other computer and printer power cords (a lot of PCs have the power brick somewhere in the middle of the process, and then one of these cords that goes from the brick to the outlet). Apple is essentially doing the same thing, they’ve just disguised it as something attractive, but without ruining its compatibility with standard cables. Feel free to use this knowledge the next time somebody tries to get your goat by saying, “I don’t understand why Apple feels the need to make these proprietary accessories.”

I read about this in a Lifehacker tip, which I hope will get published. The tipster suggests that if you find yourself stuck somewhere (he was thinking of it as a way to save money on international power adapters), you go out and buy a cheap kettle or other appliance, and take the cord from that. But I’m thinking of it more in the situation of finding yourself in rehearsal and either not having your extension cord for the Mac and needing to stretch the cord farther, or you’ve lost or damaged the fold-up two-prong adapter that plugs into the power brick. In that case, there’s probably a device somewhere in the theatre or studio that you can borrow the cable from temporarily.

I’m usually pretty thorough in my preparations, and have the longer cord and the two-prong adapter with me all the time, but I pretty frequently end up needing to lend one or the other to a coworker. I can’t wait for the day I need to use this trick, either for me or someone else.


May 27, 2010

Must-See 8-bit Gaming Video

I call this: gaming,tech — Posted by KP @ 12:32 pm

So this guy made a stop-motion video on his desk, recreating famous 8-bit games with bits of construction paper and produce. I heard about this video for the better part of a day, and thought “Meh, that’s probably cute,” before I actually sat and watched it. It is so much better than I imagined, and if you love classic NES gaming, you must watch it, and watch it all the way through, because each segment is better and cleverer than the last.


May 26, 2010

Caffeine

I call this: tech,theatre — Posted by KP @ 7:36 pm


This is not my graphic, but I found it on the web, and it taught me a lot of things I didn’t know.

Whether you are a stage manager, computer geek, gamer, or all three, you will find ample uses for this knowledge. Enjoy.


Review: Speck SeeThru Satin MacBook Pro Shell

I call this: mac,tech — Posted by KP @ 6:48 pm

I’ve admired these shells for years. I like color, I like customizing things, and I like protecting my valuable devices — as long as the protection is attractive, stays out of my way, and doesn’t add too much bulk. Our wardrobe supervisor on tour this year had almost the same shell, only in a different color. I had many opportunities to study it, as it was hard to find someplace to sit in the front lounge while dodging the six Macbooks and one (gasp) PC that lived on the bus. I would question him about it regularly over the course of the tour. It really didn’t get scratched under the case? How often do you look? How often do you take it off? How long have you had it? You’re really sure it’s not causing abrasions on the aluminum? Do you find you use it differently because you have the case on? Is it too heavy? After six months of this I was reasonably sure it wouldn’t hurt my laptop.

A life lesson, learned the hard way: There’s a button on the case covering the battery button (which illuminates a series of LEDs showing the battery charge). Part of the case is sort of cut out around the button so it’s loose and can be pushed in. As it happens, this color of case is so dark that you really can’t see the LEDs light up. For the longest time I struggled putting the case on and off, checking the alignment, testing the battery button naked, and trying to figure out why it didn’t work with the case on. Eventually I manipulated the plastic button so much that it broke off. I didn’t really care, by that point I was so disappointed that it didn’t work that I was OK with poking something in the resulting hole to get to the real button (I can just barely press it with my pinky, but I have tiny hands). Only then did I figure out that the button was probably working the whole time, and I just couldn’t see the lights. Disappointing on several levels.

I might as well mention that the other LED on the case, the sleep light, shines through just fine, and actually looks pretty cool in red. As anyone who has ever slept in the same room as a Mac knows, the sleep lights on all of them can pretty much be seen from space, and you’ve probably devised some method of covering them up so they don’t scorch through your eyelids while you sleep. So dulling the light with the case is not a bad side effect.

PROS:

  • Attractive design, rich color
  • Protects from scratches and dents
  • Adds very little thickness, lid closes smoothly
  • All cutouts fit around ports and other features well, and seem to have plenty of room for bulky peripherals.
  • If the sharp front edge of the MBP bothers you, the plastic provides some relief from directly resting your arms on the metal
  • Puts a layer of protection between your lap and the metal case, making it possible to use the computer on your lap without burning yourself.
  • Soft-touch surface creates better friction for holding the computer on your lap without it sliding off.
  • Sturdy rubber feet, similar to the ones that come on the new Macbooks.

CONS:

  • Can barely see battery lights through case.
  • Very tight to put on the screen half, to the point that I’m concerned about damaging the laptop with frequent attaching and detatching. I’ve actually cancelled my planned weekly case cleaning because of this. I’m also very sensitive to it because the whole reason I had to buy the new MBP was because the old one’s screen had been damaged. The last thing I intend to do with the new one is severely bend and press the screen once a week. I’d rather it get dirty and perhaps permanently scarred than encourage its early demise.
  • Adds about a pound-and-a-half to the 15″ model (bringing it to roughly 7 lbs)

The weight is significant. You wouldn’t think a thin layer of plastic would weigh so much, but it is the size of the entire computer itself. I had done my research about that beforehand, and I know what a pound-and-a-half is (perhaps you’re familiar with how anal I am about weight when packing for the road), and I know what a difference it is in laptop terms. I think the difference isn’t so great to outweigh (literally) the benefits of protecting the device. This is, after all, the most important thing I own, as well as the most expensive. It needs to last in excellent condition for three, or ideally four years. Making it heavier is a small price to pay for the ability to use it without constantly worrying about damaging it. Of course the case will not protect it from serious damage, but for everyday hazards (like the contents of the kitchen counter falling on the lid on a moving bus), it places an extra layer of protection between the computer and light bumps and bruises. In a situation where I know the MBP won’t be traveling much for a while, I might keep the case off, but definitely on the road or in a rehearsal situation utilizing many rooms and locations, it will be a huge help.

After much debate, mostly about the weight and price, I decided to go ahead and buy this because I bought a new computer bag (review to come eventually, I’m sure), and it has a zipper for a storage pouch that lives in basically the same spot as the top of the laptop. In other words the laptop slot doesn’t come all the way up over the top of the laptop, so the zipper would probably be rubbing against the bare laptop most of the time. Rather than hermetically sealing my neoprene sleeve every time the laptop goes in the bag, I decided that was the final straw to justify the Speck shell.

Magsafe? Magpainintheass.

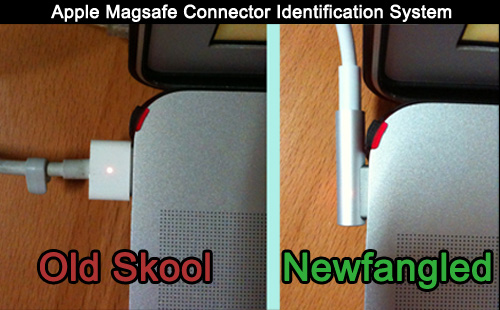
I worry a little about the newfangled Magsafe connector style, shown here:

The natural way to position it is with the cord headed “upstage,” away from the user, and out of the way of the other ports. The only problem is that the little tab holding that corner of the shell on is right there with the connector laying over it. While it does make an electrical connection and seems to charge fine, it doesn’t look like it’s laying perfectly flat, and I just worry about my AC connection not being a perfect seal. If you don’t mind covering the Ethernet and FW800 ports, you can just turn the Magsafe connector the other way with the cord coming towards you, but that’s a pretty big compromise for something that should just work. It’s a pretty tricky part to try to mod yourself, as the piece that’s in the way is the part that clips that corner in, and if it were to break or be weakened, you’d probably have problems with the shell falling off. It might be easier to shave off a millimeter of the barrel of the Magsafe connector, but that seems like the wrong set of priorities, to damage an $80 electrical device that’s essential for the operation of the computer, for the sake of a $40 piece of plastic. In the future it would be nice if Speck could move the clippy part away from the corner and more toward the hinge, so that section right next to the AC port wouldn’t be so thick. Although it’s possible it would interfere with the operation of the hinge if moved any closer, I don’t know.

If you have the old-style charger, it’s no problem at all. I have an old-skool one at home, and use the new one for travel. I also have a second old-skool one for my old MBP, and should it become a real problem, I could swap them. So, buyer beware, but if you have the old one, you have nothing to worry about.

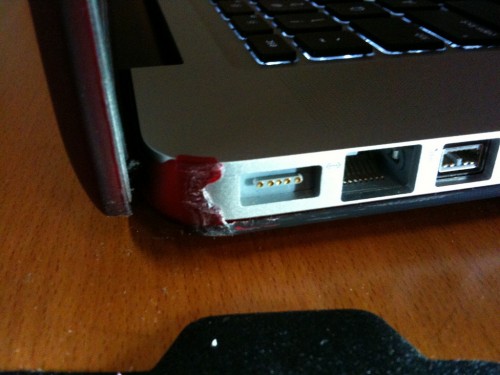
UPDATE: Before heading back out of town, I had to decide which AC adaptor to bring, and decided not to compromise. I brought the new adapter and filed down the case, after reading of a couple success stories. I used the edge of my Leatherman’s file, and a nail file for smoothing the edges. I decided to quit once it fit, rather than risk breaking or weakening the case by trying to make it look perfectly machined. So it’s not beautiful, but the plastic is fairly soft, and if you wanted to make it look prettier, it should be very possible.

A Few More Photos

Detail shot of the front-right corner:

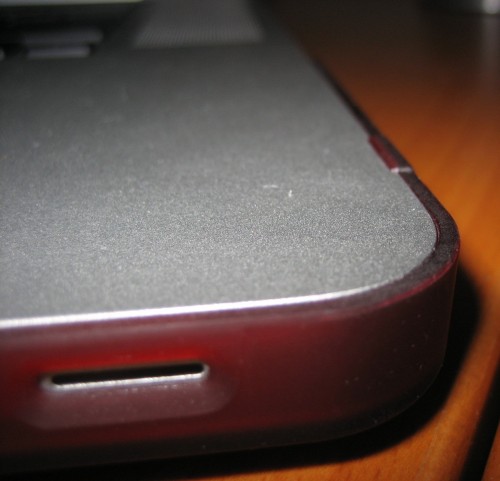
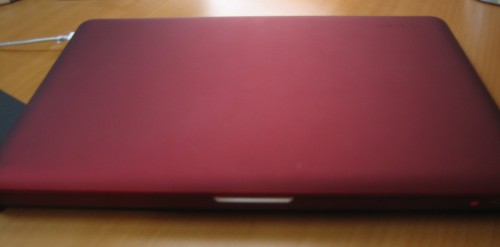
Outer shell. Sorry this is so blurry. I spent time on three separate days (with a real camera, even!) trying to get a shot that wasn’t blurry but didn’t wash out the true appearance with the flash.

The Details

Once again, the shell is made by Speck, who are purveyors of, well, stuff like this. They also make some iPhone and coming-soon iPad cases. In addition to the satin shells, they make a line of more fully-transparent shells that also come in other colors (including clear), which is the SeeThru line, as opposed to the SeeThru Satin. They make them to fit all shapes and sizes of Macbooks, so look carefully to make sure you’ve got the right one for your model. They are carried in Apple Stores, but I always find the selection to be rather limited as far as which sizes and colors are in stock. I had to order mine online, which I got from Small Dog Electronics, my favorite 3rd-party Apple retailer.

The shells retail from Speck for $49.95, but Small Dog sells them for $39.99, so shop around. You can also get them on Amazon, where the prices are generally a little higher, but you might find a good deal on a specific color.


May 17, 2010

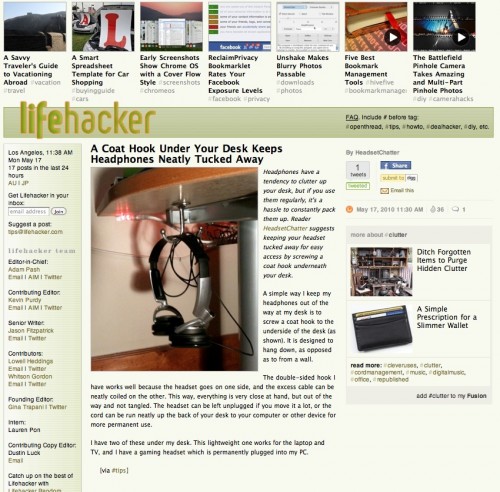
A Published Tip on Lifehacker (and CrunchGear)

I call this: computers,tech — Posted by KP @ 3:03 pm

Today is kind of a big day in my geek life:

I’m a big reader of Lifehacker, and today I have had my first tip published on the main page. It’s one I haven’t shared with you guys either, so I’m definitely blogging about it.

It relates to storing your headphones underneath your desk to keep them out of the way.

I’m hoping someday I’ll make it into a featuredworkspace profile.

UPDATE: My friend (and frequent commenter) Tom found that the tip has also been picked up by CrunchGear today, which is another site I read regularly.

Reaction to the articles has been good, although many people have pointed out that due to cats, babies, long legs, and other things I will never have to account for, it’s not the best solution for everybody. It also would appear that this style of top-mounted hook is actually very hard to find. I hope anybody who wishes to try this tip has good luck in finding one, and if you do, please post where you got it.

UPDATE: If you’re having trouble finding hooks like these, reader Jon has spotted them at Amazon. Thanks, Jon!


May 16, 2010

Let Me Tell Ye: The Internet is Too Quiet Today

I call this: tech — Posted by KP @ 9:29 am

One of my favorite things to do with my spare time is to read and comment on articles from my favorite internet sources. Usually tech blogs, sometimes forums, occasionally mainstream news.

Let me tell ye: I am sick of there being nothing to read on the weekend. I know the rest of the world browses these sites while sitting in an office pretending to work, and that’s why a lot of content (both professionally written, and provided by readers) occurs at those times. My job makes it very difficult to slack off and surf the net under most circumstances, and even then rarely follows the same hours as everybody else who’s pretending to work, so generally the day means nothing to me.

Some of the professional blogs even have editors specifically assigned to the weekends, or evenings. I know they can’t help it that companies don’t issue press releases on the weekend, but it would be nice if they could save up some thoughtful slow-news-day pieces so I don’t stare at my empty RSS feeds all day (I’ve been planning an RSS reader roundup for a while, been waiting to decide I actually like any of them).

In short, I am bored. I’m perfectly capable of amusing myself, but I am accustomed to having a certain amount of interaction with the tech news of the day and discussing it with other geeks, and when inexplicably (from my perspective) it goes from hundreds of articles a day to like five, I feel lost.

I do have a life, actually. I’m spending the day with my parents today. But when I get up at 8:30, and there is not a single new article in any of my feeds since I closed the computer at 11:00 last night (yes, I do occasionally go to bed before midnight!), I don’t know how to go through my morning routine, which is partially based on how long it usually takes me to get through my feeds. In short, let me tell ye, I am not amused, and I’m going to blog about it, so in case you’re feeling the same way you’ll have something to read.


May 8, 2010

iPhone App Review: Pano

I call this: phones,tech — Posted by KP @ 7:46 pm

I don’t usually do reviews of individual apps, but I feel like this one needs it, because it’s not just an app, but a way of taking photos that has specific applications for stage management that I find handy.

Pano ($1.99 on the App Store) is a photo-taking app that automatically stitches together multiple photos to make a panorama.

Now of course you could do this with any camera and then spend an hour painstakingly putting the photos together yourself in Photoshop, but this app will do a surprisingly good job in about a minute, all right there on your phone. The convenience of it is that even if you have the skill and software to make your own panoramas, this app allows you to do it almost as fast as taking a regular picture, which allows you to use it in situations where it otherwise wouldn’t be practical, such as when you need to take a picture and email it to someone right away. Instead of making do with one or more regular photos that don’t capture everything you’re trying to show, you can give the big picture with a panorama.

Here’s a purely work-related example:

Before beginning rehearsal on Romeo and Juliet, Nick and I flew out to Minneapolis a few days early and set up the rehearsal room. Our director would not arrive until the night before rehearsals began, so to give her an idea of what the environment would be like, and a chance to request any changes, I took this panorama and emailed it to her. I didn’t do the greatest job, as you can see the room looks a little wiggly in the middle. I have been trying to get better at positioning myself to avoid distorting the image. Sometimes you don’t have the luxury of time or movement to set up the perfect shot, but in those cases Pano will still do a decent job of letting you snap off a few quick pics. It might be obvious it isn’t one photo, but it will still capture the idea of the space better than a single photo.


Here’s an example of why panoramas aren’t just for landscapes and wide open spaces: on tour this year we were big fans of playing Wii on our bus, and I wanted to take a picture of this. With the slide out, the bus is 10 feet wide, which is not usually very wide for a picture, but in the cramped conditions of a bus it’s hard to stand back far enough to get everything in the shot.

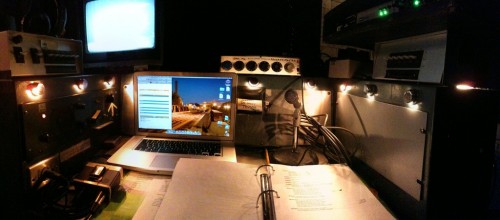
Another use I’ve found that’s kind of related to the above is that a panorama can be better at showing things the way the human eye perceives them. I had a really cool calling desk at one venue on the road, and just taking a flat picture of it wasn’t capturing all the detail. After several attempts, this is the best panorama I came up with:

If you look at the bottom edge of the Macbook you’ll see an imperfect stitch where it gets a little wavy, but for the most part it looks like a single image.

Basically what I’ve taken to using this app for is to get a better picture of something when all of it won’t fit in one frame. You can also get more detailed shots because you’re getting closeups of say, four sections of something, rather than standing back and getting a smaller-resolution photo of all of it.

So how does it work?

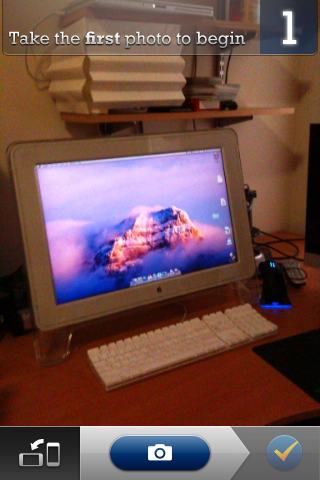
Now that I’ve told you all the reasons you should want this app, here’s how it actually works. As an example, I will take a picture of part of my desk.

The first shot is easy, and every shot after that will show you a transparent slice of the edge you’re trying to align the next photo with:

The hardest part is putting yourself in the perfect position to get the next shot lined up with the guide from the previous shot. You may not notice you’re moving, but every slight adjustment in all three dimensions changes your alignment, and even when you think you’ve got a couple distinctive parts of the image lined up perfectly, there may be one thing that you didn’t notice was all out of whack, especially when dealing with things that are varying distances from the camera.

Here’s an example of the final product:

The one thing I really messed up is the iPhone cable coming off the computer. The keyboard on the left has a slight waviness to it near the arrow keys as well, though that’s less noticeable. I could fix either of those things in Photoshop if I really cared about making it look perfect, but if my goal was just to show somebody what my desk looks like, it won’t hurt their understanding of the photo as a whole.

You also have the option of taking your photos in portrait or landscape. In the example above I used portrait mode, but the first photo of the rehearsal room was done in landscape. It just depends on what you’re trying to include and how many photos you want to take to cover that area. You can also use pano to include more vertical space than you could otherwise, as shown in this quick-and-dirty thing:

I have two complaints:

  • If you are interrupted while constructing your panorama, and have to leave the app, it will not save your progress, so you have to start over with the first shot.
  • The camera doesn’t support the advanced tap-to-focus features of the 3GS, which gives you less flexibility in getting a clear shot than you would get with the default camera app. Not sure if this is a limitation Apple places on third-party apps, or an oversight from the developer, but my guess is it’s the former.

What I find most useful overall is that at the most basic level, I am in the business of transmitting information. Pano allows me to convey more information in a photo than often is possible with a camera alone, which gives the recipient a greater understanding of the situation in question.


Review: Razer Sphex Mousepad

I call this: computers,gaming,tech — Posted by KP @ 6:10 pm

I’ve had this mousepad a really long time, and never got around to reviewing it. Which is probably the better way to write a review, after you’ve had a product for like a year, and actually have experienced it in many different situations.

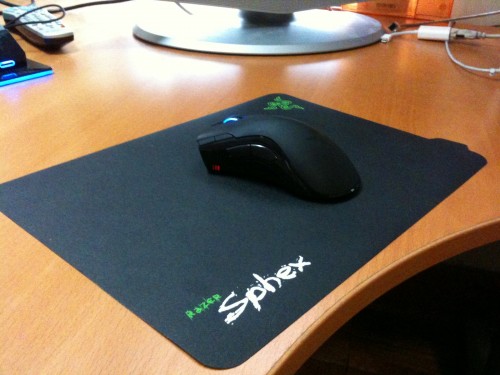
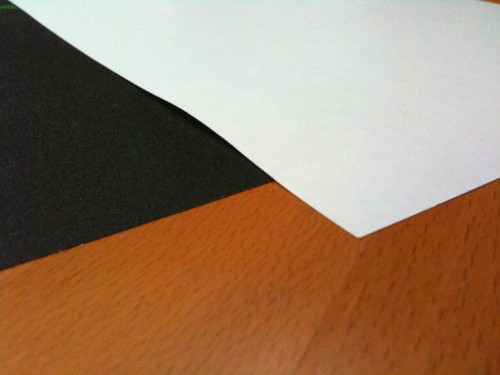
The concept of the Sphex is that it’s really, really thin. It’s about the thickness of a piece of paper. After much scientific study with my fingertip, I have determined it’s actually the thickness of two pieces of paper, but I buy cheap paper. If you have some real quality stock of paper, it might be just one. The point is, it’s so thin as to be almost imperceptible on your desk. The other very nice feature is that Razer has priced it very well. It’s only $14.99, which for a gaming-grade mousing surface is about as cheap as they come. Knowing Razer’s penchant for making high-quality gaming devices, but with prices that reflect their quality, when I first read about it I figured it had to be at least $30. I was very impressed that they made it so affordable.

It’s Thin

There are several advantages to how thin it is. It feels a lot less constricting when playing, because the edges of the pad don’t get in the way of your hand. The pad is relatively small for a gaming pad, but I don’t use really big hand motions so it’s fine for me. I also love it because I tend to move things around on my desk, while working and while playing. Sometimes I want to put my laptop down on it, or overlap my keyboard on top of it. Definitely when gaming, I sometimes need to place my joystick and throttle on the portion of the desk normally reserved for the mouse. In all of these situations, I can place anything over it without creating an unstable surface because it’s so thin. It’s more like a differently-texture section of the desk, rather than a separate object. Right now while typing on my laptop, my left forearm is resting on the corner of it. With a regular mousepad that would be annoying, and I’d need to shove it out of the way, but I don’t even notice it.

Being a Razer product, naturally it’s fine-tuned for gaming, and the surface is made of the proper texture to provide good tracking for optical and laser mice. The texture thing can be a personal preference. Some people like their mousing surface really smooth for quick movements, some people like more control, so a more pitted surface that slows down the mouse but allows the sensor to more accurately track its position is better. And then there are those who like soft cloth mats for lots of control, but this is not that. It definitely feels like a hard mat, and leans a little more to the “control” type of texture, which I like.

Because it’s so thin, there’s no room for rubber or anything to keep it in place, so the entire mat is covered in a gentle adhesive. It arrives with a plastic backing which peels away. There’s a little tab on the side of the mat that is not sticky, so you can peel it up easily to move it. The adhesive is not too strong, just enough to keep it from going anywhere when pressed onto your desktop, and is intended to be reusable.

Here is a picture of the Sphex vs. a piece of paper:

Portability

I always tour with a mousepad. First of all, I’m just that kind of gamer. I’m aware of the impact my mousing surface has on my gaming, and I want my favorite surface with me all the time. Also, in a hotel you never know what kind of desk you’re going to get from day to day. It might be something really inappropriate, like glass, in which case you’ll probably wind up mousing on top of a brochure about historic Chattanooga or something.

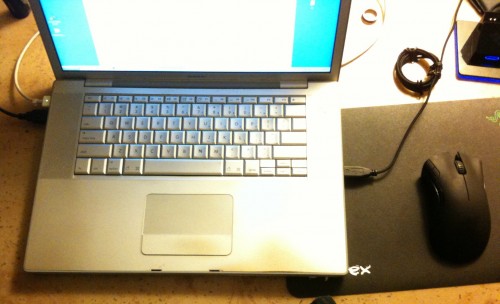
Speaking of Chattanooga, I found this picture that I inexplicably snapped there, of my laptop set up for gaming. The table wasn’t even the kind of work-friendly desk hotels usually give you. It was just a round table, that tapered off quickly outside the photo frame. In this case I am demonstrating how handy it is to be able to overlap your computer (or keyboard, in the case of a desktop) with the mouse pad when working in tight quarters. Incidentally, it also demonstrates why I’m so glad my new Macbook Pro has both USB ports on the left.

But mostly, the main reason I always bring a mousepad is to protect the mouse, which is the real investment. A $125 mouse that’s treated like a $20 mouse will start to perform like a $20 mouse when it gets all scratched up or used on a dirty surface. So I always make sure before I use the mouse that the mouse pad is perfectly clean and smooth, and nothing that can cause damage (food and drinks, objects that could scratch it) is ever put on the mouse pad.

Using a mouse pad also protects the surface from getting scratched by the mouse (which is sort of like saying that not keying a Ferrari protects the keys from getting paint on them), but especially with heavy gaming, it’s good for your furniture, and respectful of other people’s furniture if you’re in a hotel, dorm room, or any other place that’s not yours.

I both love and hate touring with this mat. First of all, I love it because it’s so light. For the purposes of packing, its weight is completely negligible. My previous mat was backed in aluminum, which added a little bit of weight and rigidity to the packing of my backpack. It wasn’t a huge problem, but replacing it with something weightless and flexible was a big improvement. Obviously this is a precision surface and you don’t want to pack it somewhere where it will get crushed or bent, but it has a little bit of give to it, and that’s helpful sometimes. I usually pack it in the section of my bag intended for papers and stuff — most laptop bags have a file-holder divider for this purpose. I’ve usually got a few papers in there (pay stubs, hotel receipts, schedules), and will pack the Sphex between these papers so it’s got a little protection against anything that might rub against it in the bag.

The one drawback for touring is the need to use the adhesive. I kept the plastic backing around because I knew this mat would need to move a lot. So whenever I travel with it, I try to make sure both sides are free of debris, and then carefully align the plastic with the back so all the sticky parts are covered. After many travels, the adhesive loses a lot of its stickiness. I notice it mostly in the fact that the plastic will no longer stick to all of it. If you look closely in the photos above you can see places where it’s lifting off the desk a tiny bit. There’s still enough adhesive on the mat to keep it from sliding around, but there are regions of it that have become worn down, either because the adhesive came off on the surface it was on, or it has attracted some dirt. I should mention that occasionally it will leave a some residue on a desk, which can be cleaned off, but on my home desk sometimes that takes a lot of effort.

However, there is one way to help this problem, in that the mat is designed to be washable. Yes, you can wash it with water and a little soap, and it will clear the dirt off the adhesive side, but I find that it doesn’t go back to being as sticky as when it was new. I figure that’s probably a result of some of the adhesive actually coming off, rather than being covered in dirt.

Longevity

My recommendation on moving around with it is that it is definitely reusable, and would be perfectly fine for moving a couple times a year, but if it’s your job to be in a different city every day, or you go to LAN parties where your rig is constantly being set up somewhere new, you might get frustrated by it. However, if the prospect of gaming on such a thin surface seems really exciting to you, it might be worth it. Also, the price is low enough that if you really care so much about your gaming experience, it’s not going to break the bank if you have to replace it eventually.

Actually, if I was really going to be thorough, it would be a good idea to have one that stays at home in perfect condition, and one for travel. Any bumps on a mousing surface — either on the mouse skates or the pad — create jittery movement for your game, and a tiny particle of dirt stuck under the pad could create a noticeable bump when playing. I always do my best when re-applying the pad to make sure the table is perfectly clean, and there’s nothing stuck to the adhesive, but the more it moves the more chances there are for imperfections.

Summary

Overall this purchase is one I am completely happy with. The only drawbacks to it are a result of my lifestyle not really being suited for the way the mat works, and even then it works pretty well. I’m not sure if I could ever deal with a mouse pad getting in my way again. It’s got all the advantages of mousing directly on your desk, but with the advantages of using a mouse pad as well: you won’t damage your desk or your mouse, and you have a surface designed to help your mouse track better.


« Newer PostsOlder Posts »