HOME

July 5, 2007

Missing Sync Replacement Icon Set

I call this: mac,phones — Posted by KP @ 10:10 pm

Missing Sync is pretty much the only decent way to sync various PDAs with Macs these days. The Palm version just recently moved to version 6.0. Along with a bunch of exciting improvements came one incredibly ugly set of new icons that one would be unlikely to recognize as having anything to do with Palms. See here:

Color icons in the menu bar?! Are they crazy? Not to mention that a bumpy orange ball saying “Pa” is not the most intuitive abbreviation for the Palm logo.

I got really sick of this really fast, so as soon as I had a moment I set about designing new icons so I didn’t have to look at that mess. At first I intended it only to preserve my own sanity, but then decided that perhaps the rest of the world could use an alternative as well. Because the MS icons are interactive, both in the dock and in the menu bar, it’s more complicated than replacing your normal OS X application icon. It requires going inside the app file itself and replacing various .icns files contained within the package. Fortunately I’ve gone through most of the trouble myself so with a little clicking and dragging you can replace your icons.

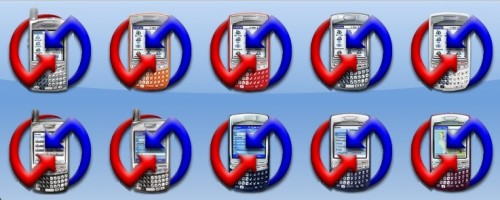
This is my icon set:
For the main application icon you have your choice of a variety of Treo models and colors (I think I got all of them starting with the 650).
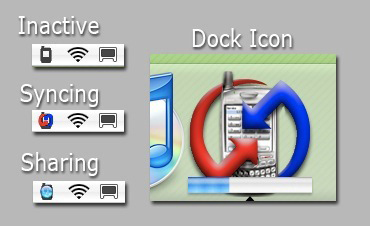
Here you can see the various states of the menu bar, and what the dock icon looks like with the little sync progress bar over it.
Installing the Files

If you want to be safe I’d suggest before replacing any files to drag the old ones to a folder somewhere where you can keep them if you have a problem, or if you really like orange balls that say “Pa” and want to go back to them.

  • First download the file MSicons.zip and unzip it.
  • In the folder “App Icons” you will find many subfolders with the names of various Treo models. Find the one you want, and inside will be the file missingsync.icns with the image of that Treo.
  • Find your Missing Sync application file (by default it should be in /Applications/Missing Sync for Palm OS — I assume it’s similarly named if you have the Windows Mobile version and want to apply these icons)
  • Right-click on the app and select “Show Package Contents.” This will pop up a new window where you can see the files within the application.
  • navigate through Contents/Resources and inside the Resources folder you’ll see lots of icons. This is where you drop your missingsync.icns file to replace the app’s icon. It will ask if you want to replace the file, and you can just say yes, or remove the old one first if you want to keep it somewhere safe.
  • Back up one folder and you will see in the Contents folder another called SharedSupport. This contains little mini-apps that do various things.
  • Right click on “Missing Sync Menu Bar” and select “Show Package Contents”
  • Again go through the “Contents” folder to “Resources,” where you will find another bunch of icons.
  • In the zip file you downloaded is a folder called “Menu Bar” with five files. Those five files get dragged into the Resources folder to replace the menu bar icons. Again, either agree to replace, or pull out the old ones first.
  • You can now close any windows you have open and you will be ready to go. Logging out is the simplest way to see the changes applied.

Hope you enjoy the icons. Please let me know if I’ve left out your favorite Palm.


July 4, 2007

I am the Chosen One

I call this: phones — Posted by KP @ 6:41 pm
UPDATE A major bug has surfaced in the Verizon MR (which apparently is also in the Sprint MR). The data connection will not work when the phone is in a regular 1X data area, instead of the faster EVDO connection which is now available in some parts of the country. I can’t even conceive of how a bug like this got through, and I’m not sure if everyone has it, but please consider that before you go running off begging Verizon to give you the upgrade. If you’d like to learn more, the TreoCentral forum for the 700p has several threads discussing it and other advantages and disadvantages of the MR, but this one seems to be the most directly related.

There’s a developing situation in the Treo world centering around the maintenance release (MR) for the Treo 700p.

A brief background:

The 700p was released by Palm over a year ago, and from the start has had a number of bugs, enough to actually make it notable above the normal amount of bugs of any Palm device. The biggest one is what is usually simply referred to as “the lag.” Instead of the normal immediate response that Palms are known for (and that makes the limitations of the Palm OS justifiable), the 700p was known for taking several seconds (or much more) to switch between apps or do various things. Some people were very much up in arms that the lag makes it skip when playing MP3s in the background. There is also something apparently wrong with the Bluetooth stack which makes it difficult for the phone to hold a connection with another device.

Cut to far too late:
Palm announces they are finally going to provide a maintenance release (not just a patch, sort of like a Service Pack is to Windows) that supposedly will fix all that ails the 700p, as well as adding a couple enhancements. Much fanfare was made when the MR was released for Sprint back on June 4. Of course the Verizon people were bitching that their version was not released simultaneously, which just poured salt in the wound of Sprint having released the Treo 755p first, also supposedly containing the same improvements. So the Sprint people had two options for a better Treo, Verizon users were still stuck with the buggy 700p.

Things evened out a bit more when after a few days it became clear that there was something wrong with Sprint’s MR. Instead of being a simple patch added to the phone’s RAM, the MR is a permanent upgrade to the ROM, which leaves open the possibility of the phone turning into a brick if something goes wrong during the upgrade. A lot of users were experiencing problems, either with bricked phones or the update failing to apply properly, and Sprint pulled the upgrade. Sprint then re-released the MR on June 21, which seems to be better at installing itself.

Verizon drags their feet
With this whole saga apparently resolved on Sprint (despite some new bugs that have arisen with the MR), Verizon users still have not heard a peep about either the fix for the 700p or the release of the 755p. So when I heard the rumor that the 755p was going to be delayed at least 6-8 more weeks, I decided I had to buy a 700p, even though I have a major aversion to paying for something that’s already obsolete. My Treo 650 first of all had a talk time of less than 3 minutes from a full charge, and besides that was acting even more buggy and losing more data than even a 650 has any right to. And I was getting tired of the slow data connection, especially given that I pay Verizon $45/mo. for data, regardless of whether I’m getting dial-up speeds or broadband. I was a little worried about the fact that I would be getting a phone without the MR, but since people have at least been living with their 700p’s, albeit unhappily, I decided it was OK.

Buying the 700p

So after kicking around some ideas, I decided that since the 700 is not that different from the 755, I should just get on with my life and enjoy the improvement over my 650. Plus, it would keep me from doing something stupid like jumping on the iPhone too early. So I called up a nearby Verizon store and asked if they had any. The guy I spoke to had to look it up, then said, “Yeah, I’ve got a couple.” He took my phone number and said he would get it set up for me to pick up.

When I arrived I was thankfully able to skip past the line of people waiting for service, and we talked a bit about my plan and I made some adjustments from my last contract. Then when everything was confirmed he passed my phone off to be activated, for which there was a bit of a line, so I amused myself looking at all the other PDAs that I had been considering switching to.

I found it kind of odd that they didn’t actually have the 700p on display. They had the 700wx, which is the Windows Mobile version, as well as several Blackberries, the Motorola Q, and the VX6700, which is soon to be replaced by the more stylish 6800. I have never owned a non-Palm smartphone, and have often wondered if perhaps I might like a less antiquated OS, but having so much free time to try all of them out, I was unimpressed. I’m sure if I owned them I would be customizing them more to my way of working, but the general feel of them was kind of nauseating. Anyway, it made me feel better about sticking with Palm. But I did wonder, as I watched salespeople showing customers around, how they were even supposed to know the 700p was available.

Finally my name came up on the list and I paid for the phone and signed my contract. However, when the rep tried to activate the phone, it started a reset loop. He showed me and I played with it while they brought out another one and went through the process of marking it as DOA. After completing digitizer calibration, the Verizon Wireless splash screen would come up and the phone would promptly reset.

The second phone they brought out started doing the same thing, so a tech was called out to look at it. He explained that they had just installed new software on all the phones and maybe the upgrades had failed on a few. I was surprised at this, because I like to think I have my finger on the pulse of the Treo world, especially given how desperately I was waiting for the release of the 755p. I asked if this was the big update Palm was releasing, because I didn’t think it was out yet. He said they had just gotten it in the day before (which would have been July 1), and he had spent the day updating each of the phones in their stock. I believe he said he did 40 of them.

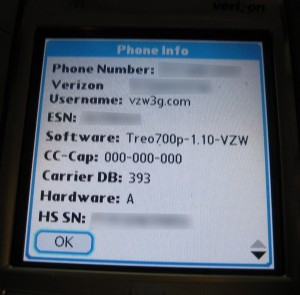
Of course I was very happy to hear I would be getting the MR, but I was still perplexed at how I could have missed hearing of this huge development. When I got home and checked TreoCentral, I read a thread which said something like “some people say they’ve gotten the MR,” without a link to who these statements. So I chimed in that I had just bought a 700p and was told it had the MR. I asked what version numbers I should be looking for, and was told software version 1.10, and Bluetooth version 3.1.2 were the big indicators, as well as a new feature where you hold the home button and it pops up a list of recently used apps. My phone has all these things. A number of posters contacted Verizon, either the main customer service, calling local stores, or by e-mail, and were all told the MR has not been released to the public, is not available for upgrade in stores, and is not being sold on new units in stores. It was at this point that I took the above picture of my phone’s info screen and posted it.

I’m not sure who these other people are who claim to also have the MR, but they’ve remained silent on all the threads I’m following, and I haven’t seen links to any of these claims. All I know is I seem to be the only person in the Treo community who has it, and I’m not sure if I should feel lucky to be The Chosen One, or scared that my phone is running software Verizon swears up and down doesn’t exist.

Other notes:

The Sprint MR’s most apparent flaw is referred to as the “DTMF tone issue.” What happens is that when you perform certain actions that elicit a sound, like a beep when you click on something, simultaneously with the beep coming from the phone’s rear speaker, you will hear a sound from the earpiece that is the same tone you would hear when pushing the * key on a phone. As soon as I began using my 700p I noticed this, and being unfamiliar with the 700p, I figured I must have something set wrong in my system sounds or something. When I got home I found this thread, where I realized all the Sprint users were complaining about this on their MR. Just for the record, I would like to point out:

  • This update comes over a year after the phone was released
  • Palm has had ample time to test this update
  • Sprint has done their own tests to ensure it operates correctly on their network
  • Verizon has taken their notoriously sweet time with their extra “quality assurance”
  • NONE OF THEM NOTICED SOMETHING THAT YOU CAN HEAR WITHIN SECONDS OF USING THE PHONE

As it turns out, the quick and dirty fix seems to be turning off system sounds altogether, which sucks if you like system sounds. Personally I keep them on because it’s a good reminder if I’ve forgotten to put my phone on silent, I will notice right away that I hear beeps when I tap on things. But for now I’m OK going without. I do hear the tone still when setting ringtones — if I tap on a sound in the list it will first play the DTMF tone through the earpiece, then the sound through the speaker. It’s also heard when that sound is played as an alarm (and presumably for calls as well). The sound doesn’t play every time a system sound plays, but one method that’s been discovered to be reliable is to go to the phone app and press spacebar. I would like to point out that this even happens if your phone is on silent (probably because silent mode doesn’t affect things coming out of the phone’s earpiece).

OK, a little annoying, right? But here’s the kicker: it really is a DTMF tone, and as such, will send a “*” to your phone whenever it plays. Some people have reported being on phone calls and having it do things, like deleting their voicemail while they were listening to it. NOT GOOD, PALM. NOT GOOD.

Why am I so blessed among all the millions of Verizon customers to be the only one with this obviously carefully tested piece of software? I don’t know. But there are many people trying to find out, and I will keep updating as the situation progresses.

Additional Reading:


July 2, 2007

My Pokemans – Let Me Show You Them

I call this: gaming — Posted by KP @ 10:56 pm

Somebody help me, I just bought a Pokemon game today.

It started a few weeks ago during a performance of Singin’ in the Rain. One of our followspot operators, Nick, is a fellow lover of the Nintendo DS, and he had told me he had just purchased a Pokemon game. While I have a general knowledge of what Pokemon are, I had never actually played one of the games.

Over the course of the next few performances, I would sometimes hear exclamations from Nick on headset like, “Yes!! My Pokemon evolved!” We have several gamers on the crew, and our off-topic conversations on headset sometimes revolve around games we’re playing. So occasionally I would ask a question about exactly how the game worked. One day he had his DS with him down on the ground, and I watched a little bit of the gameplay and asked more questions. Having gotten bored of Animal Crossing for a while, I decided this might be something I should check out. He warned me that it would consume my life, but that would be nothing new. It couldn’t possibly be more demanding than Animal Crossing, which punishes you for not playing often enough. I asked exactly which version he had, which was Diamond. I had heard of it, and had a general idea that it was one of the newer titles.

So today I stopped into the local GameStop while waiting for my laundry, and they happened to have a used copy. It started out slow with all the setup of the story and training-type exercises, but yeah, it’s kind of addictive so far.


Treo 700p and my first time touching an iPhone

I call this: phones — Posted by KP @ 8:19 pm

As you may know, for the last several months I’ve had my eye on the Treo 755p, which came out for Sprint in May, and has been reportedly on its way to Verizon by July. Well despite rumors of a July 4 release, there’s been no word on it, and today I read this post on TreoCentral claiming it failed its testing and will suffer further delays. My Treo 650’s talk time is now down under 3 minutes from a full charge, and I’m getting sick of how out of date it is, especially since everyone’s complaining about how slow the iPhone’s data connection is, while it’s several times faster than my Treo. In order to remind myself why I don’t have an iPhone, I must have a device that is faster. So I weighed my options (everything from getting an iPhone just to spite Verizon, to a Windows Mobile device, to a $40 battery for the 650.) I decided to suck it up and do the logical thing — get the 700p, which is exactly the same as the 755p except without the slick new form factor. I even get to keep my current SD card instead of having to buy a Mini-SD.

So I called up a nearby Verizon store and had them hold one for me. It took over an hour to get it, as they were quite crowded, and then they had some problems activating it. Unbeknownst to me, the long-awaited 700p maintenance release (read: Palm released a buggy phone a year ago and has just gotten around to patching it) just came out for Verizon yesterday. I hadn’t heard anything about it on the internet, which really surprised me when the technician came out and explained that he had just installed the patch on all the Treos in their stock and it had probably patched badly or something. After some time he got one working and I went home.

I also decided to go ahead with the purchase because I actually wanted to renew my contract with the Evil Empire. My current plan is very expensive ($124/mo.), and I wanted to scale it down and add basic text messaging. I didn’t realize until I got there and talked to the rep that in the two years I’ve had my plan they’ve actually come up with a cheaper one (imagine that!), because there’s a phone+data plan now, which saves you $5. At the time I last renewed there was no such combo package. So I saved $5 on the combo (which I promptly spent on the TXT plan), and I also reduced from 900 minutes to 450. I will have to keep an eye on that to make sure it’s enough. When I’m really busy my usage can get up to 500, so I’ll have to be smart about it. Ever since my parents got Macs and broadband, we use iChat instead of the phone, so that has probably reduced my usage by 100-200 minutes alone.

I feel like a cassette tape user describing to you the wonders of the CD player, so I’m not going to go into any details about what’s special about the 700p, at least until I’ve used it some more. To me it’s a nice upgrade, though.

While I was waiting for my turn to have my phone activated, I had a lot of time to kill in the store, so I played with all the other smartphones that I had considered getting. To cut to the chase, all of them sucked. No question, I didn’t want any of them, and once I tried them, I had no regrets about going with the 700p. I’ve never owned a Windows Mobile device, and have always wondered if perhaps I was missing something. When a friend will let me play with their phone I try to get a feel for it, but there’s little you can mess around with without screwing up your friend’s phone. A store display model is much easier to work with. I’m sure there are ways of customizing them, but neither the Blackberry or WinMobile UIs appealed to me at all. I’m sick to death of Palm OS, but I didn’t find the others very usable.

When I arrived at the mall, I thought, “Oh cool, when I’m done I can go to the Apple Store and look at the iPhone.” Then I decided perhaps it would be a better idea to look at the iPhone before buying the Treo, just in case the Apple Reality Distortion Field really was that strong. Well, obviously I made it out of the store, but I can’t say I did it with confidence. I think I was shaking a little. God, it’s pretty. If it wasn’t for my strong distrust of AT&T, I’d have overlooked all the phone’s other flaws and walked out of the store with one.

In brief, I found the touchscreen to be a little difficult. Every device responds best to a different amount of pressure, I’ve learned this from all my years with Palm, so maybe it was just that adjustment, but I found it sometimes didn’t respond right away, or in exactly the way I touched it. When viewing web pages I sometimes had to poke at it multiple times to get it to click on a link. Everyone is saying “trust the keyboard.” I found this to be true. When using it in portrait, I made quite a few mistakes, but the software correctly predicted what I was trying to type. I’ve heard in landscape mode it’s more accurate because the keyboard is a little bigger. I didn’t spend much time trying it that way. Overall, I agree with the general consensus online, it’s an amazing piece of work. The screen is beautiful, and the design makes you just want to keep using it. I am more than ever looking forward to seeing what the next version can do.


June 27, 2007

The Life of a Retired Powerbook

I call this: mac — Posted by KP @ 8:39 pm

My new Macbook Pro has received lots of interest and attention from blog readers and real-life friends alike. But what of the faithful old Powerbook that was so unceremoniously upstaged on the morning of the MBP’s release?

When I was planning my summer, I was aware that in all likelihood I would be returning home with two laptops, which is kind of inconvenient for someone who likes to travel as lightly as I do. My solution was that I would have to ship some stuff home on the day I left, mostly soft, durable, low-priority items like clothes and scripts, so that I could carry all the delicate computer stuff by hand on the train. You may recall that I had to make a quick trip back to New York on my day off during the run of Singin’ in the Rain. This would have been the perfect opportunity to solve my problem by bringing the Powerbook and its accessories home.

But I just couldn’t do it. One reason was professional: the Macbook Pro, little more than a week old, was running projections for Singin’, which I considered a risk in itself, only tempered by the fact that my trusted Powerbook was kept loaded with the current show file, and was standing by. Well it seemed like a risk, until I had 4GB of RAM overnighted to the theatre and we saw the MBP run a massive video file with no stutters or digital artifacts. The next day I was given a DVD full of new versions of every video in the show, using a higher-quality codec, eliminating all artistic concerns about the movies looking too digital in a show set in 1927. The Powerbook could never have run the final show file, but still I was not about to take it back to New York when there was a slim chance of it being needed to rescue us if the MBP completely flaked. I could have thrown together a lower-quality version that would have run well enough to at least allow the show to go on. Thankfully the MBP did fine, although it sometimes required an especially firm press on the space bar to advance to the next cue, which would have been a huge problem in a show with more precise video cues, and I’d like to investigate that further.

The other reasons I had for keeping the Powerbook around were more personal. First of all, I wanted a pretty clean start with the MBP and was selective about the files I transferred over from the PB. But having had the MBP only a week or two, I had the nagging feeling there were still files on the PB I would need, but I might not realize it right away.

The one thing I was looking forward to about getting “stuck” with both computers all summer was that I could leave the PB at the apartment to record TV programs using my EyeTV. The EyeTV is useful for watching TV when I’m home, since I don’t bring a physical TV with me to Reagle, but the recording features don’t help me much, since if I’m at rehearsal, my computer is with me and unable to stay home and play VCR for the night. With the Powerbook in retirement, it has nothing better to do while I’m out of the house. The other thing I’ve discovered is that my EyeTV seems a little buggy with the MBP. I still use version 1.x of the software, because they wanted some ridiculous amount to upgrade, like $50, when I was perfectly happy with the present features. As it turns out, it looks like the version I have predates the Intel Macs, which might explain why it’s flaky. I’ve been thinking of getting some newer EyeTV hardware, like the little tiny USB thingy, so I don’t intend to pay for a software upgrade when I could get a better value by having it included in the cost of improved hardware. So the PB has continued to be my TV, which is nice because it frees me up to do other things with the MBP without using up screen real estate or system resources, and I can restart or boot into Windows without losing my TV.

Other things the Powerbook continues to do:

  • It’s writing this post right now. I was backing up my MBP when I got the idea for this post, so I started writing it on the PB. The files are not yet too out-of-date from the MBP, so most tasks feel exactly the same on either machine.
  • I have a perhaps unhealthy ability (or need) to multi-task, and I like to have two computers on at once if one is doing something where I can’t keep a browser window open. This allows me to use the idle computer to browse the web while waiting for the primary computer to complete a task, or to search for solutions to issues I’m having with the other machine.

I said on the day I got the MBP that once I loaded it up with my files I hardly felt like I was using a different computer. For the most part it continues to be that way. These are the occasions that I notice it:

  • When I try to do something really simple on the PB and it beachballs, or gives no reaction at all for several seconds, then beachballs, then finally completes its task while the hard drive cranks in protest.
  • The trackpad scrolling. This one confuses the hell out of me. I’ve always had trouble getting the hang of the two-finger scroll when I’ve played with other people’s Macs, but now that I’ve been using it full time I find that I’m quite good at it, although I do sometimes scroll slightly horizontally when I don’t mean to. I’m also no longer bothered by the wider trackpad and button, or at least not enough to notice it. But now that I’m used to two-fingered scrolling without thinking about it, I inevitably hop onto the PB and can’t figure out why it won’t scroll. I’ve gotten so comfortable with the new scroll that I don’t even consciously know I’m doing it. Then when I look at my position on the desk and remember that the machine on the left is the PB (the hardware differences are subtle enough that I really don’t notice them when I’m using both machines), I see my problem and attempt to do the SideTrack-driven edge scroll, and I realize how annoying it is to need to feel for the edges, instead of just throwing two fingers down anywhere I please. Then of course if I spend too much time on the PB, I go back to the MBP and can’t figure out why I can’t get it to scroll by dragging one finger down the edge. I can’t win. I wish someone would come out with a driver to make either one behave like the other so I can have some consistency!
  • I swear something is different about the keyboard. I don’t know what it is, I can’t see it from a casual look, but when I first got the MBP I kept making typing mistakes, as if a couple keys were not exactly where my fingers expected them to be. I don’t do the real touch-typing method of keeping my fingers on the home row at all times, I just know where all the keys on a given keyboard are and somehow decide which fingers are most convenient for hitting them at that particular time. I’m a fast typer (thankfully I’ve never had the kind of job where it was necessary to give my typing skill a numerical value), but I tend to be slower on an unfamiliar keyboard because I don’t actually touch any of the keys except the ones I’m pressing, so if I misjudge my location in mid-air over the keys I don’t have any way to tell until I hit the wrong button. When I got the MBP I started making more mistakes than I would on the PB, and now using the PB again I find I’m making more mistakes than I do now that I’ve been using the MBP for a while. It’s subtle, but I swear something is different. Mostly what’s happening is that my aim is slightly off and I don’t hit the key hard enough or in the right place to make it register. Maybe it’s not the location or size of the keys. Maybe it’s the travel, or the tension, or the size of the wrist rest area in front, or the fact that the PB is thicker, and therefore elevating my wrist a little higher off the table. I don’t know, nor does it bother me very much, but I do notice it when switching back and forth.
  • The higher screen resolution of the MBP was at first more subtle than I expected it to be. It’s when going back to the PB that I notice things take up more of the screen — sometimes in a good way, like when text is bigger and easier to read, but sometimes in a bad way, like the menu bar and tool bars in apps taking up more screen real estate. I don’t mind the smaller objects on the MBP. The brighter screen makes up for any need to squint, in fact I find myself squinting and putting my face close to the PB, which you would think would be the opposite.
  • Working with the lid. I’ve got one of those original Aluminum Powerbooks with the white spots and the bad latch. I won’t count the white spots, as I consider that cheating, but since the latch is not just a defect, but a change in design from one latch to two, I will mention it. My PB has never wanted to stay closed. If left to its own devices, it would be waking itself from sleep every few seconds when in a bag or carried by hand, or in any sort of motion, which can’t be good for it, not to mention what it does to the battery. I let it do this for a couple weeks when it was young, before giving it the terminal command sudo pmset -a lidwake 0, which tells it that it can’t be trusted to know when its lid is open or closed, and it is hereby instructed to wait for me to press a key before waking from sleep. This solved the problem quite well, but when faced with the MBP and its very authoritative double latch which leaves no doubt that this notebook is now closed, I decided to leave it at its default setting with lidwake on, and see if it annoyed me for any reason (like maybe there would be times I’d want it to stay asleep after I open it). So far I like being able to open the lid and have it wake up right away. I have my machine set to ask for a password upon waking, so it requires some key-pressing either way. It really doesn’t make much of a difference to me, but it’s very nice — and to me still unexpected — to close the lid and feel it lock securely instead of bouncing back open. Part of this is the defect with my particular revision of Powerbook, and part of it is the improved design of the MBP which used two latches on the 15″ models for a much more secure feel.

I’m not sure if I’ll keep it when I finally return home from the summer. I’d like to, it would still be useful around the house, but my parents could also use a new computer. If you think this PB is obsolete, you should see their iMac. With a new battery the PB would work well for their needs. I’ve been getting more and more annoyed with it (and frightened of it suddenly having a massive hardware failure) in the last year or so, but in the end it’s really amazing that it’s held up so well and in many ways can hold its own on the same desk as the very latest model sporting more RAM than any laptop really has any business having.

Enjoy retirement, Powerbook. You’ve earned it.


June 20, 2007

The Macbook Pro and Windows

I call this: computers,gaming,mac,pc — Posted by KP @ 9:19 pm

One of the reasons I was originally excited about Apple’s switch to Intel processors was the prospect of running Windows at a reasonable speed on my Mac. I have always owned Virtual PC as long as I’ve been a Mac user, just because every now and then I’d find something that absolutely couldn’t be done without a PC (not your everyday tasks, but things like flashing a hacked ROM onto my cell phone). The one thing I use Windows for on a regular basis is gaming. I have a gaming PC (which I swear one of these days I’ll actually make a post about), but since my primary computer has to be a laptop because of my job, and a Mac because of my sanity, the prospect of taking my games with me was previously an impossibility.

When I first switched to Mac I tried to like the games, but the selection is limited to only the few most popular PC games, and they usually aren’t released until long after PC users have tired of them and moved on to something better. I knew this going in, but what distressed me even more as I came to own more Mac games, is that the few ported PC games there are are usually terrible ports. They’re buggy, they’re slow, and in general don’t play as well as the PC version. And from what I can tell, the developers don’t care, because there’s no competition (it was basically Aspyr and Macsoft), and so few people playing the games that it really doesn’t matter. If the same problems existed in PC games there would be a patch out immediately. So I quickly got tired of throwing my money away on such crap and decided I would be better off building a PC and having access to all the games I wanted, I just couldn’t play when away from home.

Having a Mac laptop running Windows fast enough to play games is something I’ve been looking forward to as long as we’ve known about Apple’s switch to Intel. So now that I finally have one, I’ve been catching up on all the options available and playing around with it. I knew that Boot Camp was the best method for running games, because it addresses the actual computer and all its resources, but I knew I’d also want virtualization software so that I could quickly access Windows while getting actual work done. Parallels was the first to come out with a solution, and I didn’t really become aware of VMWare’s Fusion until I began seriously researching this after buying the MBP.

I was stupid when packing for the summer and didn’t bring my Windows XP install disk from home, even though it was obvious I’d be getting a MBP at some point over the summer and would need this to install Windows with Boot Camp. I did have Virtual PC running on my Powerbook, and was happy to find out that VPC disk images can be easily converted to run on Parallels. So that’s how I first tried Windows on the MBP, running my old VPC image. It was certainly fast enough to feel like a real computer, not like the slow-motion experience of running VPC.

About a week later, I had my XP disk and some games from home sent up to me, and installed XP under Boot Camp. The install software will guide you through the process of partitioning your hard drive to make a partition for Windows. Thankfully, you can do this without erasing the whole drive. Here you have a couple choices to make. First, the size of your partitions. I picked 20GB for Windows, as I don’t really want to take too much space away from OS X, but I think 20GB will be enough to install a decent amount of games, which is all the XP partition will really need to hold.

The other decision is one I wasn’t expecting: you have to decide if you want the partition formatted in FAT32 or NTFS. I know from my Windows experience that NTFS is better for XP because it allows more advanced security features like encryption, and in general is better for stability. However, the installer warns that NTFS is not good if you want your Mac OS to be able to read the files in the Windows partition. This concerned me, since I wasn’t really sure what they meant by that. Much Googling was done before I proceeded. I still don’t fully get it, but what I found pointed to NTFS as the better choice. Apparently it works much better in Parallels as well, which is the main way I intend to share files between the two partitions. I assumed that the incompatibility was that I could not directly open files on the Windows partition by clicking on the volume in the Finder and navigating like I would any other disk. Well it turns out that you can access files on the disk, but it’s read-only. So to move files from OS X to Windows I need to drag them into Parallels.

By the way, you will wind up with the Windows partition visible as a volume in the Finder. At first I found this kind of annoying because I don’t really want that partition anywhere in my life if I’m not actively using it, but it’s growing on me. The biggest realization I had about the Boot Camp method is that when I back up my hard drive, backing up my OS X volume does not back up Windows. If I were using a Parallels virtual disk, one backup would cover everything because the Windows content would just be a file within my OS X files. Now I have to do two separate backups, so I partitioned my backup drive the same way, with a 20GB partition to back up the Windows volume. Part of me doesn’t give a damn what happens to the Windows partition and some game files, but I guess it can’t hurt to back it up once in a while.

I used my product key for a copy of Windows that I no longer use, and it activated and all was well. Using the driver CD that Boot Camp has you burn, I installed the drivers for the MBP with no problems, and all my hardware seemed to be working, and I was on my Airport network quickly. As Steve Jobs said in his WWDC keynote, when Leopard comes out it will have Boot Camp included and the drivers will be on the install CD so you won’t have to burn one yourself. As long as you’ve got a blank CD hanging around, it’s no big deal to use the current method.

So with everything in Boot Camp looking good, I rebooted in OS X.
You can set one OS or the other to be booted into automatically by setting the Startup Disk in OS X System Prefs, or hold Option when you start the computer to choose which one to use.

Now I went back to Parallels and got rid of my VPC version of Windows. Unfortunately Parallels will not detect the Boot Camp partition and give you the option to import it unless you have no other virtual PCs. So I just deleted the one I had been playing with, and it saw the Boot Camp partition and loaded it up.

There are two major obstacles to using a Boot Camp partition with Parallels, as far as I’ve discovered:
1. When you close Parallels you must shut down the virtual computer. You can’t save the state and return right back where you were the next time you start Parallels. This is to prevent you from screwing everything up by trying to access the files from Boot Camp while they are suspended in Parallels. I wish there was a better way around this so that if you primarily use Parallels you don’t have to always wait for the computer to start up and shut down, but I guess the only option would be to never close Parallels. Anyway, Windows doesn’t take all that long to start, so it hasn’t been that bad. VPC used to take twice as long just to restore from a saved state.

2. Activation. As you probably know, Windows has all sorts of annoying ways to make sure that it’s as difficult as possible for you to use the operating system you paid for. One of the things it does to treat all users like criminals is to look at your system specs and deactivate itself if the specs change too much. On a “real” computer this could mean upgrading RAM, changing your hard drive, video card, processor, motherboard. I’m not sure exactly what it looks at, but if you like to upgrade your hardware you’ll run into this problem. On the Mac this is pretty much unavoidable. When I installed Windows in Boot Camp, it sees itself installed on a machine with 4GB of RAM and a Nvidia something-or-other video card. When Parallels loads the same installation, it uses a virtual machine which tells Windows that it’s running on hardware of lesser specs than my real hardware (because some of my resources still need to be used to run OS X). So it sees a machine with 1GB of RAM, a Parallels Video Driver, and a virtual hard drive, and it thinks (not unexpectedly) that it’s installed on a different computer. So it freaks out and demands to be activated within 3 days or it will stop working. When you go to the website it directs you to, it gives you lots of reasons this might have happened, like maybe you bought the computer used and the guy you bought it from was using a pirated copy of Windows. Not one example assumes you actually are trying to use a legitimate copy of Windows in a manner allowed under the EULA, and that the activation feature is simply wasting your time.

So I called the 800 number they give, which of course directed me to India. I explained that I was using XP on a Mac and that because I was using Boot Camp and Parallels the activation software saw it as two different computers and was asking for another activation code. I was given no argument from the nice lady, she simply asked if I bought the OS at retail or if it came with a computer, and I said it was a retail copy. Then she gave me a code to put into the activation window, and it happily accepted it. When I got back into Boot Camp, it once again popped up the activation warning, and I was about to lose it. But when I picked the option to activate over the internet, it did its business and obviously got an answer it was happy with, because it activated. Since then I’ve not heard a peep from the activation app. I was pleased to find that the Microsoft rep did not give me any grief for being a Mac user or act like what I wanted to do with my copy of Windows was wrong or strange. I’ve heard others say the same as well, so I applaud MS for at least making that part of this ridiculous process easy.

I tried Parallels first because I was more familiar with it as the first virtualization program available for Intel Macs. In trying to find out the advantages and disadvantages between Parallels and VMWare, I realized that both programs are so new and developing so rapidly that anything I read was pretty much obsolete because the two apps have been constantly one-upping each other with each release. In fact while I was trying them out over the course of the first week I owned my MBP, both released pretty significant updates. I tried Parallels first and found it just felt a little more comfortable, so when my trials were running out and I had to make a decision, I went with Parallels, but I expect over the coming months the two will go back and forth with who’s got the newest exciting feature.

Once I got everything installed nicely I began installing some games. One problem I found early on was with Sid Meier’s Pirates, which relies quite a bit on the numeric keypad for its controls. Of course laptops don’t have full keypads, but the usual method is to hold the function key to turn a section of the regular keyboard into the numeric keypad. While this function was working in Windows, it wouldn’t work for me in the game, but I came across something called Input Remapper, which has more advanced keyboard drivers for Boot Camp, including the keypad, brightness and volume buttons, and more. Removing the Apple keyboard driver and installing Input Remapper solved my problems.

One more tip: by default Boot Camp’s partition will appear in OS X named “Untitled,” which is not a particularly attractive name for something you’ll probably be looking at in your Finder a lot. You can rename it, but you have to do it in Windows. Right-clicking on the C: drive in My Computer will bring up the option to rename it. After that it will display that name in the Finder as well.


June 18, 2007

The Macbook Pro and Me

I call this: computers,mac,summer stock,theatre — Posted by KP @ 1:34 pm

Since the purpose of this blog (ostensibly) is to discuss theatre and technology, and ideally both at the same time, now I’d like to examine a few ways that my latest purchase can be used to help me in my job in ways that my Powerbook couldn’t.

The camera

Last year I was supposed to have a MBP before starting the summer season at Reagle. I had the money saved up, but then the IRS took about half of it, and I moved right before leaving for the summer, and the expenses added up to a lot more than I was expecting. So no MBP for me for another year. I thought I was OK with this, until we were planning the second show of the year, Thoroughly Modern Millie.

Our director was coming in from California, but we needed to have a production meeting before he could get to Waltham. We bonded quickly over the phone when we discovered we were both big Mac users, and since the Reagle office is not really set up for meetings or conference calls, we decided to set up my Powerbook in the lobby and have an iChat conference, with everyone gathered around the table and him on iChat. This was the first big moment when I said, “Damn it, if only I had a Macbook Pro!” He had an iSight, and if I had only been able to make that purchase, we could have had a video chat instead of audio, which would have been very helpful for seeing who’s talking (since he hadn’t met any of us) and holding up diagrams to the screen. If there ever comes the need to do that again, now I will be able to do it.

The Remote

This was round 2 of my disappointment on Millie. I ran the projection of supertitles for the show on my Powerbook via Keynote. It was a big deal to get the 100-ft cable run from the projector over the house, up through the ceiling to the booth (this is now a permanent installation and we will use it again this summer). Unfortunately, the cable was run before tech. In theatre it’s customary for the tech and initial dress rehearsals to be run from one or more tech tables, which are usually just sheets of plywood bridging over some seats in the middle of the house, to form a large desk to hold the light board, communications equipment, and for the stage manager and designers to put their scripts, computers and other stuff on. This allows us to see and hear the show up close as the audience will see it, and be near the actors, director, choreographer, etc. for easier communication. Because the video cable was already run, I had to leave my computer in the booth. The result was that I did all of tech from the booth, which is not the ideal way to learn to call a show, or to run a tech. The director and I both had God mics, and every single thing I said or was said to me by anyone in the house, had to be done over the God mics. We got through it, but I kept wondering if it would have been possible with the remote for the MBP to have had the computer sitting in the doorway of the booth (where the cable was just long enough to put it) and for me to have been at or near the tech table and cued it over my shoulder with the remote. It sounds a little unlikely that the remote would work at any helpful distance, and I never tried it for Singin’ in the Rain. Because there are relatively few, and relatively easy video cues, I just got the asst. sound engineer to run it for me during tech.

Improved Wi-Fi Performance

The Powerbooks always had trouble with Wi-Fi because of the metal case interfering with the signal. Somehow the MBP has been redesigned to make this no longer an issue. The antenna is actually in the hinge between the screen and keyboard, which is lower than the old location on the upper edges of the screen, but I guess it gets better signal because the area exposed from the metal is much larger.

Since I usually don’t work in places with good or any Wi-Fi coverage, this improvement could very well be the difference between broadband or no broadband if I’m connecting to a base station far away in the building, or even spilling over from the building next door or across the street. I’ve rehearsed a number of shows in locations where the signal was intermittent or there was a specific spot you had to stand in to get reception. With this machine I’d probably have been able to sit comfortably at my desk and get a decent signal. I’ve heard a rumor from one of my followspot operators that the magsafe cable actually acts as an antenna for wi-fi, but I have yet to confirm this anywhere else. That would be cool if it did, though.

Battery Life

This is a two-part advantage, one part which I will consider cheating. I’d make an unscientific estimate of my MBP’s battery life at somewhere over 4 hours. My Powerbook currently gets about 7 minutes. That’s cheating. But I’m currently writing this on a train, where I’ve been for the last hour and a half, and with my brightness all the way down and wi-fi turned off (but bluetooth going the whole time for internet access, and USB charging my phone), I still have more than half of my battery life remaining (supposedly), and haven’t had to bug the lady next to me to let me use the plug (which is good cause that plug is huge and I don’t think I’d actually ask). The point is, if this model gets better battery life, that’s a big advantage in real-world use when it could mean an extra half hour or more of work gets done.


June 16, 2007

New Goodies Have Arrived

I call this: computers,mac — Posted by KP @ 11:28 am

Since I got my Macbook Pro, I have been busy with some other purchases that I’d been waiting on to go along with it.

Adobe CS3 Design Standard

I plan to use this for a long, long time, especially since it could take me the better part of a decade to come up with money for an upgrade. This one arrived most recently and I haven’t actually spent much time working with it yet. After an installation that seemed to take forever, I’ve mostly just been using the Adobe Bridge app to organize my commonly-used images and give them keywords and stuff. I mentioned that I find iPhoto unsatisfactory for my image-organizing needs, and Aperture and Lightroom too expensive. This fills the gap in some ways, at least. I’m looking forward to playing with it more.

4GB of RAM

I was planning to wait a while on the RAM upgrade, but when concerns came up about the quality of video playback on the projections for Singin’ in the Rain, I decided to have 4GB sent overnight from Crucial so they would arrive in time for tech. Crucial’s $369 was not the lowest price I found, but I’ve ordered from them several times before and trust their quality and service. The RAM arrived in the morning on the first day of tech, but as the computer was already busily projecting things, I didn’t get a chance to do the upgrade until the meal break. When I did, it was pretty amazing. After putting in the new RAM and screwing the cover back on, I turned it on and it flew through the boot-up process. The loading OS X progress bar went by so fast it was almost invisible. Don’t get me wrong, it’s not some magical instant-everything solution. There are some things that happen very fast and others that go along as always, probably due to the rather unimpressive hard drive I wound up going with.

External Hard Drive

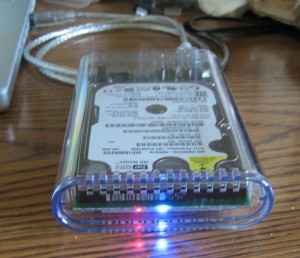
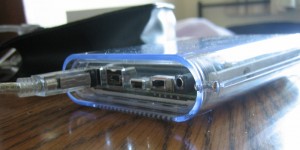
I mentioned before that I didn’t bring a backup drive with me to Waltham, because I was waiting to buy one for the new computer. What I really wanted was an external enclosure offering Firewire 800 and USB 2.0, not requiring its own power source, and holding a 2.5″ drive that would be the same capacity and type as the one inside my MBP (thus the reason for waiting), so that in the event of a HD failure I would have an immediate replacement.

So upon purchasing the MBP, I hopped on to Newegg and was surprised to find that the number of 2.5″ enclosures with FW800 and USB is… ZERO. After some Googling, I found a total of ONE. I wound up ordering both enclosure and drive from a company I’ve never purchased from before called OWC (Other World Computing). They specialize in hardware for Macs. They make this enclosure which looks nice, it’s clear, which is kind of cool. It comes with cables (which is good cause I’ve never had a reason to buy a FW800 cable before), and it even includes the power adapter should I ever want or need to plug it in. The HD I got is a Western Digital SATA 160GB 5400rpm, same specs as the internal one I have (I thought I might go bigger, but it was significantly more expensive, and I prefer to have the drives just be clones of each other anyway). The drive and enclosure went together easily, and it seems to be working well. FW800 is faster than USB 2, although nowhere even near the theoretical speed. I’m averaging about 15-20mbps when backing up, under USB it was about 7mpbs. The backup software I use is Intego’s PersonalBackup, which is the first backup software I have ever found to be user-friendly enough to actually get me to backup regularly.


June 13, 2007

The Highest Purpose for Theatrical Projections

I call this: gaming,mac,summer stock,theatre — Posted by KP @ 9:10 pm


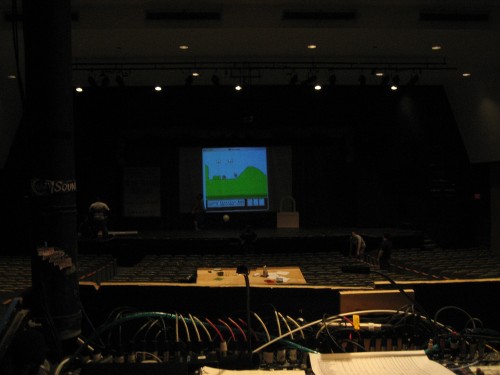
I had a few minutes tonight as we were doing the pre-show, and we had our first round of NES gaming on our lovely projection screen. We didn’t have a chance to do much, as most people were actually engaged in important work, or were about to be, but it was nice to try it out. I played a little bit of Mike Tyson’s Punch-Out, showed how much I suck at Spy Hunter, and just a tiny bit of Bionic Commando to show the young’uns a cool game that they may not have heard of, before moving on to the greatest game ever made, Super Mario Bros. 3.

Here’s a short video clip of Angela trying out SMB3. And yes, the sound is being run over the house system.

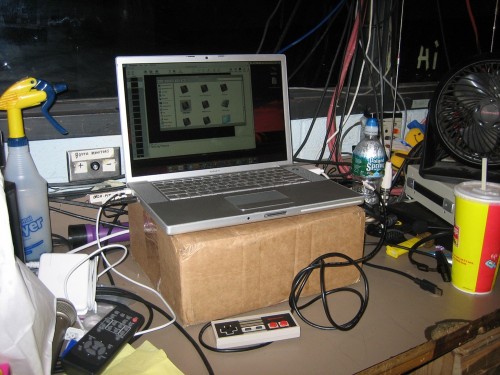
Here’s the (messy) setup in the booth:

The controller is something I picked up last year. It’s an actual NES controller that has been rewired for USB by RetroZone. The Emulator I use on the Mac is Nestopia, which is freeware, but does not support joysticks without a shareware add-on, which is $30. For only $20 you can get USB Overdrive, which is an all-purpose driver for tons of USB devices. You can assign buttons to do just about anything, and have different profiles for individual apps, so I could have my NES controller assigned as a really cool iTunes remote in that app without screwing ups its functions in Nestopia. Not that I would ever need it to do that, but now that I’ve come up with that example, I think it just may have to be.

Getting the game on the projector is simple. Just drag the window off your main screen to the side that leads to the projector’s screen (see here for details on setting up the projector). It was necessary for me to resize the window a bit to get it all on the screen.


Projections for Theatre Using Keynote

I call this: computers,mac,summer stock,theatre — Posted by KP @ 8:03 pm

Quite by accident, I have become something of an expert on the use of Apple’s Keynote presentation software for running projections for professional theatre. Since I’m currently in the midst of one of these shows right now, I thought it would be a good time to take a look at how it’s done.

To start at the beginning, you must know about the show that gave me my first experience with Keynote. At the time (2003), I had recently switched to Mac, and owned a Power Mac desktop, and my former computer which was an 8-lb. Dell laptop. By this point I knew I could never go back to using Windows to get any real work done, and I accepted that if I ever got a tour, I would have to buy a Powerbook. This was at the end of the product life of the Titanium Powerbook, and I was hoping if such a thing ever happened, that Apple had a better 15″ model up their sleeve. In the late summer, the 15″ Aluminum Powerbook was released, and I breathed a sigh of relief. Even more so when only a few weeks later I got called to interview for PSM of a small tour. A few days after that, the producer called to offer me the job. I literally hung up the phone, grabbed my keys, and ran to the Apple Store.

With my shiny new Powerbook, I began rehearsals. This show had a really large projection component, both still images and video, and they were not just decorative. The actors interacted with and referenced the images throughout the show, and any errors would make the show not make sense. The video designer was happy to see I had a Powerbook, because he intended to use the then-new Keynote app to run the show. The fact that I owned a Mac laptop simplified things greatly, and I was more than happy to offer its services, since it gave me the opportunity to tinker with my new toy, and a free copy of Keynote to boot. I learned a lot from our designer as he experimented with the slides and played with various features. I had to become pretty proficient with it, because he would not be traveling on the tour, and as the show was still going to be undergoing changes, I would have to be able to handle most situations that would come up. The only thing he would do was editing of the videos and images themselves, which would then be FedExed on a DVD to whatever theatre we were at, and it was up to me to create the slides around them and the transitions between each one to fit the needs of the show.

Sometimes I would be asked ten minutes before a performance to add or remove a border around all the images, or to move or crop all the images in some way, or to swap or reorder them. I think at its peak the show had about 70 projection cues, and I’m not kidding when I say I was asked ten minutes before a show to make changes to all of them. I got very fast with Keynote, and much of the credit has to be given to the intuitive drag-and-drop interface and that magical way Mac apps have of answering all your wishes when you say, “I wonder if I can do this.” This was only version 1 of Keynote, and it has only gotten more stable and flexible through version 2 and now 3. One huge complaint I had on that tour was that the display on my computer while I was running the show did not give me any helpful information about my presentation that I couldn’t already see on the screen. Even the column of thumbnails on the side didn’t scroll as the slideshow progressed, so once you reached beyond the first ten or so, you didn’t even know what was coming next.

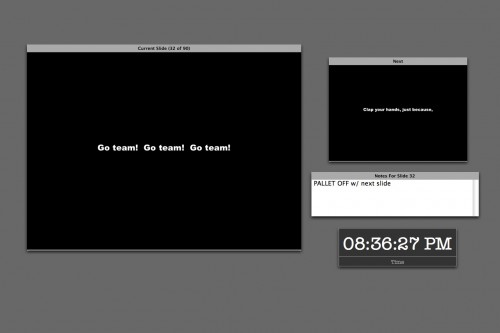
Nowadays, when I’m running a show my screen looks like this:

You can choose which elements to include on the screen, where to place them, and resize the current and next slide displays. I like this layout because it places the emphasis on what’s on stage so I don’t get confused, but also gives me a good idea of the cue I’m about to go into.

This is from my file for Thoroughly Modern Millie, which I’m proud to say has since been used in productions in North Carolina and California, and I even got paid! The only projections in that show are supertitles, but there’s a ton of them (90, including the blank slides for when nothing is supposed to be seen), as they are used to translate for the two Chinese characters. It was one of the greater challenges of my career to be displaying Chinese translations in real time while also calling the rest of the show. You can see I’ve used the notes field in this slide as a substitute for my calling script. During the Chinese sections I literally couldn’t look down for the entire scene, because each slide only shows a few words and I had to make sure I was on the right one for what they were saying. I don’t speak Chinese, but I did learn all the dialogue in the show. Having that notes field conveniently placed made it possible for me to keep my head up watching the screen and the actors, while being able to get a quick reminder so I could call cues and give warnings and standbys without the script.

The clock of course is handy for noting the running time of the show.

On the tour I first used Keynote on, it was part of the deal that each theatre supplied the projector. We had to deal with whatever they had, and I was prepared to hook up to any kind of connector: DVI, VGA, BNC, RCA, or S-Video. The Powerbook has a DVI and S-video port, and all the others could be done with adapters that I carried. BNC could sometimes be problematic because the signal had to go through two adapters: S-video out to RCA and RCA to BNC. The digital formats (DVI and VGA) tended to be the best, but sometime depending on the projector and the theatre the analog actually worked better. This is why I got good at setting up and breaking down the whole shebang very quickly. I could walk into a theatre for the first time and be pointed to the projector with my laptop and a couple adapters and have video running in probably two minutes. Hours and hours and hours would sometimes be spent if there were problems with the projection angle, bulb brightness, height of the ceiling, etc. but getting the show coming out the lens was the easy part.

One of the tough things about doing shows with devices like DVD players and VCRs is that if it’s not a Broadway show using professional equipment, consumer models have a tendency to display things you don’t want an audience to see, like big letters that say PAUSE coming up between cues. The solution to this is usually some sort of physical device that blocks the lens between cues, but this is often impractical, especially when the projector is hung in the air over the audience. The beauty of using the computer is that you can project a black screen between cues, even if you have to exit the presentation. How to do this is not always obvious. When I offer my services to a show, the question I always get is, “But how will you be able to run it without the audience seeing your desktop?” People really don’t believe it can be done. When you’ve done it a few hundred times, it’s ridiculously easy.

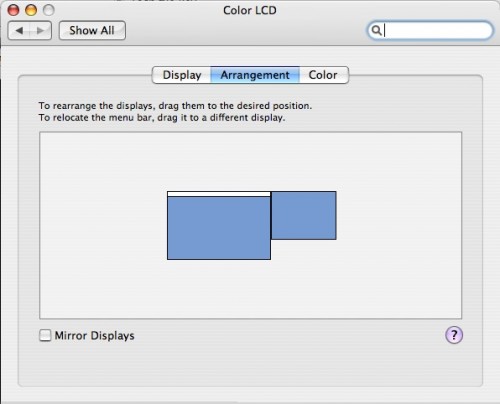
Several steps: you want to turn off display mirroring. In System Prefs/Displays, under the Arrangement tab, you will see a checkbox called Mirror Displays. Uncheck it. I discovered when trying to help the folks at Reagle do this for one of their winter shows that iBooks have their graphics card’s mirroring capability disabled. There is apparently a hack (Google for screenspanningdoctor), but they didn’t try it because it’s not particularly safe. I’m not sure if this is still the case with Macbooks.

When you have mirroring off, imagine the projector is a second monitor attached to one side of your screen. You’ll see something like this.

You can drag the second screen around wherever you want, I always keep it to the upper right as shown. Wherever you put it, the contents of the projection screen will exist in that direction off your desktop. If I’m clumsy and slide my mouse off to the right, you will see it on the projector. There’s nothing wrong with having to back out of the presentation to fix something during a show, the only danger is accidentally flicking the mouse off your laptop into that area leading to the other screen.

Also notice there’s a little white border at the top of the center screen. This represents your primary display, in the shape of the Mac menu bar. Whichever screen you drag that white bar to is the one which holds your menu bar, dock, and by default your desktop icons. You do not want this on your projector. If somehow it winds up there, just drag the white bar back to the other display.

Now you have two screens: your regular one on the computer, and the other, rather empty one on the projector. By default, your desktop wallpaper will probably end up on the projector as well. This is probably not what you want. I have an image in my wallpaper folder that is all black. It’s called BLACK so it’s easy to find. When you go to System Prefs and select Desktop and Screen Saver, you will get a window on both your computer and the projector’s screen. The cool thing is that using the window on the projector, you can sets its wallpaper independently of your normal desktop. So I have the projector set to BLACK, but I can keep my favorite desktop wallpaper on my computer. You should only have to do this once, after that the computer will remember to assign the black desktop to the projector. Unless you make the mistake I made this afternoon, when I plugged the cable in to my computer before turning on the projector. Apparently this confuses the computer, for it set my desktop resolution to 800×600 or something, forgot the wallpaper, and had mirroring turned on. I will remember not to do that again.

Another word of advice: whenever possible, focus the projector on a nice projection surface before you try to do anything with your desktop settings. It never seems to work this way for me, I always wind up trying to manipulate the windows while the projector is throwing an out-of-focus, backwards, horribly-keystoned, and way-too-far-away-to-read image across the ceiling, proscenium and several layers of set pieces. It can take several minutes just to find the mouse pointer. You have to know the desktop prefs window pretty well to be able to set it under those conditions.

When doing a show I do like to keep the desktop settings icon on the menu bar for quick access, especially for shows with analog connections, because the display will not be detected automatically, so you have to select “Detect Displays” every day when you plug the projector in. The screen will flash for a second, and then you will be good to go. You can also adjust the resolution of both screens from that drop-down menu. Unless you have a really fancy projector, its maximum resolution will probably be lower than your computer’s. When you first set it up, the computer may lower res to match the projector (especially if mirroring is enabled by default), but this doesn’t have to be the case. Just go to the drop-down menu and select the normal resolution for your computer and whatever you want for the projector.

A few basic things you should do to your computer when using it for a show:

  • Always have the power cord plugged in when running the show
  • Put the computer to sleep: never (Energy Saver prefs)
  • Put the display to sleep: never (Energy Saver prefs)
  • Turn off all system sounds (Sound prefs)
  • Turn off “play feedback when volume is changed.” If you ever want to hear the little blip, you can hold shift when hitting the volume keys.
  • Mute the startup chime just in case your computer crashes and needs to restart (I use Tinkertool System, but there are others)
  • Start screen saver: never (I forgot to do this when switching to the new computer, and came back on a break during tech to see the default “Flurry” all over the house curtain)
  • Turn off any background apps that have notifications that might pop up (anti-virus, backup reminders, etc.)

Before starting the show:

  • Close all programs except Keynote
  • Shut down background apps that consume resources
  • If you’re outputting audio to the sound console, you’ll probably want to keep your Mac set at a consistent level and let the engineer control the volume. So to start the show make sure you’ve got your computer’s volume where it should be. For Singin’ in the Rain, I keep mine at half.
  • If you’re really concerned about speed and stability, a restart right before the show will probably give you the most reliable performance.

Designing Slides
Keynote has lots of options for deciding how your slides look and how they change. I won’t go into all of it, but I will hit some of the most common techniques I use.

When designing for theatre, you will probably always want to choose a master slide with a black background. You can add colorful backgrounds by creating a shape the size of the slide.

My friend the Yellow Box
When you click on “Shapes” in Keynote, by default it gives you this textured yellow box. The yellow box makes a pretty good target on a black background, and I use this to move and resize around the screen until I’ve figured out what size the projected image needs to be. In this case, we have a drop that flies in with a movie screen in the middle of it, and the movie needs to hit only this part of the drop. So I fiddle with the yellow box, making adjustments until it’s the right size. Then I take the actual content for that slide, the pictures or videos, and drag them so that it’s the size of the yellow box. There are very easy arrangement buttons to help with this if necessary — forward, back, group and ungroup. If you’ve got an image that you don’t want to distort, or a video that can’t be stretched to the correct size, you can then create some black boxes and layer them over the edges of the images to essentially crop them. This leaves you free to manipulate the original image below and drag it around until you like which part is cropped. It also makes it easy to later drop in a new image without losing the work you’ve done with the black borders to size it properly.

So when it’s 7:55 and your director says, “Can all the images be six inches narrower on the left and right side?” you can just make two black rectangles, drag them around until they have the desired proportion on stage, and once you have the first slide looking good, group the black shapes together, select them, and copy. When you paste them into the next slide, they will retain their position in the slide. So all you have to do is select every slide and hit command-V in each one, and you can rest easy knowing they will all match. This is the secret to making changes when you don’t have the time to actually inspect each slide on stage. Get one looking right, and then create something that you can paste in every slide to use as a guide.

Transitions can do some nifty things, but most of the shows I’ve done have not been the kind of situation to use anything fancy. A simple fade in and fade out are the most common. The Inspector in Keynote has a tab called Slide which has the effects for how that whole slide changes to the next (applying a transition affects how you go OUT of the selected slide). An important concept is that you can set transitions for the whole slide, or for elements within the slide. If you can’t get it to do what you want, this may be the problem. When you set the transitions, make sure you know if you’ve selected the actual slide or a part of it.

Say you have a slide with a picture-within-a-picture. You can have the larger picture be displayed when the slide starts, but the inner one appears later. To do this you select the element you want to change and go to the Build tab. If the Build options are grayed out, you need to select the object you want to apply the effect to by clicking on it. There are too many options to go into, but you can set the action to occur either by a certain number of seconds’ delay, or with another button push. The timed ones are great if you want to fade the image with a light cue for instance, but if you want to cue it yourself you can control it with the button. You can build in and out of an image, and can set multiple builds per slide and the order in which they happen. I’ve only ever needed to scratch the surface of this feature, but it can do some pretty cool things.


« Newer PostsOlder Posts »