HOME

April 13, 2009

Bag Review: Booq Python Pack

I call this: bag reviews,computers,mac — Posted by KP @ 4:13 pm

It all started under the truck. This is me, in St. Louis, being cute and acting like I’m pulling the truck. Oh, so funny! What a great Facebook picture! But this fun Facebook picture did not come without sacrifices. As we had just left the bus, I had my usual computer backpack on my back, and I specifically left it on for this picture, hoping it would sort of look like I had some kind of harness on helping me to pull the truck. Well what ended up happening was that all the grease under the trailer (which I assume is what makes it able to slide onto the tractor so easily) got all over my bag. I mean all over. If you have not crawled around under a truck, I don’t think you can conceive of this much grease. At first I thought my bag might be a total loss, but over the two or three days in St. Louis, I decided to clean it, with a variety of products suggested by my colleagues. I had some success with dishwashing detergent, but the bag was still stained and vaguely slimey. I bought a cute Jansport sling-style bag in the college bookstore to use until my bag either dried out or was given up on, and while I’m glad I have that bag for other uses, it was never big enough to replace my primary computer bag (which was a Victorinox laptop backpack that I can’t even find a picture of anymore.) My bag had these kind of cool rotatable straps that were connected to a flexible plastic plate inside the bag. The plate had started cracking, and I was growing concerned that one day the whole thing might crack off and the bag would become a useless pile of jello. So I was starting to keep my eyes open for a suitable replacement. You may know, I’m a bag whore — I’ll buy a bag for any specific purpose or situation, but my computer bag almost never satisfies me, because it must be able to do everything. So I stick with the same one for a long time, not because I’m being frugal or rational, but because I rarely find one I find acceptable for such an important job.

All this to say, this is not just any bag review of some bag I saw that I thought might be cool to try. This is the decision to replace the bag, the one that in a few cubic inches allows me to bring my stage managementy goodness wherever I go — safely, comfortably, and with the ability to fit and organize every item that I deem must be with my person at all times.

Needless to say, I did a lot of research. One major factor that immediately excluded a lot of bags is that I refuse to buy a bag with a dark or black interior. There is no good reason that the interior fabric of a bag should make it difficult to find things inside. There aren’t that many companies that take this seriously, and Booq stood out as one of the few that had an obvious understanding of the benefit of a brightly-colored interior.

Booq is a small company that seems to aim their products at Mac users without exactly excluding others. I’m guessing the reason for this is that their M.O. seems to be that they make really really expensive bags. Really nice, really thought out, really expensive bags. And the mentality of the average Mac user is probably more in line with that philosophy of “Yeah I spent a whole lot of money on it, but look, it’s awesome!”

They seem to have a lot of cool bags for different purposes. What I wanted most in mine was capacity and organization for lots of small accessories, while not being too huge for my small body. I found the Python Pack most to my liking. It’s designed for photographers, and comes with a matching camera case that has dividers which can be arranged to fit camera, lenses, and other accessories, and then the whole case slips into the bottom of the main compartment. The idea as best I can tell is that you have your laptop, accessories, memory cards, and camera gear, and then a little room for some extra stuff. I wasn’t so interested in the camera bag, but the size of the spacious compartment, and the many pockets and slots for storage appealed to me, so I gave it a try. Because it doesn’t seem to be carried in stores, I had to make something of a leap of faith. Thankfully, I ordered it from ebags.com, who I’ve always had good luck with, and who happen to have a generous return policy, so if I decided that this bag I paid $300 for, sight unseen, was not the perfect bag for all my needs, I could return it.

Due to my laptop dying on me, it’s taken me longer to finish this review than I had intended, which is good because I have had more time to truly live with the bag. I am still completely happy with my purchase, and this is definitely going to be my main bag for a while. Now on to the details.

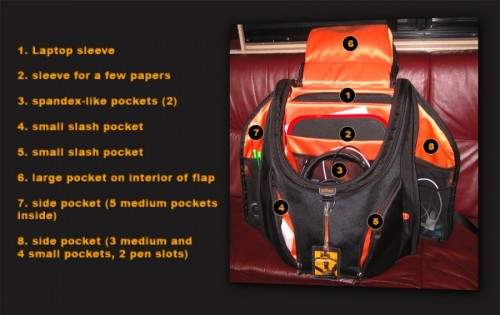
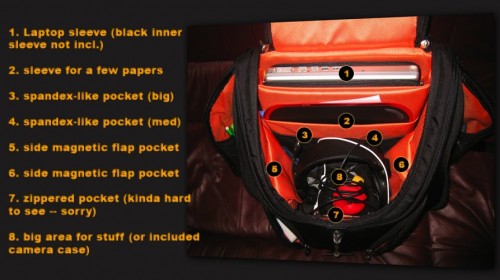
List of Pockets and Compartments
I’m a little too happy to have Photoshop back, so I made a fancy list. Do you hate me? I hate me a little. Click for full size.
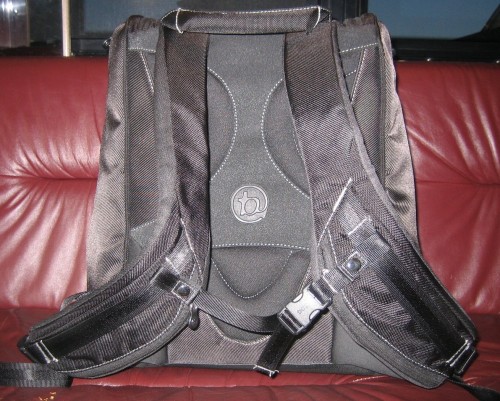
I didn’t get so fancy for this one. There’s just a pocket on each shoulder strap. Because the straps get bent around your body, I wouldn’t really advise putting anything in them that might not like getting bent. I usually keep gum in them. It would be good for an iPod smaller than an iPhone.
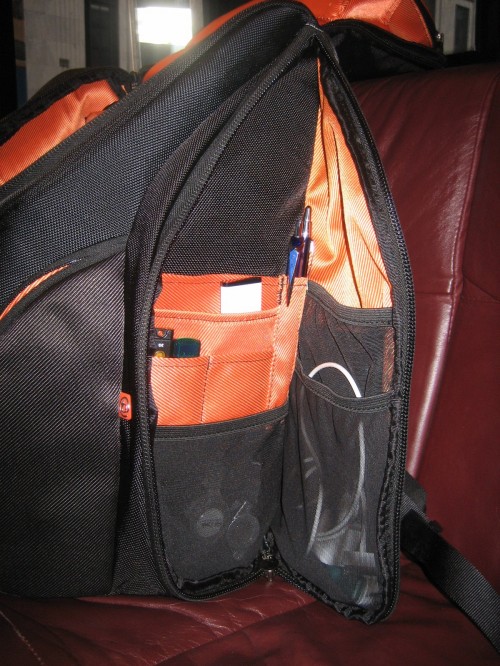
The right-side flap has a lot more little pockets than the other side. I keep things like my computer’s remote, a few thumb drives, my camera (not shown unfortunately because I was taking the picture with it), and some assorted cables. There are two pen slots, but neither is big enough for a chunky pen or pencil, and one of the slots is really only appropriate for a standard #2 pencil. As a stage manager and fan of mechanical pencils, this is pretty useless.


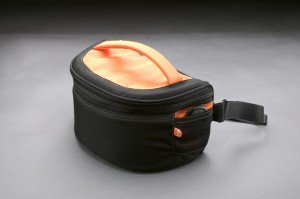
Basic exterior view. Henry V luggage tag not included!
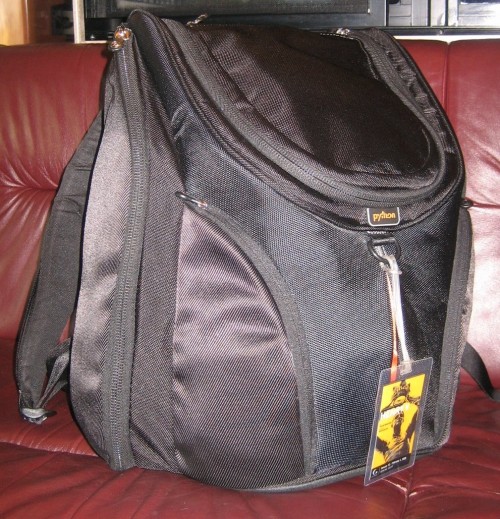
PROS:

  • Very nice quality construction. The fabric, zippers, seams and pockets feel sturdy. They’re also kind of sexy. The spandex-like material on some of the pockets, which is also functional for its elastic effect, and the magnetic closure on the flaps inside the main compartment, are just pleasant to use.
  • Rubbery base, which wraps around onto the back. It not only protects the bag from whatever may be on the ground, it provides a little traction on the back to keep the bag from sliding around.
  • Orange interior — easy to find things. Unfortunately the large side pockets have a partially black interior, which sucks a lot, but I suppose due to the construction of the bag it probably couldn’t be avoided.
  • It has waist and sternum straps — and just as important, they are removable. I use the sternum strap a lot. I originally took it out on the road with the waist straps stowed in a pocket. But since I never used them, I now travel without them altogether.
  • Comfortable straps
  • CONS:

  • Overall most of the pockets are too tight. What I mean is there are tons of pockets, but it doesn’t feel like much thought went into what happens when there are contents in them. Suddenly they are very small and many of the little pockets overlap, so when one is filled, the one in front of it becomes almost impossible to get anything into. This is helped a bit by the fact that many of the pockets are made of a spandex-like material, so they expand when things are in them. The ones that are not made of this material have very little give.
  • The two slash pockets on the front are so thin, small, and strangely shaped, I’m not sure what is intended to go in them. Right now I have my business cards, a pack of gum, and my Advil/Tylenol box.
  • The camera case is too big to get in and out of the bag easily.
  • Camera Case
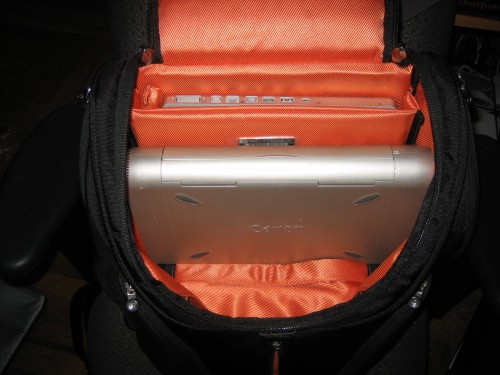
    The camera case is really too big for the bag. Even with all the interior pockets empty, the case has to be forced just to get through the opening of the bag. Also, it’s too tall to have it sitting in the bottom of the bag and still be able to get a binder upright above it (you can kind of fit one diagonally, but it’s awkward.) I try to travel with my script in my bag as little as possible, but to be unable to makes me uneasy. While experimenting with this, I discovered that my printer (Canon i70) does indeed fit sideways in the bag, just barely, which helps justify using the camera case in certain situations. Case, printer, script and laptop is never going to happen, though.

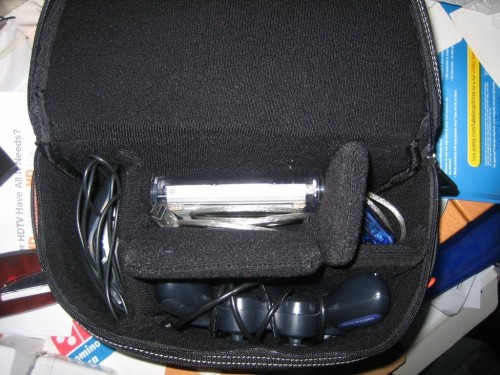
    I’m not a photographer, so I really had no use for the case, but I thought it might be fun to play with the provided partitions and use it to hold other goodies of an electronic nature. It holds most of the gaming peripherals I travel with on the road: mouse, USB hub, and gamepad, as well as my backup hard drive. I brought the case on this leg of the tour, and it was a stupid idea. It takes up way too much space for its usefulness. Keeping it in the bag on a daily basis is not a good use of space, and the important stuff, like my mouse and backup drive, live perfectly well in the pockets within the main compartment of the bag itself — pockets which ironically can’t be filled when the camera case is in the bag.

    At any rate, the case would definitely be useful to bring along in more casual situations where I would not need to carry a binder. For an overnight trip, for instance, there would be just enough room left in the bag for some clothes and other small items.
    Here’s how I set up the dividers for my HD and gaming stuff (that’s mouse on the left, HD top center, USB hub upper right, and gamepad at the bottom.)
    Below is a picture of the bag with the camera case in it, and my printer on top.
    Commuter Report:
    My first commute with the bag went surprisingly well. All I had in it was my laptop and the accessories I permanently carry (which is a lot of stuff). The bag was very well balanced, and as a result felt much lighter than it was. My morning train was pretty packed — I got a seat, but I was crammed in, so it was a good opportunity to check how well the bag can be contained on one’s lap without spilling over into someone else’s personal space. While it is much more rigid than a normal backpack, it can still be squeezed into a smaller footprint if need be. The sturdy handle on the top is also nice. It’s big, padded, and strong enough to really be used to drag the bag around with a lot of heavy stuff in it.

    World Traveler Report:
    The bag has been nice to fly with. Again I was nervous about the fact that it’s kind of rigid, but I have found it fits beneath the seats of every plane I’ve been on, including some tiny puddle jumpers. On a couple it has been really tight, though. It does fit in the overhead compartments well, too, if you can tame the straps from going everywhere. When I fly I tend to take the little tiny electronic crap out of my bag as much as possible so the TSA people don’t freak out and have to look at all of it. On my first flight with this bag, I didn’t really do that, and sure enough it had to be hand searched. But because there are enough pockets for everything to have its proper place, that didn’t take long.

    Work Report:
    I really love the fact that the bag naturally stands upright. It just makes getting into it easier. The rigidity is also nice since you don’t have to dig around, everything is exposed. I keep my laptop charging cable in the inner pocket on the flap, which makes it very heavy. When the bag is largely empty and the charger is still in the pocket, it does have a tendency to fall over, but that probably serves me right for packing it that way. The handle on the top is very sturdy for wrestling with the bag and dragging it under my desk, into the junk bunk on the bus, or anywhere I need it to go.

    In Conclusion:
    I have no regrets about buying this bag. It’s very expensive, but so far it’s been worth it, as I haven’t seen another bag that meets my needs so well.

    And finally, here’s a view of the bag carrying a theoretical load of two large scripts, my printer, and computer (for those who really care about the distinction, that was my 15″ Powerbook standing in for the picture, my Macbook Pro was busy doing something — it’s a little bit longer and thinner than the PB.) You can also see one of the padded inserts that comes with the bag, so that it can fit Macbooks from 13″ (where you would use both pads) to 15″ (with one pad) to 17″ (no pads needed).
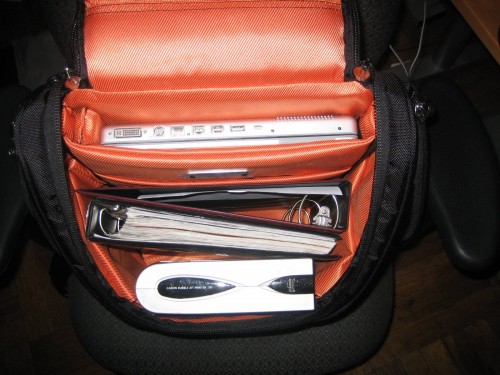
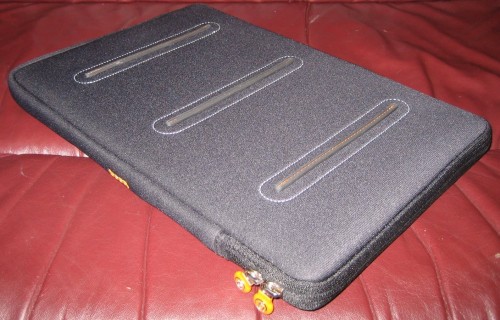
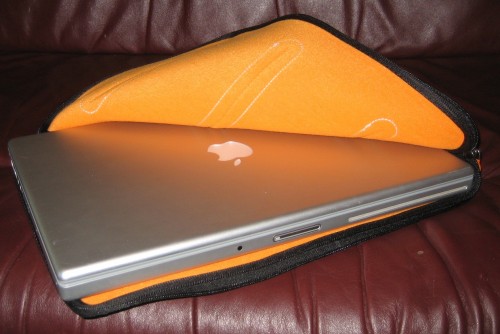
    You can see in some of the other pictures that I have an inner sleeve in the laptop slot. That is one I just bought, also made by Booq, although it’s not particularly marketed as an accessory for this bag. It’s their Taipan Skin sleeve, which comes in a couple colors. The black one pretty much matches this bag. It has three little rubbery stripes sewn on it, which give it a little more protection and grip. The zipper wraps around two sides of the bag, so you can take the computer out horizontally or vertically. There are also two zippers. I have the medium model, designed for the 15″ MacbookPro. If you’re curious, Booq makes it clear that it fits both current (unibody) and previous-gen MBPs. Mine is previous-gen, and the fit is very snug, but not too snug. I don’t have a current-gen model to test it with, so I can’t say for sure how it would fit, but I’d guess it wouldn’t be swimming in it. It’s a little tight to just slip the computer in when it’s inside the laptop slot in the bag, but I like traveling with a sleeve because it allows me to carry the laptop around by itself with some protection, when it’s overkill to take my whole bag, such as running into the theatre for a minute from the bus, or going up to the booth during a show.
    April 3, 2009

    On Apple Repair

    I call this: computers,mac — Posted by KP @ 3:29 pm

    I am typing this from my Macbook Pro. If you’ve been following my continuing adventures, you will know that last Friday, a week ago, a day that will live in infamy, I opened my computer at the theatre and found that the graphics had crapped out. This was in Phoenix. Since we were leaving Phoenix Sunday, I decided to wait until we arrived in Tucson on Monday (which also has an Apple Store) before taking my poor electronic friend to the Genius Bar to see just how screwed I was.

    Monday morning at 11AM, I went in, and was saddened to be told the logic board needed to be replaced, and inconveniently, this graphics failure doesn’t happen to be the same Nvidia graphics failure that would have offered me a free out-of-warranty repair, it’s just one that looks exactly like it. Now I’ve heard horror stories of logic board replacements that cost more than a new computer. I was really surprised to be quoted about $350 for said repair. Considering I don’t even like the current version of the MBP (mostly due to the glossy screen) I was far happier to pay a relatively small amount to get my current computer back rather than have to buy a newer one. So I counted myself lucky, and bid farewell to my friend for a while. Because we’re only in Tucson for a week, and the repair was estimated at 4-6 days turnaround, I felt it unwise to have it sent back to Tucson, so reluctantly I gave the Acting Company’s office as the return address. I expected it to arrive today (Friday) or maybe Monday, and then I would pick it up first thing Tuesday morning when I got home on vacation.

    Then yesterday morning I awoke around 9AM, and grabbed my now-incredibly-important iPhone off the nightstand to check my email. I had an email from our office manager in New York, saying my computer had arrived, and did I want it shipped out to me, or would I pick it up? Well I had every intention of keeping it simple and picking it up when I got to New York, but I never imagined it would be there Thursday morning. I counted, “Friday, Saturday, Sunday, Monday, Tuesday…” and made a quick calculation that perhaps the cost of overnighting an object of such value, while excessive if it were anything else in the box, might be worth the benefits of having my computer for four and a half days when I otherwise wouldn’t have it. So I asked for it to be sent to our hotel, and it arrived during our morning matinee. So far everything appears to be fine, although it’s hard to tell because the internet here at the Hotel Arizona is an embarrassment to the entire hospitality industry.

    Anyway, I have never had a computer so utterly crap out on me in my life (well once, in 1993, and it was a Packard Bell, and it sucked). It has always been my absolute nightmare to have such a catastrophic failure while out on the road. And I am so impressed at how smoothly the process went to get it fixed, at every step of the way. Like most things Apple, it just works. Make an online appointment at the Genius Bar, show up, they tested it on site, took some basic information, and sent it off for me. I see now from my receipt that came back with the machine, the repair center in Texas received it the following day, and repaired it that same day. Two days later it was in New York first thing in the morning. For a computer out of warranty to need the replacement of its most essential part, and to be processed so quickly, and have it only cost about $350 including tax, is pretty amazing. I hope never to have to go through it again, and I know there are horror stories out there, but I feel really good about how it all went, and God forbid I should ever have something like this happen again in my computing life, I will at least feel like Apple will make the process go as easily as such a huge inconvenience can be.

    So now I’m back, and can get about the business of catching up on my tour blog, and my big review of my new computer bag.

    Oh, and P.S. — bravo to the iPhone. I can’t believe a person as geeky as myself could survive for a week without a computer and not go completely insane. This was only made possible by the fact that the iPhone provides so much of the essential connectivity that a person such as myself relies on. It can’t do everything, of course. There were things that I had to borrow Nick’s computer for, such as doing the show report, blogging, and other things like paying my credit card bill, that I just felt better about doing on a full computer. But for email, calendar, Facebook, keeping my Flickr photos updated with my traveling adventures, reading emails and documents, podcasts, my phone was sometimes a little more cumbersome, but it allowed me to continue doing most of the things I needed to do. The quality of Safari on the iPhone is also pretty amazing. Although it doesn’t support all the more advanced functions of certain web pages, and can be unwieldy to use with pages of unconventional layouts, I was surprised at how many pages I was able to use that I figured would just not work. It wasn’t always pretty, but when I had no other option, I was glad just to be able to keep running my life at all.


    March 31, 2009

    The Ongoing Adventures of a Geek Without a Computer

    I call this: computers,mac,On the Road Again — Posted by KP @ 10:24 am

    Day 5 without computer. The 4″ iPhone screen is feeling extremely claustrophobic. I don’t mind it so much for reading web pages, but for any page that requires input and typing (blogs, forums, etc.) it can be really frustrating to use, and usually doesn’t render properly.

    I’m currently using Nick’s Macbook. It’s load-in day, and we’re basically done after an hour, as usual. So I’m grabbing this opportunity to bogart his computer once again. It’s kind of comical how many copies I have of my “TAC” folder with all the show stuff in it. It’s still on my computer somewhere out there in the bowels of Apple repair world, it’s on my backup drive, on Nick’s computer, and on two thumb drives. The only thing left for me to do would be to hide the two thumb drives in different places — like put one of them in my suitcase. Which is probably a good idea since normally all three of my thumb drives live side-by-side in my computer bag (which I suppose should now be referred to as “bag”).

    We’re loading in in Tucson, where the Arizona Theatre Company has another venue. A lot of the department heads are the same folks we worked with in Phoenix, so it’s been very easy. The theatre is not quite as fancy, but it seems very nice so far. I took some video of our truck driver, Scotty D., backing the trailer at a crazy angle to their loading dock.

    Well I must move on and do all the other things that one does while one has a computer.


    March 29, 2009

    Technical Difficulties

    I call this: computers,mac — Posted by KP @ 11:56 am

    Greetings from Phoenix. My beloved Macbook Pro has had a graphics failure and is pretty much out of commission (I think and hope it might be the known failure of the 8600M which would mean it’s still covered under warranty). This has happened before.  Last time it magically fixed itself on the morning I was to bring it in to the Genius Bar.  We shall see.  I have an appointment at the Apple Store in Tuscon tomorrow.

    The computer is completely functional except that the internal and external displays don’t work.  I’m actually typing this on it now, by screen sharing from Nick’s laptop.  Like an idiot I had turned screen sharing off about a week ago, and had to do some Terminal hackery to enable it through SSH.  I don’t know much about unix, so that made me feel pretty damn cool.

    Anyway, as the only way I can access my computer is by borrowing someone else’s, I’m pretty much restricted to necessary purposes, so I may not be blogging much for a while.  We are home in a week, so whatever happens, I’ll have my PC and my poor Powerbook, which surely can’t withstand another tour.  Or can it?


    July 12, 2007

    New Discoveries

    I call this: computers,mac — Posted by KP @ 9:11 pm

    iGlasses
    Have you heard the news that the new Macbook Pros have a 1.3MP camera in them? Very exciting to get something you didn’t know you were getting. Doesn’t look like any apps can take advantage of that yet, but surely it’s a sign of better things to come. The test app mentioned in the link is now available for download to be played with by all. You can see the video is quite slow, so some work will have to be done to make real-time video at this resolution practical. But if you just want to take a better snapshot with your camera, you can use this little app and have it saved to the desktop.

    All this talk about the camera drew my attention to an app called iGlasses. I hadn’t yet gotten around to digging up the best apps for camera-having Macs, and I think this one is a keeper. And at only $8, the improvement in picture quality is more than worth it to me. The terrible single-source florescent lighting in my summer apartment has made for some very dark video chats, and iGlasses’ “enhanced” setting immediately improved the brightness to a normal level. It also features some funky options to entertain or annoy your chatting partner, depending on their perspective.

    Using Protection
    My assistant at Reagle has, as long as he’s had his iBook, sworn by using a protective sheet over his keyboard to prevent finger oils from getting rubbed on the screen, and to keep the keys from pressing into the screen and leaving permanent marks. Personally I’ve always felt I was too busy to deal with such a thing, but this probably stems from the fact that my Powerbook had the “white spots” flaw, which began to show itself after two or three weeks of ownership, and I figured there was nothing the keys could do to the screen that would make it look any worse. Four years later, the screen has a full representation of the keyboard imprinted on it, which I can really only see when it’s off. One day during rehearsal I was sitting in the lobby with the MBP, bathed in sunlight from the courtyard, and saw the faint outline of the very edges of my keys on the screen. It’s one thing to let a defective screen go to hell, but this machine is being very good to me, and I was not treating it with the respect and care it deserves. I stopped at Staples on the dinner break to get some screen cleaner spray, and vowed to get to the Apple store as soon as I could to buy a proper cover for the keyboard.

    You know every Apple laptop comes with a thin piece of foam that covers the keyboard during shipping. Some people keep this and continue to use it. But really, part of the experience of being a Mac owner is spending a bunch of money on a piece of cloth, secure in the knowledge that this is the only piece of cloth ever professionally manufactured specifically for the purpose of covering the keyboard of your machine.

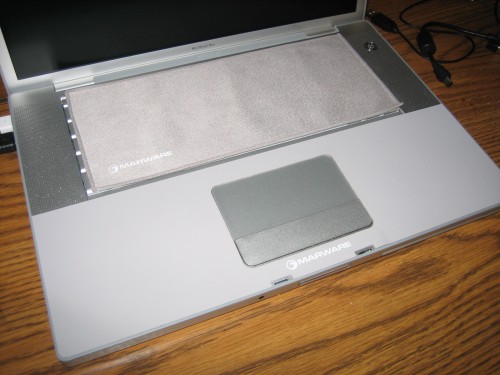
    This miracle device is included in the Marware Protection Pack. It’s a piece of cloth. It’s the size of the keyboard, except it’s actually not. It would need to be a millimeter or two wider to be perfectly sized. But it’s made of microfiber, which means it can also be used to clean the screen. While it’s bigger than the microfiber cloth I normally carry for this purpose, at least it means I no longer have to carry that and keep it clean.

    Also in the Protection Pack is a leathery protective sticker that covers the whole wrist rest area. I worry about my wrist rest because I have a metal clasp on the bottom of my watch (which I’m generally careful to keep elevated off the keyboard), and my PB has pitting on the aluminum where my right hand sits when using the trackpad (over the CD slot), and on the trackpad button. While I see this more as a testament to the hard work this machine has done, it’s definitely not pretty. Based on my research, I decided the only thing uglier than the pitting was the Marware wrist rest cover. On a Macbook, especially a black one, the color of the laptop and the wrist rest might blend in. But there is a big difference between bare aluminum and a gray leathery thing. How could I make my MBP so ugly for its whole lifespan in the name of preventing it possibly becoming ugly years down the road? Unfortunately while Marware does sell the keyboard cover separately, the Apple Store only had them in the combo pack for $20. I decided since I was worried about the wrist rest it might be worth having the protective sticker just in case. I put the thing on just for kicks, and this was the result:

    It looks as professional as it can under the circumstances, although again it’s not quite cut right to fit the trackpad perfectly. I played with it for a few minutes, took some pictures, and then closed the screen. It wouldn’t latch. Maybe because of the four teeny-tiny bumpers around the top of the screen, maybe that made it just a little too thick. I don’t care why. After several attempts to press the lid down, I pulled the sticker up and stuck it back on its backing and put it away. This to me was final confirmation that it’s simply unnatural to cover up a MBP like that, and I will take my chances without it.

    I was also interested in this trackpad protector. I’ve never had a problem with a trackpad, but as I said my PB’s trackpad button is all messed up. It was reported to be basically invisible (it’s on in that picture above), and it is. However, I did have a lot of trouble with the trackpad response. I have seen reviews saying it’s fine, and some saying it’s less responsive. I had trouble adjusting, but then again I had a lot of trouble with the MBP’s trackpad when I first got it and now have gotten used to it. I didn’t give it much time, not even a full day, before removing it. But I kept the button cover on, and saved the trackpad cover. The box actually comes with two of each, which is nice of them.

    So after all that I am still using the keyboard cover and the protective sticker on the trackpad button, and I feel like I’m doing my part to keep my MBP in good condition.


    June 27, 2007

    The Life of a Retired Powerbook

    I call this: mac — Posted by KP @ 8:39 pm

    My new Macbook Pro has received lots of interest and attention from blog readers and real-life friends alike. But what of the faithful old Powerbook that was so unceremoniously upstaged on the morning of the MBP’s release?

    When I was planning my summer, I was aware that in all likelihood I would be returning home with two laptops, which is kind of inconvenient for someone who likes to travel as lightly as I do. My solution was that I would have to ship some stuff home on the day I left, mostly soft, durable, low-priority items like clothes and scripts, so that I could carry all the delicate computer stuff by hand on the train. You may recall that I had to make a quick trip back to New York on my day off during the run of Singin’ in the Rain. This would have been the perfect opportunity to solve my problem by bringing the Powerbook and its accessories home.

    But I just couldn’t do it. One reason was professional: the Macbook Pro, little more than a week old, was running projections for Singin’, which I considered a risk in itself, only tempered by the fact that my trusted Powerbook was kept loaded with the current show file, and was standing by. Well it seemed like a risk, until I had 4GB of RAM overnighted to the theatre and we saw the MBP run a massive video file with no stutters or digital artifacts. The next day I was given a DVD full of new versions of every video in the show, using a higher-quality codec, eliminating all artistic concerns about the movies looking too digital in a show set in 1927. The Powerbook could never have run the final show file, but still I was not about to take it back to New York when there was a slim chance of it being needed to rescue us if the MBP completely flaked. I could have thrown together a lower-quality version that would have run well enough to at least allow the show to go on. Thankfully the MBP did fine, although it sometimes required an especially firm press on the space bar to advance to the next cue, which would have been a huge problem in a show with more precise video cues, and I’d like to investigate that further.

    The other reasons I had for keeping the Powerbook around were more personal. First of all, I wanted a pretty clean start with the MBP and was selective about the files I transferred over from the PB. But having had the MBP only a week or two, I had the nagging feeling there were still files on the PB I would need, but I might not realize it right away.

    The one thing I was looking forward to about getting “stuck” with both computers all summer was that I could leave the PB at the apartment to record TV programs using my EyeTV. The EyeTV is useful for watching TV when I’m home, since I don’t bring a physical TV with me to Reagle, but the recording features don’t help me much, since if I’m at rehearsal, my computer is with me and unable to stay home and play VCR for the night. With the Powerbook in retirement, it has nothing better to do while I’m out of the house. The other thing I’ve discovered is that my EyeTV seems a little buggy with the MBP. I still use version 1.x of the software, because they wanted some ridiculous amount to upgrade, like $50, when I was perfectly happy with the present features. As it turns out, it looks like the version I have predates the Intel Macs, which might explain why it’s flaky. I’ve been thinking of getting some newer EyeTV hardware, like the little tiny USB thingy, so I don’t intend to pay for a software upgrade when I could get a better value by having it included in the cost of improved hardware. So the PB has continued to be my TV, which is nice because it frees me up to do other things with the MBP without using up screen real estate or system resources, and I can restart or boot into Windows without losing my TV.

    Other things the Powerbook continues to do:

    • It’s writing this post right now. I was backing up my MBP when I got the idea for this post, so I started writing it on the PB. The files are not yet too out-of-date from the MBP, so most tasks feel exactly the same on either machine.
    • I have a perhaps unhealthy ability (or need) to multi-task, and I like to have two computers on at once if one is doing something where I can’t keep a browser window open. This allows me to use the idle computer to browse the web while waiting for the primary computer to complete a task, or to search for solutions to issues I’m having with the other machine.

    I said on the day I got the MBP that once I loaded it up with my files I hardly felt like I was using a different computer. For the most part it continues to be that way. These are the occasions that I notice it:

    • When I try to do something really simple on the PB and it beachballs, or gives no reaction at all for several seconds, then beachballs, then finally completes its task while the hard drive cranks in protest.
    • The trackpad scrolling. This one confuses the hell out of me. I’ve always had trouble getting the hang of the two-finger scroll when I’ve played with other people’s Macs, but now that I’ve been using it full time I find that I’m quite good at it, although I do sometimes scroll slightly horizontally when I don’t mean to. I’m also no longer bothered by the wider trackpad and button, or at least not enough to notice it. But now that I’m used to two-fingered scrolling without thinking about it, I inevitably hop onto the PB and can’t figure out why it won’t scroll. I’ve gotten so comfortable with the new scroll that I don’t even consciously know I’m doing it. Then when I look at my position on the desk and remember that the machine on the left is the PB (the hardware differences are subtle enough that I really don’t notice them when I’m using both machines), I see my problem and attempt to do the SideTrack-driven edge scroll, and I realize how annoying it is to need to feel for the edges, instead of just throwing two fingers down anywhere I please. Then of course if I spend too much time on the PB, I go back to the MBP and can’t figure out why I can’t get it to scroll by dragging one finger down the edge. I can’t win. I wish someone would come out with a driver to make either one behave like the other so I can have some consistency!
    • I swear something is different about the keyboard. I don’t know what it is, I can’t see it from a casual look, but when I first got the MBP I kept making typing mistakes, as if a couple keys were not exactly where my fingers expected them to be. I don’t do the real touch-typing method of keeping my fingers on the home row at all times, I just know where all the keys on a given keyboard are and somehow decide which fingers are most convenient for hitting them at that particular time. I’m a fast typer (thankfully I’ve never had the kind of job where it was necessary to give my typing skill a numerical value), but I tend to be slower on an unfamiliar keyboard because I don’t actually touch any of the keys except the ones I’m pressing, so if I misjudge my location in mid-air over the keys I don’t have any way to tell until I hit the wrong button. When I got the MBP I started making more mistakes than I would on the PB, and now using the PB again I find I’m making more mistakes than I do now that I’ve been using the MBP for a while. It’s subtle, but I swear something is different. Mostly what’s happening is that my aim is slightly off and I don’t hit the key hard enough or in the right place to make it register. Maybe it’s not the location or size of the keys. Maybe it’s the travel, or the tension, or the size of the wrist rest area in front, or the fact that the PB is thicker, and therefore elevating my wrist a little higher off the table. I don’t know, nor does it bother me very much, but I do notice it when switching back and forth.
    • The higher screen resolution of the MBP was at first more subtle than I expected it to be. It’s when going back to the PB that I notice things take up more of the screen — sometimes in a good way, like when text is bigger and easier to read, but sometimes in a bad way, like the menu bar and tool bars in apps taking up more screen real estate. I don’t mind the smaller objects on the MBP. The brighter screen makes up for any need to squint, in fact I find myself squinting and putting my face close to the PB, which you would think would be the opposite.
    • Working with the lid. I’ve got one of those original Aluminum Powerbooks with the white spots and the bad latch. I won’t count the white spots, as I consider that cheating, but since the latch is not just a defect, but a change in design from one latch to two, I will mention it. My PB has never wanted to stay closed. If left to its own devices, it would be waking itself from sleep every few seconds when in a bag or carried by hand, or in any sort of motion, which can’t be good for it, not to mention what it does to the battery. I let it do this for a couple weeks when it was young, before giving it the terminal command sudo pmset -a lidwake 0, which tells it that it can’t be trusted to know when its lid is open or closed, and it is hereby instructed to wait for me to press a key before waking from sleep. This solved the problem quite well, but when faced with the MBP and its very authoritative double latch which leaves no doubt that this notebook is now closed, I decided to leave it at its default setting with lidwake on, and see if it annoyed me for any reason (like maybe there would be times I’d want it to stay asleep after I open it). So far I like being able to open the lid and have it wake up right away. I have my machine set to ask for a password upon waking, so it requires some key-pressing either way. It really doesn’t make much of a difference to me, but it’s very nice — and to me still unexpected — to close the lid and feel it lock securely instead of bouncing back open. Part of this is the defect with my particular revision of Powerbook, and part of it is the improved design of the MBP which used two latches on the 15″ models for a much more secure feel.

    I’m not sure if I’ll keep it when I finally return home from the summer. I’d like to, it would still be useful around the house, but my parents could also use a new computer. If you think this PB is obsolete, you should see their iMac. With a new battery the PB would work well for their needs. I’ve been getting more and more annoyed with it (and frightened of it suddenly having a massive hardware failure) in the last year or so, but in the end it’s really amazing that it’s held up so well and in many ways can hold its own on the same desk as the very latest model sporting more RAM than any laptop really has any business having.

    Enjoy retirement, Powerbook. You’ve earned it.


    June 20, 2007

    The Macbook Pro and Windows

    I call this: computers,gaming,mac,pc — Posted by KP @ 9:19 pm

    One of the reasons I was originally excited about Apple’s switch to Intel processors was the prospect of running Windows at a reasonable speed on my Mac. I have always owned Virtual PC as long as I’ve been a Mac user, just because every now and then I’d find something that absolutely couldn’t be done without a PC (not your everyday tasks, but things like flashing a hacked ROM onto my cell phone). The one thing I use Windows for on a regular basis is gaming. I have a gaming PC (which I swear one of these days I’ll actually make a post about), but since my primary computer has to be a laptop because of my job, and a Mac because of my sanity, the prospect of taking my games with me was previously an impossibility.

    When I first switched to Mac I tried to like the games, but the selection is limited to only the few most popular PC games, and they usually aren’t released until long after PC users have tired of them and moved on to something better. I knew this going in, but what distressed me even more as I came to own more Mac games, is that the few ported PC games there are are usually terrible ports. They’re buggy, they’re slow, and in general don’t play as well as the PC version. And from what I can tell, the developers don’t care, because there’s no competition (it was basically Aspyr and Macsoft), and so few people playing the games that it really doesn’t matter. If the same problems existed in PC games there would be a patch out immediately. So I quickly got tired of throwing my money away on such crap and decided I would be better off building a PC and having access to all the games I wanted, I just couldn’t play when away from home.

    Having a Mac laptop running Windows fast enough to play games is something I’ve been looking forward to as long as we’ve known about Apple’s switch to Intel. So now that I finally have one, I’ve been catching up on all the options available and playing around with it. I knew that Boot Camp was the best method for running games, because it addresses the actual computer and all its resources, but I knew I’d also want virtualization software so that I could quickly access Windows while getting actual work done. Parallels was the first to come out with a solution, and I didn’t really become aware of VMWare’s Fusion until I began seriously researching this after buying the MBP.

    I was stupid when packing for the summer and didn’t bring my Windows XP install disk from home, even though it was obvious I’d be getting a MBP at some point over the summer and would need this to install Windows with Boot Camp. I did have Virtual PC running on my Powerbook, and was happy to find out that VPC disk images can be easily converted to run on Parallels. So that’s how I first tried Windows on the MBP, running my old VPC image. It was certainly fast enough to feel like a real computer, not like the slow-motion experience of running VPC.

    About a week later, I had my XP disk and some games from home sent up to me, and installed XP under Boot Camp. The install software will guide you through the process of partitioning your hard drive to make a partition for Windows. Thankfully, you can do this without erasing the whole drive. Here you have a couple choices to make. First, the size of your partitions. I picked 20GB for Windows, as I don’t really want to take too much space away from OS X, but I think 20GB will be enough to install a decent amount of games, which is all the XP partition will really need to hold.

    The other decision is one I wasn’t expecting: you have to decide if you want the partition formatted in FAT32 or NTFS. I know from my Windows experience that NTFS is better for XP because it allows more advanced security features like encryption, and in general is better for stability. However, the installer warns that NTFS is not good if you want your Mac OS to be able to read the files in the Windows partition. This concerned me, since I wasn’t really sure what they meant by that. Much Googling was done before I proceeded. I still don’t fully get it, but what I found pointed to NTFS as the better choice. Apparently it works much better in Parallels as well, which is the main way I intend to share files between the two partitions. I assumed that the incompatibility was that I could not directly open files on the Windows partition by clicking on the volume in the Finder and navigating like I would any other disk. Well it turns out that you can access files on the disk, but it’s read-only. So to move files from OS X to Windows I need to drag them into Parallels.

    By the way, you will wind up with the Windows partition visible as a volume in the Finder. At first I found this kind of annoying because I don’t really want that partition anywhere in my life if I’m not actively using it, but it’s growing on me. The biggest realization I had about the Boot Camp method is that when I back up my hard drive, backing up my OS X volume does not back up Windows. If I were using a Parallels virtual disk, one backup would cover everything because the Windows content would just be a file within my OS X files. Now I have to do two separate backups, so I partitioned my backup drive the same way, with a 20GB partition to back up the Windows volume. Part of me doesn’t give a damn what happens to the Windows partition and some game files, but I guess it can’t hurt to back it up once in a while.

    I used my product key for a copy of Windows that I no longer use, and it activated and all was well. Using the driver CD that Boot Camp has you burn, I installed the drivers for the MBP with no problems, and all my hardware seemed to be working, and I was on my Airport network quickly. As Steve Jobs said in his WWDC keynote, when Leopard comes out it will have Boot Camp included and the drivers will be on the install CD so you won’t have to burn one yourself. As long as you’ve got a blank CD hanging around, it’s no big deal to use the current method.

    So with everything in Boot Camp looking good, I rebooted in OS X.
    You can set one OS or the other to be booted into automatically by setting the Startup Disk in OS X System Prefs, or hold Option when you start the computer to choose which one to use.

    Now I went back to Parallels and got rid of my VPC version of Windows. Unfortunately Parallels will not detect the Boot Camp partition and give you the option to import it unless you have no other virtual PCs. So I just deleted the one I had been playing with, and it saw the Boot Camp partition and loaded it up.

    There are two major obstacles to using a Boot Camp partition with Parallels, as far as I’ve discovered:
    1. When you close Parallels you must shut down the virtual computer. You can’t save the state and return right back where you were the next time you start Parallels. This is to prevent you from screwing everything up by trying to access the files from Boot Camp while they are suspended in Parallels. I wish there was a better way around this so that if you primarily use Parallels you don’t have to always wait for the computer to start up and shut down, but I guess the only option would be to never close Parallels. Anyway, Windows doesn’t take all that long to start, so it hasn’t been that bad. VPC used to take twice as long just to restore from a saved state.

    2. Activation. As you probably know, Windows has all sorts of annoying ways to make sure that it’s as difficult as possible for you to use the operating system you paid for. One of the things it does to treat all users like criminals is to look at your system specs and deactivate itself if the specs change too much. On a “real” computer this could mean upgrading RAM, changing your hard drive, video card, processor, motherboard. I’m not sure exactly what it looks at, but if you like to upgrade your hardware you’ll run into this problem. On the Mac this is pretty much unavoidable. When I installed Windows in Boot Camp, it sees itself installed on a machine with 4GB of RAM and a Nvidia something-or-other video card. When Parallels loads the same installation, it uses a virtual machine which tells Windows that it’s running on hardware of lesser specs than my real hardware (because some of my resources still need to be used to run OS X). So it sees a machine with 1GB of RAM, a Parallels Video Driver, and a virtual hard drive, and it thinks (not unexpectedly) that it’s installed on a different computer. So it freaks out and demands to be activated within 3 days or it will stop working. When you go to the website it directs you to, it gives you lots of reasons this might have happened, like maybe you bought the computer used and the guy you bought it from was using a pirated copy of Windows. Not one example assumes you actually are trying to use a legitimate copy of Windows in a manner allowed under the EULA, and that the activation feature is simply wasting your time.

    So I called the 800 number they give, which of course directed me to India. I explained that I was using XP on a Mac and that because I was using Boot Camp and Parallels the activation software saw it as two different computers and was asking for another activation code. I was given no argument from the nice lady, she simply asked if I bought the OS at retail or if it came with a computer, and I said it was a retail copy. Then she gave me a code to put into the activation window, and it happily accepted it. When I got back into Boot Camp, it once again popped up the activation warning, and I was about to lose it. But when I picked the option to activate over the internet, it did its business and obviously got an answer it was happy with, because it activated. Since then I’ve not heard a peep from the activation app. I was pleased to find that the Microsoft rep did not give me any grief for being a Mac user or act like what I wanted to do with my copy of Windows was wrong or strange. I’ve heard others say the same as well, so I applaud MS for at least making that part of this ridiculous process easy.

    I tried Parallels first because I was more familiar with it as the first virtualization program available for Intel Macs. In trying to find out the advantages and disadvantages between Parallels and VMWare, I realized that both programs are so new and developing so rapidly that anything I read was pretty much obsolete because the two apps have been constantly one-upping each other with each release. In fact while I was trying them out over the course of the first week I owned my MBP, both released pretty significant updates. I tried Parallels first and found it just felt a little more comfortable, so when my trials were running out and I had to make a decision, I went with Parallels, but I expect over the coming months the two will go back and forth with who’s got the newest exciting feature.

    Once I got everything installed nicely I began installing some games. One problem I found early on was with Sid Meier’s Pirates, which relies quite a bit on the numeric keypad for its controls. Of course laptops don’t have full keypads, but the usual method is to hold the function key to turn a section of the regular keyboard into the numeric keypad. While this function was working in Windows, it wouldn’t work for me in the game, but I came across something called Input Remapper, which has more advanced keyboard drivers for Boot Camp, including the keypad, brightness and volume buttons, and more. Removing the Apple keyboard driver and installing Input Remapper solved my problems.

    One more tip: by default Boot Camp’s partition will appear in OS X named “Untitled,” which is not a particularly attractive name for something you’ll probably be looking at in your Finder a lot. You can rename it, but you have to do it in Windows. Right-clicking on the C: drive in My Computer will bring up the option to rename it. After that it will display that name in the Finder as well.


    June 18, 2007

    The Macbook Pro and Me

    I call this: computers,mac,summer stock,theatre — Posted by KP @ 1:34 pm

    Since the purpose of this blog (ostensibly) is to discuss theatre and technology, and ideally both at the same time, now I’d like to examine a few ways that my latest purchase can be used to help me in my job in ways that my Powerbook couldn’t.

    The camera

    Last year I was supposed to have a MBP before starting the summer season at Reagle. I had the money saved up, but then the IRS took about half of it, and I moved right before leaving for the summer, and the expenses added up to a lot more than I was expecting. So no MBP for me for another year. I thought I was OK with this, until we were planning the second show of the year, Thoroughly Modern Millie.

    Our director was coming in from California, but we needed to have a production meeting before he could get to Waltham. We bonded quickly over the phone when we discovered we were both big Mac users, and since the Reagle office is not really set up for meetings or conference calls, we decided to set up my Powerbook in the lobby and have an iChat conference, with everyone gathered around the table and him on iChat. This was the first big moment when I said, “Damn it, if only I had a Macbook Pro!” He had an iSight, and if I had only been able to make that purchase, we could have had a video chat instead of audio, which would have been very helpful for seeing who’s talking (since he hadn’t met any of us) and holding up diagrams to the screen. If there ever comes the need to do that again, now I will be able to do it.

    The Remote

    This was round 2 of my disappointment on Millie. I ran the projection of supertitles for the show on my Powerbook via Keynote. It was a big deal to get the 100-ft cable run from the projector over the house, up through the ceiling to the booth (this is now a permanent installation and we will use it again this summer). Unfortunately, the cable was run before tech. In theatre it’s customary for the tech and initial dress rehearsals to be run from one or more tech tables, which are usually just sheets of plywood bridging over some seats in the middle of the house, to form a large desk to hold the light board, communications equipment, and for the stage manager and designers to put their scripts, computers and other stuff on. This allows us to see and hear the show up close as the audience will see it, and be near the actors, director, choreographer, etc. for easier communication. Because the video cable was already run, I had to leave my computer in the booth. The result was that I did all of tech from the booth, which is not the ideal way to learn to call a show, or to run a tech. The director and I both had God mics, and every single thing I said or was said to me by anyone in the house, had to be done over the God mics. We got through it, but I kept wondering if it would have been possible with the remote for the MBP to have had the computer sitting in the doorway of the booth (where the cable was just long enough to put it) and for me to have been at or near the tech table and cued it over my shoulder with the remote. It sounds a little unlikely that the remote would work at any helpful distance, and I never tried it for Singin’ in the Rain. Because there are relatively few, and relatively easy video cues, I just got the asst. sound engineer to run it for me during tech.

    Improved Wi-Fi Performance

    The Powerbooks always had trouble with Wi-Fi because of the metal case interfering with the signal. Somehow the MBP has been redesigned to make this no longer an issue. The antenna is actually in the hinge between the screen and keyboard, which is lower than the old location on the upper edges of the screen, but I guess it gets better signal because the area exposed from the metal is much larger.

    Since I usually don’t work in places with good or any Wi-Fi coverage, this improvement could very well be the difference between broadband or no broadband if I’m connecting to a base station far away in the building, or even spilling over from the building next door or across the street. I’ve rehearsed a number of shows in locations where the signal was intermittent or there was a specific spot you had to stand in to get reception. With this machine I’d probably have been able to sit comfortably at my desk and get a decent signal. I’ve heard a rumor from one of my followspot operators that the magsafe cable actually acts as an antenna for wi-fi, but I have yet to confirm this anywhere else. That would be cool if it did, though.

    Battery Life

    This is a two-part advantage, one part which I will consider cheating. I’d make an unscientific estimate of my MBP’s battery life at somewhere over 4 hours. My Powerbook currently gets about 7 minutes. That’s cheating. But I’m currently writing this on a train, where I’ve been for the last hour and a half, and with my brightness all the way down and wi-fi turned off (but bluetooth going the whole time for internet access, and USB charging my phone), I still have more than half of my battery life remaining (supposedly), and haven’t had to bug the lady next to me to let me use the plug (which is good cause that plug is huge and I don’t think I’d actually ask). The point is, if this model gets better battery life, that’s a big advantage in real-world use when it could mean an extra half hour or more of work gets done.


    June 13, 2007

    The Highest Purpose for Theatrical Projections

    I call this: gaming,mac,summer stock,theatre — Posted by KP @ 9:10 pm


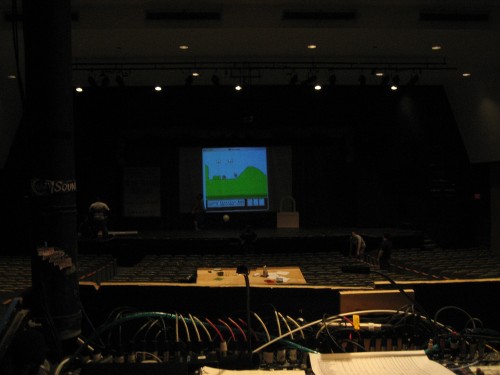
    I had a few minutes tonight as we were doing the pre-show, and we had our first round of NES gaming on our lovely projection screen. We didn’t have a chance to do much, as most people were actually engaged in important work, or were about to be, but it was nice to try it out. I played a little bit of Mike Tyson’s Punch-Out, showed how much I suck at Spy Hunter, and just a tiny bit of Bionic Commando to show the young’uns a cool game that they may not have heard of, before moving on to the greatest game ever made, Super Mario Bros. 3.

    Here’s a short video clip of Angela trying out SMB3. And yes, the sound is being run over the house system.

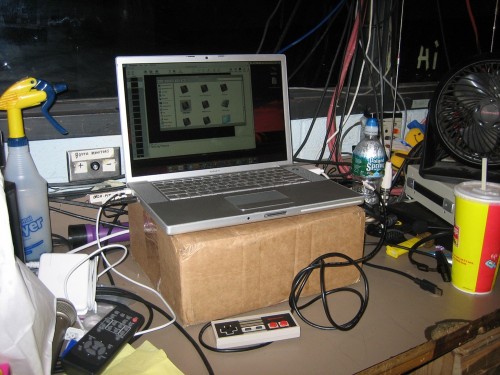
    Here’s the (messy) setup in the booth:

    The controller is something I picked up last year. It’s an actual NES controller that has been rewired for USB by RetroZone. The Emulator I use on the Mac is Nestopia, which is freeware, but does not support joysticks without a shareware add-on, which is $30. For only $20 you can get USB Overdrive, which is an all-purpose driver for tons of USB devices. You can assign buttons to do just about anything, and have different profiles for individual apps, so I could have my NES controller assigned as a really cool iTunes remote in that app without screwing ups its functions in Nestopia. Not that I would ever need it to do that, but now that I’ve come up with that example, I think it just may have to be.

    Getting the game on the projector is simple. Just drag the window off your main screen to the side that leads to the projector’s screen (see here for details on setting up the projector). It was necessary for me to resize the window a bit to get it all on the screen.


    Projections for Theatre Using Keynote

    I call this: computers,mac,summer stock,theatre — Posted by KP @ 8:03 pm

    Quite by accident, I have become something of an expert on the use of Apple’s Keynote presentation software for running projections for professional theatre. Since I’m currently in the midst of one of these shows right now, I thought it would be a good time to take a look at how it’s done.

    To start at the beginning, you must know about the show that gave me my first experience with Keynote. At the time (2003), I had recently switched to Mac, and owned a Power Mac desktop, and my former computer which was an 8-lb. Dell laptop. By this point I knew I could never go back to using Windows to get any real work done, and I accepted that if I ever got a tour, I would have to buy a Powerbook. This was at the end of the product life of the Titanium Powerbook, and I was hoping if such a thing ever happened, that Apple had a better 15″ model up their sleeve. In the late summer, the 15″ Aluminum Powerbook was released, and I breathed a sigh of relief. Even more so when only a few weeks later I got called to interview for PSM of a small tour. A few days after that, the producer called to offer me the job. I literally hung up the phone, grabbed my keys, and ran to the Apple Store.

    With my shiny new Powerbook, I began rehearsals. This show had a really large projection component, both still images and video, and they were not just decorative. The actors interacted with and referenced the images throughout the show, and any errors would make the show not make sense. The video designer was happy to see I had a Powerbook, because he intended to use the then-new Keynote app to run the show. The fact that I owned a Mac laptop simplified things greatly, and I was more than happy to offer its services, since it gave me the opportunity to tinker with my new toy, and a free copy of Keynote to boot. I learned a lot from our designer as he experimented with the slides and played with various features. I had to become pretty proficient with it, because he would not be traveling on the tour, and as the show was still going to be undergoing changes, I would have to be able to handle most situations that would come up. The only thing he would do was editing of the videos and images themselves, which would then be FedExed on a DVD to whatever theatre we were at, and it was up to me to create the slides around them and the transitions between each one to fit the needs of the show.

    Sometimes I would be asked ten minutes before a performance to add or remove a border around all the images, or to move or crop all the images in some way, or to swap or reorder them. I think at its peak the show had about 70 projection cues, and I’m not kidding when I say I was asked ten minutes before a show to make changes to all of them. I got very fast with Keynote, and much of the credit has to be given to the intuitive drag-and-drop interface and that magical way Mac apps have of answering all your wishes when you say, “I wonder if I can do this.” This was only version 1 of Keynote, and it has only gotten more stable and flexible through version 2 and now 3. One huge complaint I had on that tour was that the display on my computer while I was running the show did not give me any helpful information about my presentation that I couldn’t already see on the screen. Even the column of thumbnails on the side didn’t scroll as the slideshow progressed, so once you reached beyond the first ten or so, you didn’t even know what was coming next.

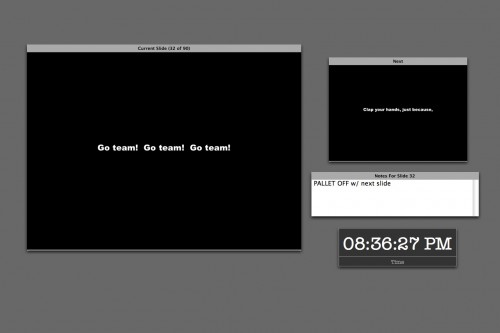
    Nowadays, when I’m running a show my screen looks like this:

    You can choose which elements to include on the screen, where to place them, and resize the current and next slide displays. I like this layout because it places the emphasis on what’s on stage so I don’t get confused, but also gives me a good idea of the cue I’m about to go into.

    This is from my file for Thoroughly Modern Millie, which I’m proud to say has since been used in productions in North Carolina and California, and I even got paid! The only projections in that show are supertitles, but there’s a ton of them (90, including the blank slides for when nothing is supposed to be seen), as they are used to translate for the two Chinese characters. It was one of the greater challenges of my career to be displaying Chinese translations in real time while also calling the rest of the show. You can see I’ve used the notes field in this slide as a substitute for my calling script. During the Chinese sections I literally couldn’t look down for the entire scene, because each slide only shows a few words and I had to make sure I was on the right one for what they were saying. I don’t speak Chinese, but I did learn all the dialogue in the show. Having that notes field conveniently placed made it possible for me to keep my head up watching the screen and the actors, while being able to get a quick reminder so I could call cues and give warnings and standbys without the script.

    The clock of course is handy for noting the running time of the show.

    On the tour I first used Keynote on, it was part of the deal that each theatre supplied the projector. We had to deal with whatever they had, and I was prepared to hook up to any kind of connector: DVI, VGA, BNC, RCA, or S-Video. The Powerbook has a DVI and S-video port, and all the others could be done with adapters that I carried. BNC could sometimes be problematic because the signal had to go through two adapters: S-video out to RCA and RCA to BNC. The digital formats (DVI and VGA) tended to be the best, but sometime depending on the projector and the theatre the analog actually worked better. This is why I got good at setting up and breaking down the whole shebang very quickly. I could walk into a theatre for the first time and be pointed to the projector with my laptop and a couple adapters and have video running in probably two minutes. Hours and hours and hours would sometimes be spent if there were problems with the projection angle, bulb brightness, height of the ceiling, etc. but getting the show coming out the lens was the easy part.

    One of the tough things about doing shows with devices like DVD players and VCRs is that if it’s not a Broadway show using professional equipment, consumer models have a tendency to display things you don’t want an audience to see, like big letters that say PAUSE coming up between cues. The solution to this is usually some sort of physical device that blocks the lens between cues, but this is often impractical, especially when the projector is hung in the air over the audience. The beauty of using the computer is that you can project a black screen between cues, even if you have to exit the presentation. How to do this is not always obvious. When I offer my services to a show, the question I always get is, “But how will you be able to run it without the audience seeing your desktop?” People really don’t believe it can be done. When you’ve done it a few hundred times, it’s ridiculously easy.

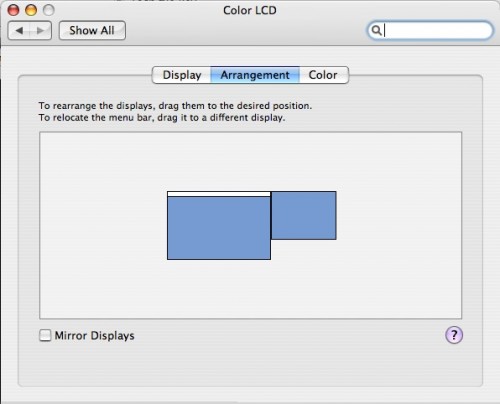
    Several steps: you want to turn off display mirroring. In System Prefs/Displays, under the Arrangement tab, you will see a checkbox called Mirror Displays. Uncheck it. I discovered when trying to help the folks at Reagle do this for one of their winter shows that iBooks have their graphics card’s mirroring capability disabled. There is apparently a hack (Google for screenspanningdoctor), but they didn’t try it because it’s not particularly safe. I’m not sure if this is still the case with Macbooks.

    When you have mirroring off, imagine the projector is a second monitor attached to one side of your screen. You’ll see something like this.

    You can drag the second screen around wherever you want, I always keep it to the upper right as shown. Wherever you put it, the contents of the projection screen will exist in that direction off your desktop. If I’m clumsy and slide my mouse off to the right, you will see it on the projector. There’s nothing wrong with having to back out of the presentation to fix something during a show, the only danger is accidentally flicking the mouse off your laptop into that area leading to the other screen.

    Also notice there’s a little white border at the top of the center screen. This represents your primary display, in the shape of the Mac menu bar. Whichever screen you drag that white bar to is the one which holds your menu bar, dock, and by default your desktop icons. You do not want this on your projector. If somehow it winds up there, just drag the white bar back to the other display.

    Now you have two screens: your regular one on the computer, and the other, rather empty one on the projector. By default, your desktop wallpaper will probably end up on the projector as well. This is probably not what you want. I have an image in my wallpaper folder that is all black. It’s called BLACK so it’s easy to find. When you go to System Prefs and select Desktop and Screen Saver, you will get a window on both your computer and the projector’s screen. The cool thing is that using the window on the projector, you can sets its wallpaper independently of your normal desktop. So I have the projector set to BLACK, but I can keep my favorite desktop wallpaper on my computer. You should only have to do this once, after that the computer will remember to assign the black desktop to the projector. Unless you make the mistake I made this afternoon, when I plugged the cable in to my computer before turning on the projector. Apparently this confuses the computer, for it set my desktop resolution to 800×600 or something, forgot the wallpaper, and had mirroring turned on. I will remember not to do that again.

    Another word of advice: whenever possible, focus the projector on a nice projection surface before you try to do anything with your desktop settings. It never seems to work this way for me, I always wind up trying to manipulate the windows while the projector is throwing an out-of-focus, backwards, horribly-keystoned, and way-too-far-away-to-read image across the ceiling, proscenium and several layers of set pieces. It can take several minutes just to find the mouse pointer. You have to know the desktop prefs window pretty well to be able to set it under those conditions.

    When doing a show I do like to keep the desktop settings icon on the menu bar for quick access, especially for shows with analog connections, because the display will not be detected automatically, so you have to select “Detect Displays” every day when you plug the projector in. The screen will flash for a second, and then you will be good to go. You can also adjust the resolution of both screens from that drop-down menu. Unless you have a really fancy projector, its maximum resolution will probably be lower than your computer’s. When you first set it up, the computer may lower res to match the projector (especially if mirroring is enabled by default), but this doesn’t have to be the case. Just go to the drop-down menu and select the normal resolution for your computer and whatever you want for the projector.

    A few basic things you should do to your computer when using it for a show:

    • Always have the power cord plugged in when running the show
    • Put the computer to sleep: never (Energy Saver prefs)
    • Put the display to sleep: never (Energy Saver prefs)
    • Turn off all system sounds (Sound prefs)
    • Turn off “play feedback when volume is changed.” If you ever want to hear the little blip, you can hold shift when hitting the volume keys.
    • Mute the startup chime just in case your computer crashes and needs to restart (I use Tinkertool System, but there are others)
    • Start screen saver: never (I forgot to do this when switching to the new computer, and came back on a break during tech to see the default “Flurry” all over the house curtain)
    • Turn off any background apps that have notifications that might pop up (anti-virus, backup reminders, etc.)

    Before starting the show:

    • Close all programs except Keynote
    • Shut down background apps that consume resources
    • If you’re outputting audio to the sound console, you’ll probably want to keep your Mac set at a consistent level and let the engineer control the volume. So to start the show make sure you’ve got your computer’s volume where it should be. For Singin’ in the Rain, I keep mine at half.
    • If you’re really concerned about speed and stability, a restart right before the show will probably give you the most reliable performance.

    Designing Slides
    Keynote has lots of options for deciding how your slides look and how they change. I won’t go into all of it, but I will hit some of the most common techniques I use.

    When designing for theatre, you will probably always want to choose a master slide with a black background. You can add colorful backgrounds by creating a shape the size of the slide.

    My friend the Yellow Box
    When you click on “Shapes” in Keynote, by default it gives you this textured yellow box. The yellow box makes a pretty good target on a black background, and I use this to move and resize around the screen until I’ve figured out what size the projected image needs to be. In this case, we have a drop that flies in with a movie screen in the middle of it, and the movie needs to hit only this part of the drop. So I fiddle with the yellow box, making adjustments until it’s the right size. Then I take the actual content for that slide, the pictures or videos, and drag them so that it’s the size of the yellow box. There are very easy arrangement buttons to help with this if necessary — forward, back, group and ungroup. If you’ve got an image that you don’t want to distort, or a video that can’t be stretched to the correct size, you can then create some black boxes and layer them over the edges of the images to essentially crop them. This leaves you free to manipulate the original image below and drag it around until you like which part is cropped. It also makes it easy to later drop in a new image without losing the work you’ve done with the black borders to size it properly.

    So when it’s 7:55 and your director says, “Can all the images be six inches narrower on the left and right side?” you can just make two black rectangles, drag them around until they have the desired proportion on stage, and once you have the first slide looking good, group the black shapes together, select them, and copy. When you paste them into the next slide, they will retain their position in the slide. So all you have to do is select every slide and hit command-V in each one, and you can rest easy knowing they will all match. This is the secret to making changes when you don’t have the time to actually inspect each slide on stage. Get one looking right, and then create something that you can paste in every slide to use as a guide.

    Transitions can do some nifty things, but most of the shows I’ve done have not been the kind of situation to use anything fancy. A simple fade in and fade out are the most common. The Inspector in Keynote has a tab called Slide which has the effects for how that whole slide changes to the next (applying a transition affects how you go OUT of the selected slide). An important concept is that you can set transitions for the whole slide, or for elements within the slide. If you can’t get it to do what you want, this may be the problem. When you set the transitions, make sure you know if you’ve selected the actual slide or a part of it.

    Say you have a slide with a picture-within-a-picture. You can have the larger picture be displayed when the slide starts, but the inner one appears later. To do this you select the element you want to change and go to the Build tab. If the Build options are grayed out, you need to select the object you want to apply the effect to by clicking on it. There are too many options to go into, but you can set the action to occur either by a certain number of seconds’ delay, or with another button push. The timed ones are great if you want to fade the image with a light cue for instance, but if you want to cue it yourself you can control it with the button. You can build in and out of an image, and can set multiple builds per slide and the order in which they happen. I’ve only ever needed to scratch the surface of this feature, but it can do some pretty cool things.


    « Newer PostsOlder Posts »